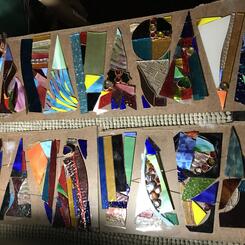
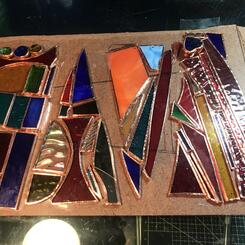
Work samples
-
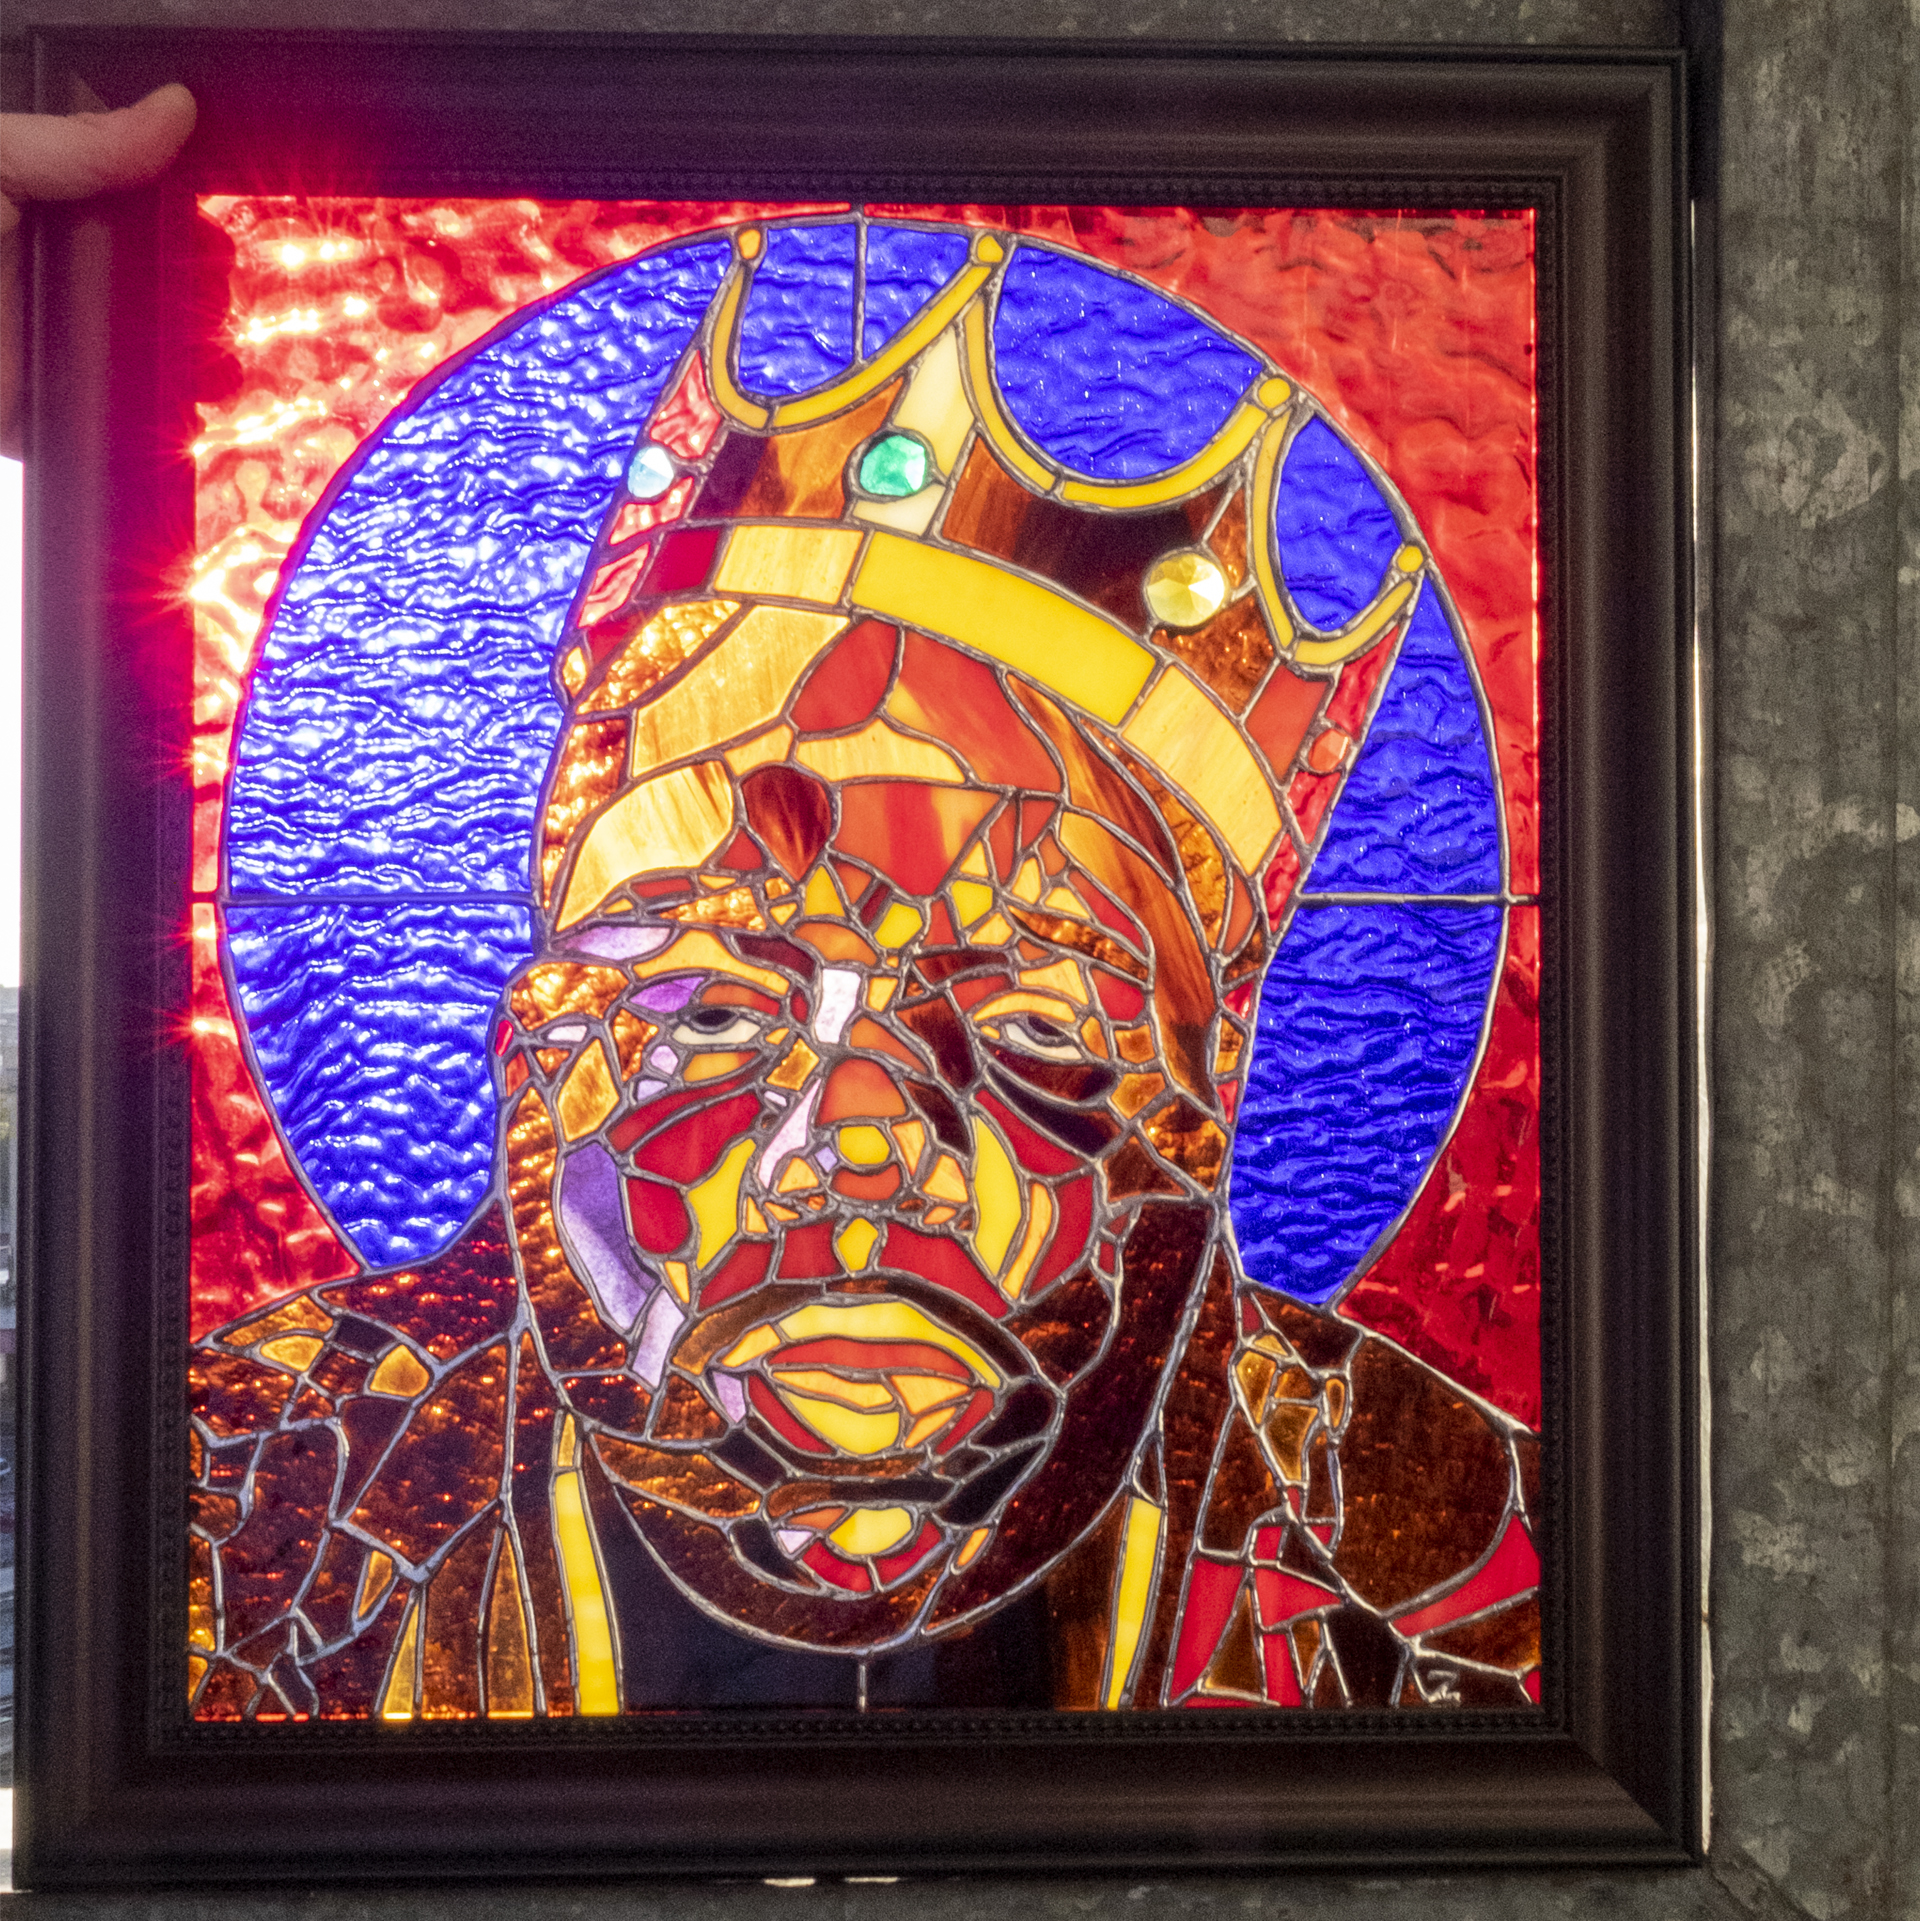
 Saint Christopher
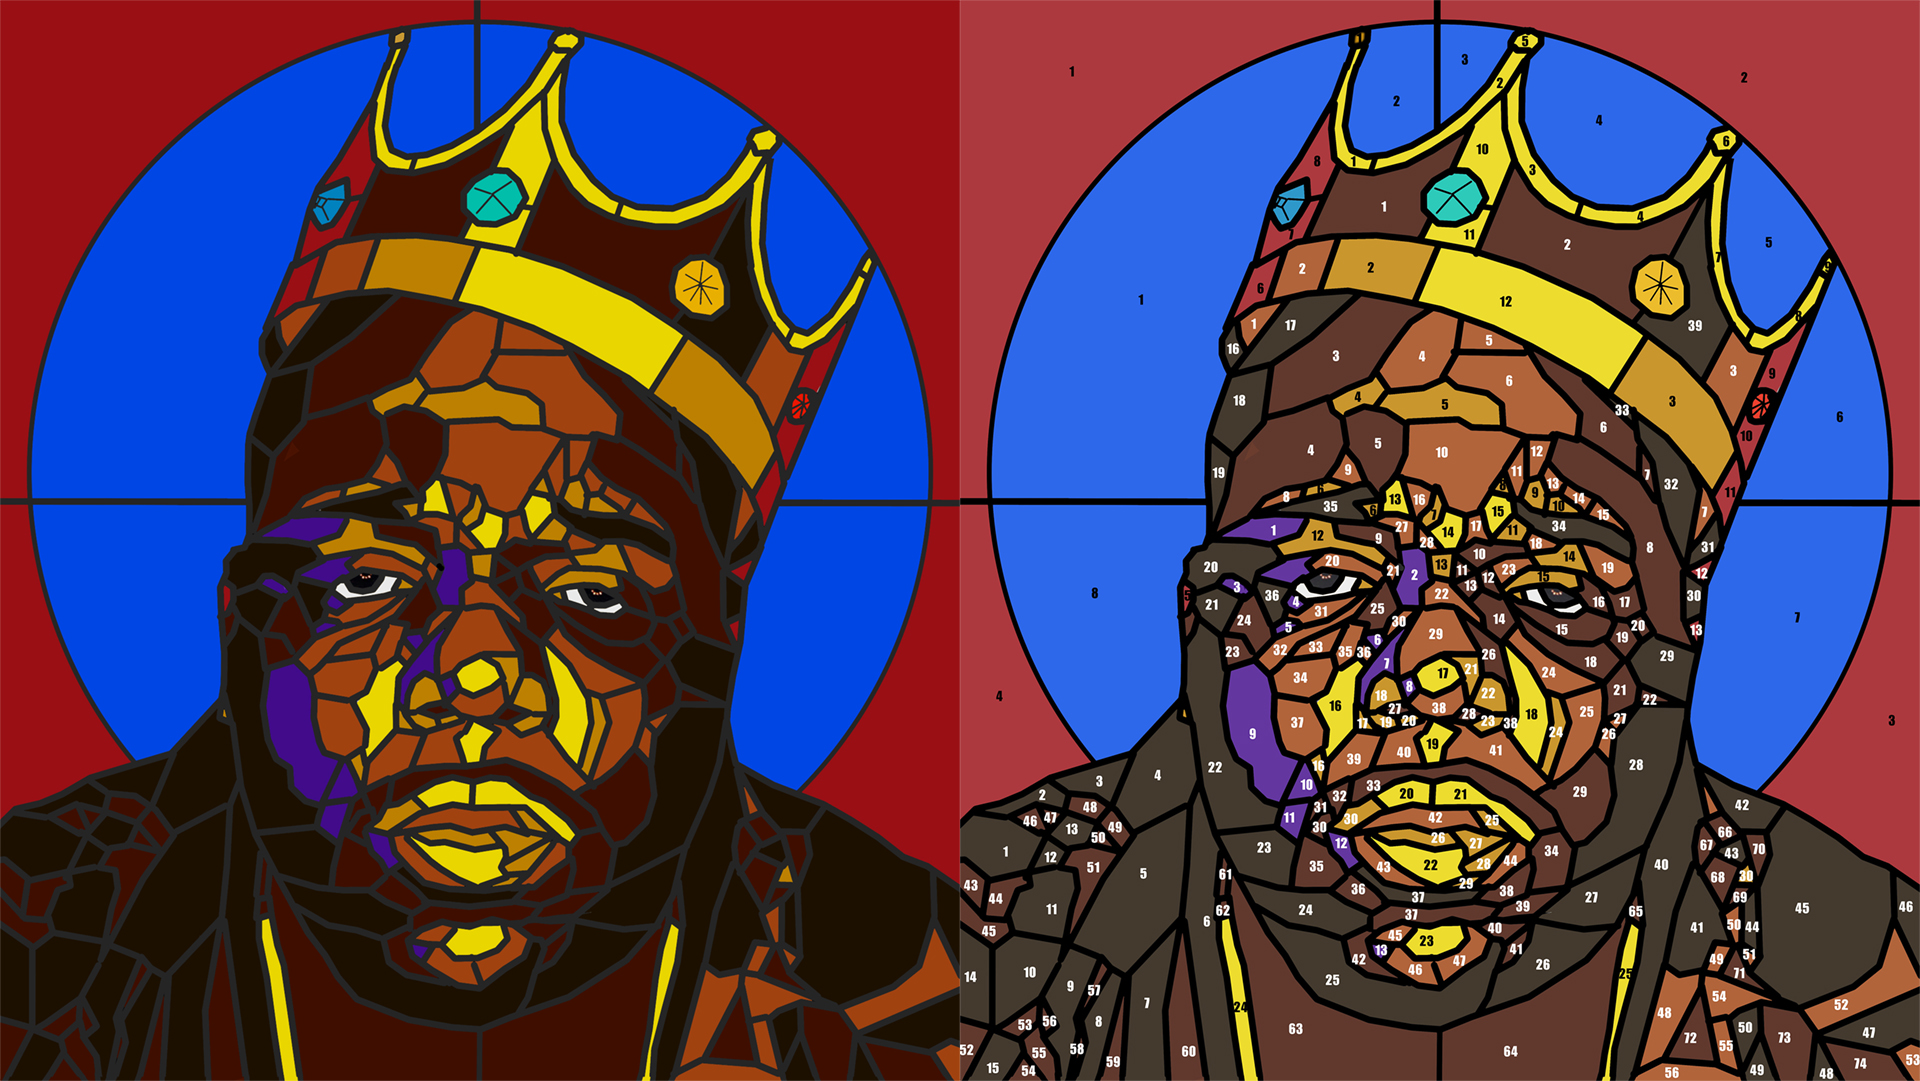
Stained glass interpretation of photographer Barron Claiborne's iconic portrait of Christopher Wallace (aka Biggie Smalls/Notorious B.I.G.). Each shape is hand-cut and diamond-bit ground, assembled using the copper foil method and 60/40 (lead/tin) solder. Special features include 3D glass jewels in the crown and cut glass nugget irises, and the piece contains almost 300 individual pieces of glass (some as small as 1/8" across). The image size is approx. 15x17", in Mahogany finish custom frame (overall dimensions approx. 18x21"). *Currently available for sale for $2200/local pickup, or $2500 with insured shipping anywhere in the continental U.S.
-
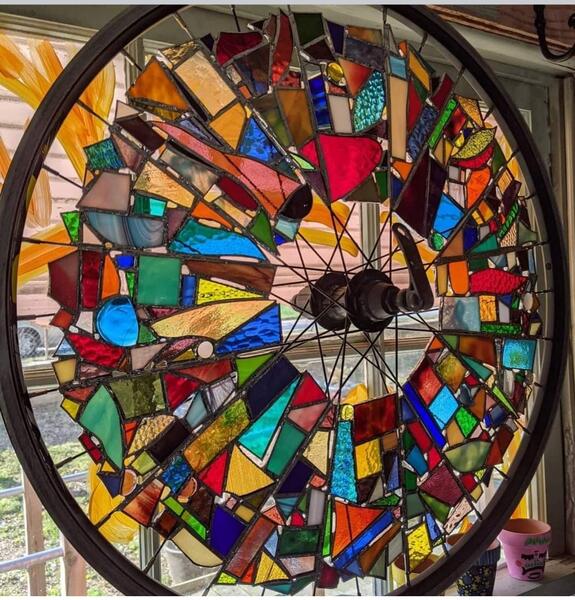
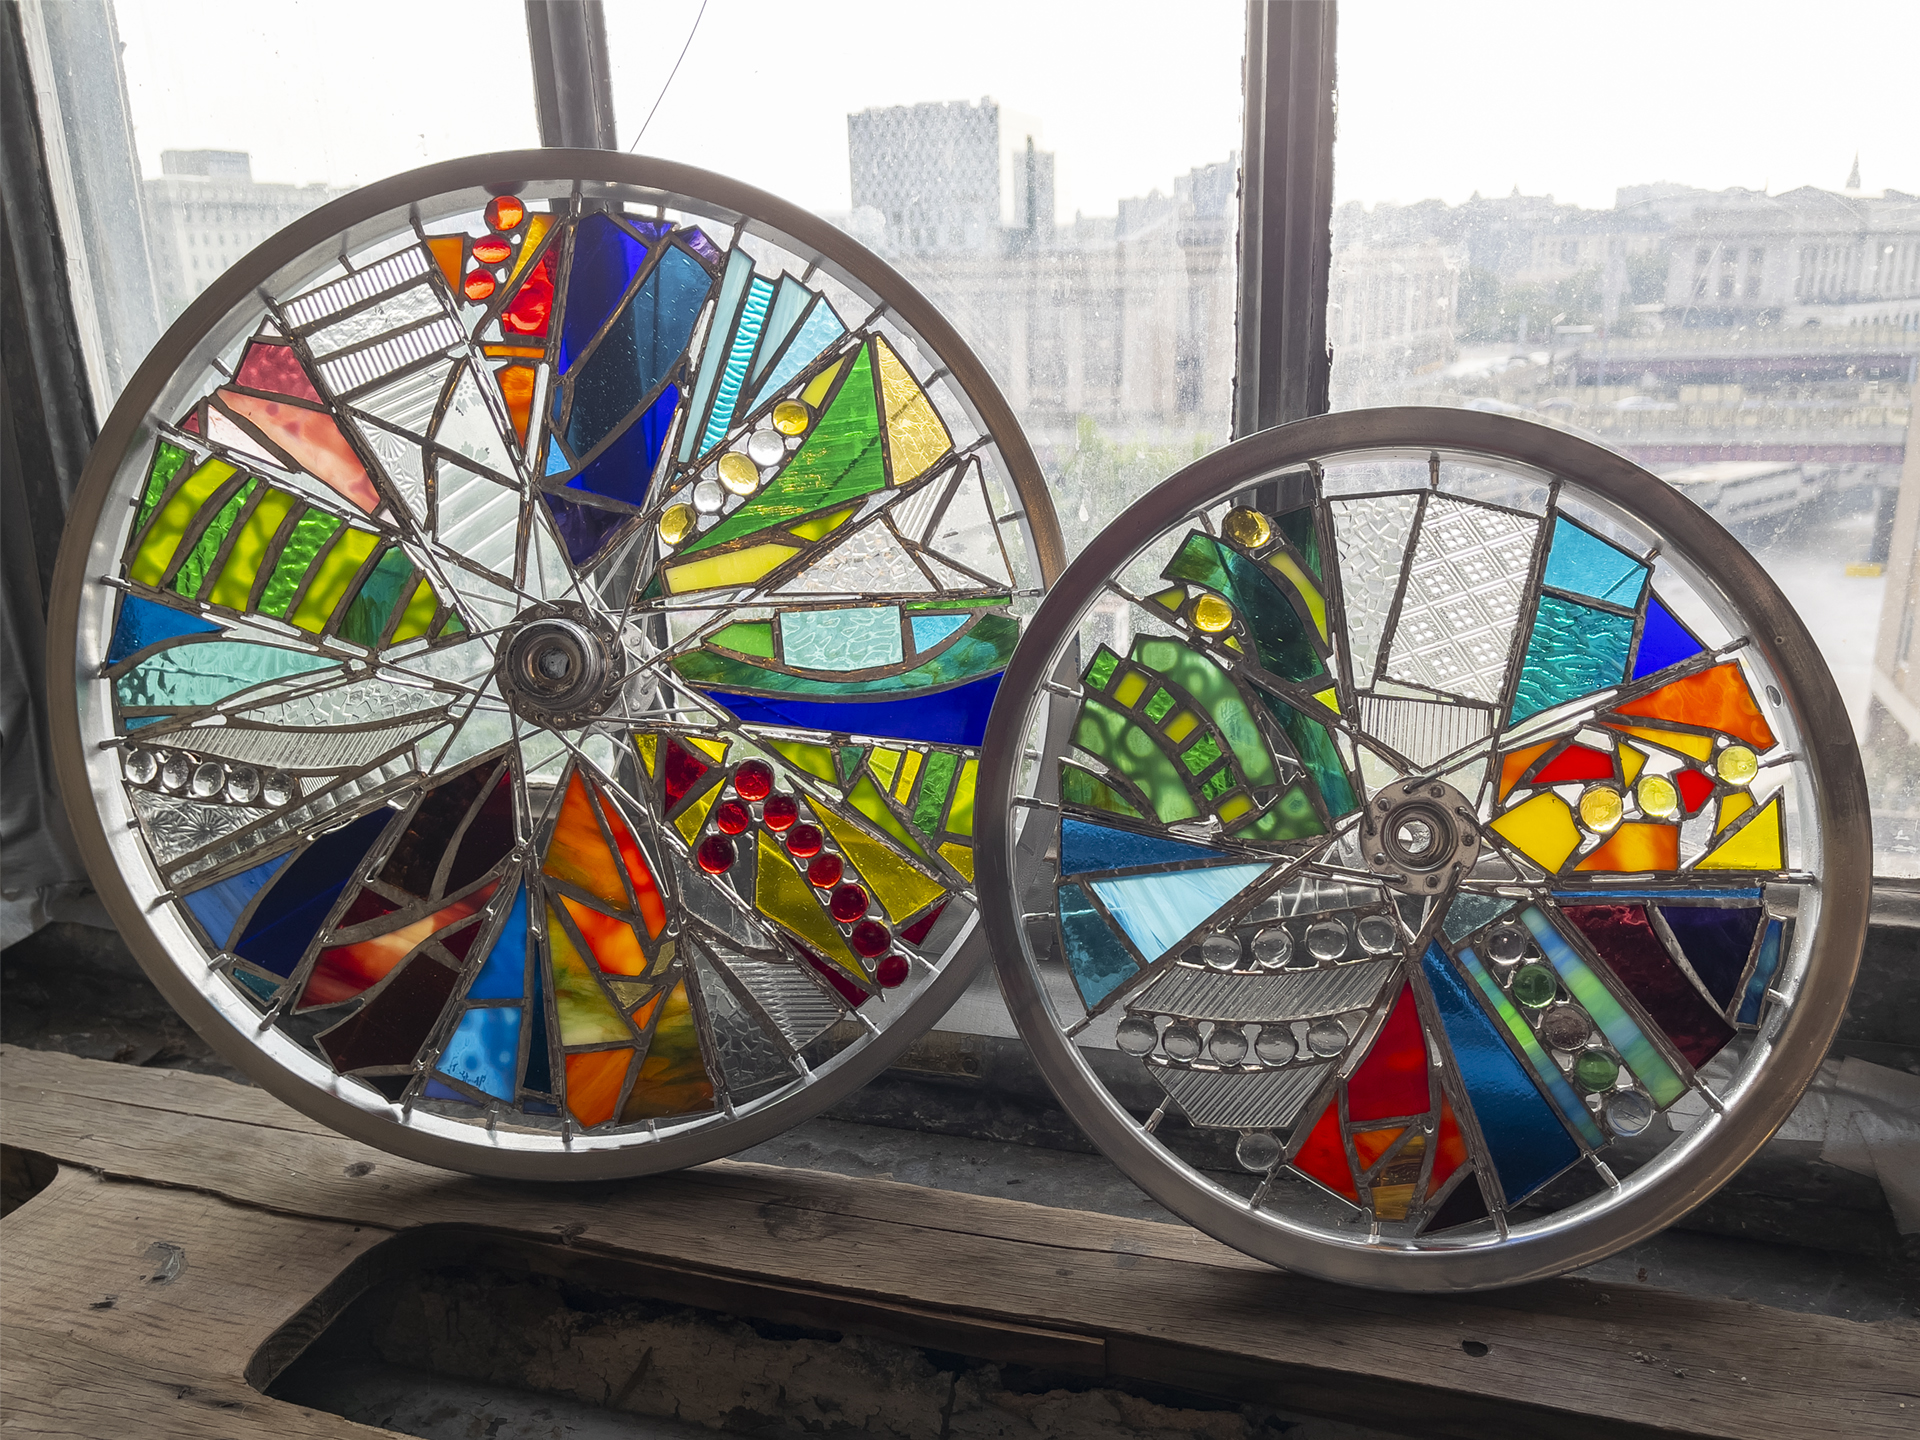
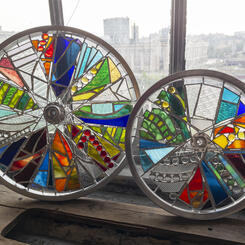
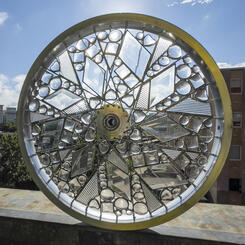
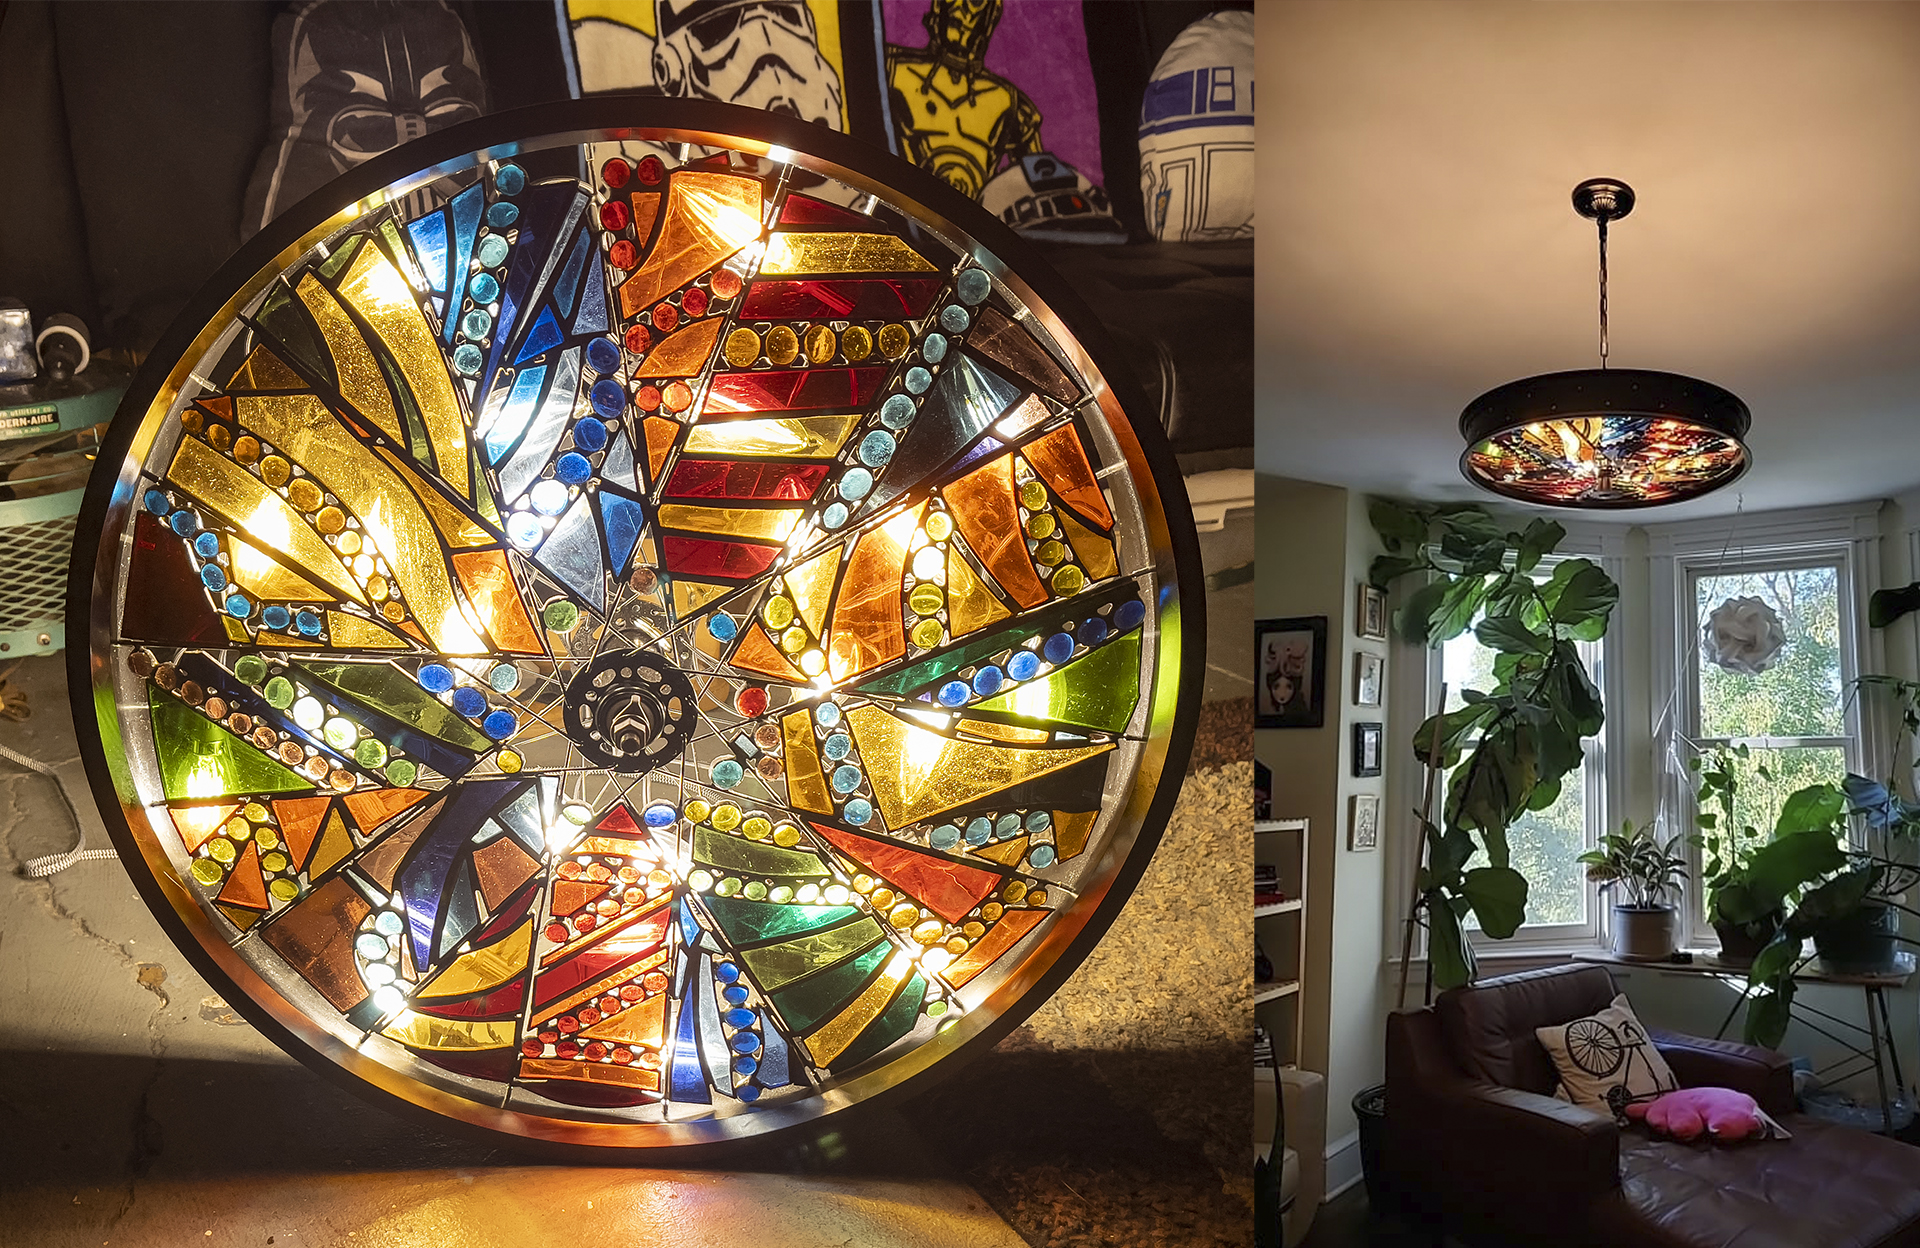
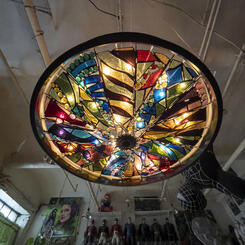
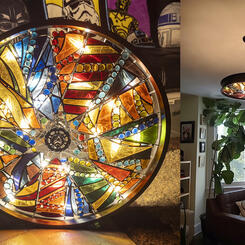
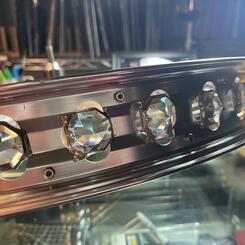
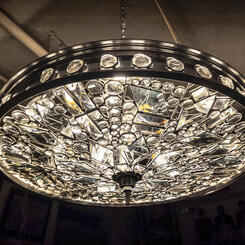
 The Blinginator (Bike Wheel Chandelier #3)
3rd and most recent in a series of custom chandeliers made using "fat bike" rims, this piece features a 26x4" chrome wheel, with 24 4w (40w equivalent) dimmable LED bulbs, lead crystals from a re-purposed antique chandelier, hand-cut and machined bevels, and glass cabuchons. *Chandelier prices start at $1500, pieces similar to this using crystals and bevels start at $1800, shipping prices calculated on an individual basis. All chandeliers must be hung from a hook rated for 50 lbs. or more in a solid structural beam, or installed by a professional contractor or licensed electrician if used on a dimmable fixture. Purchaser assumes all liability.
-
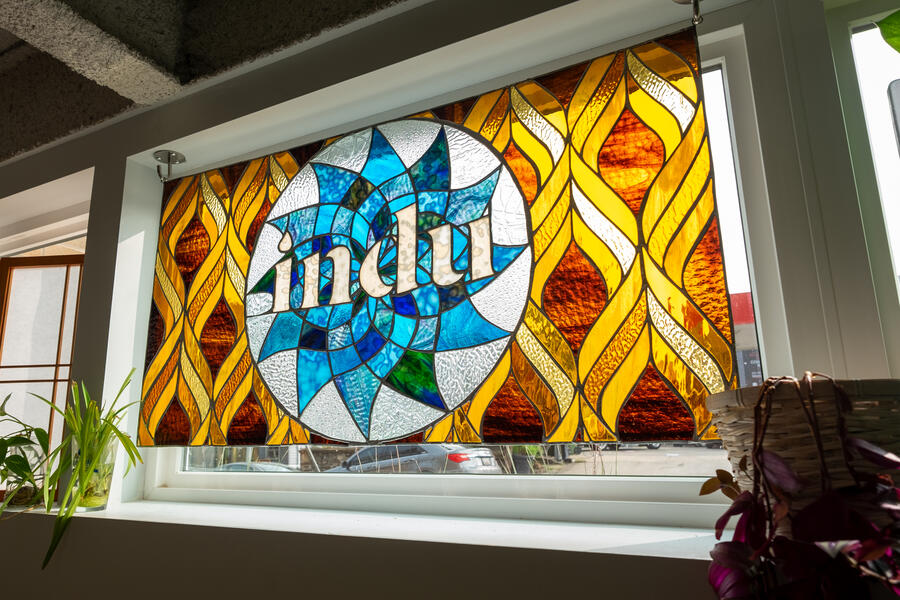
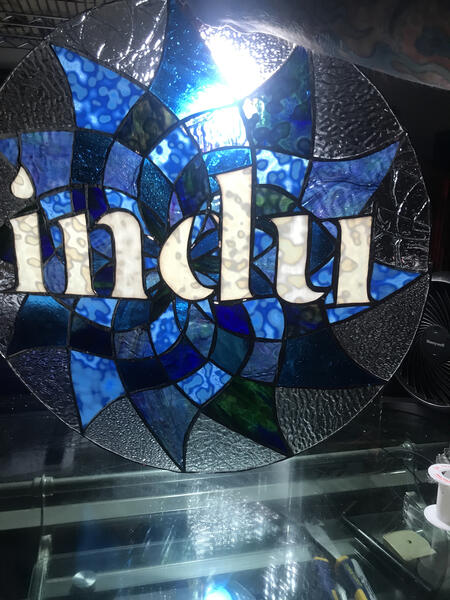
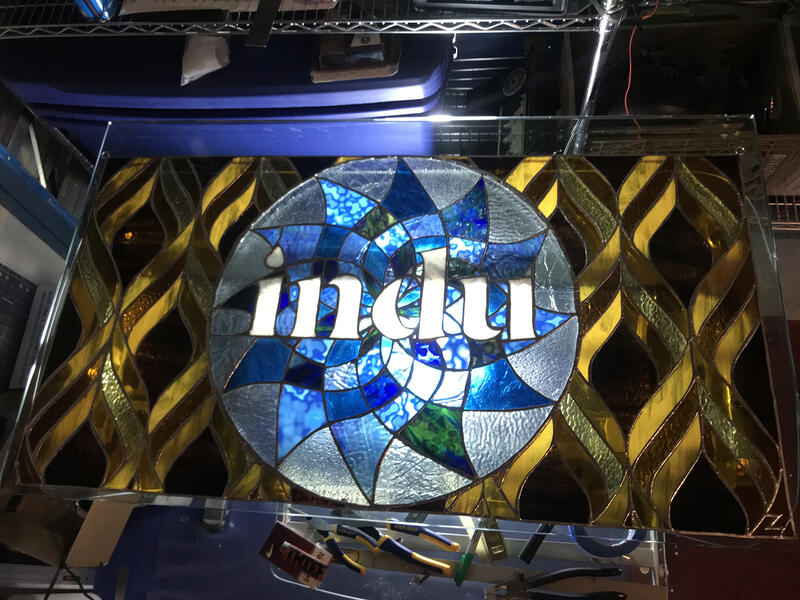
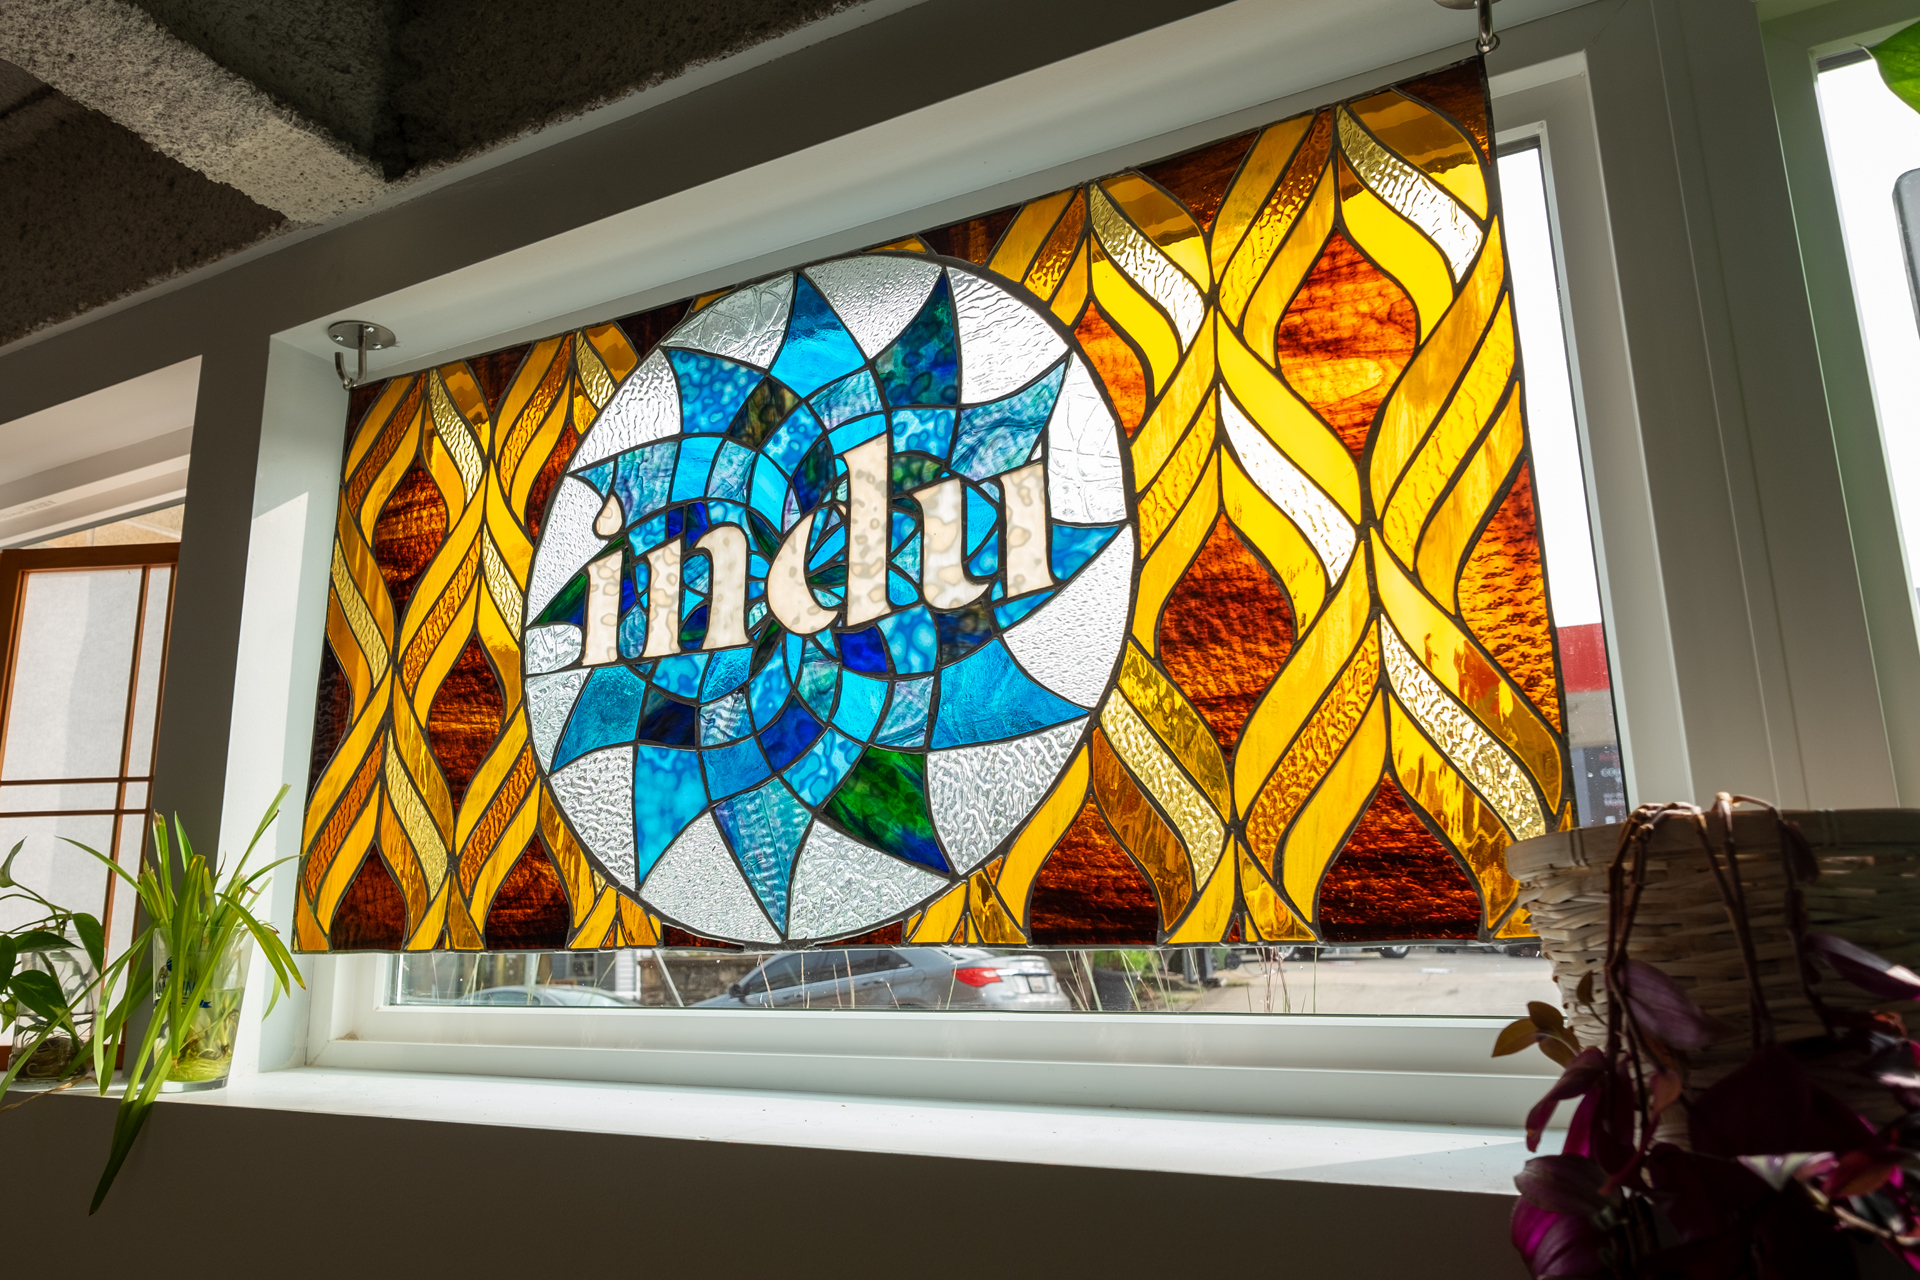
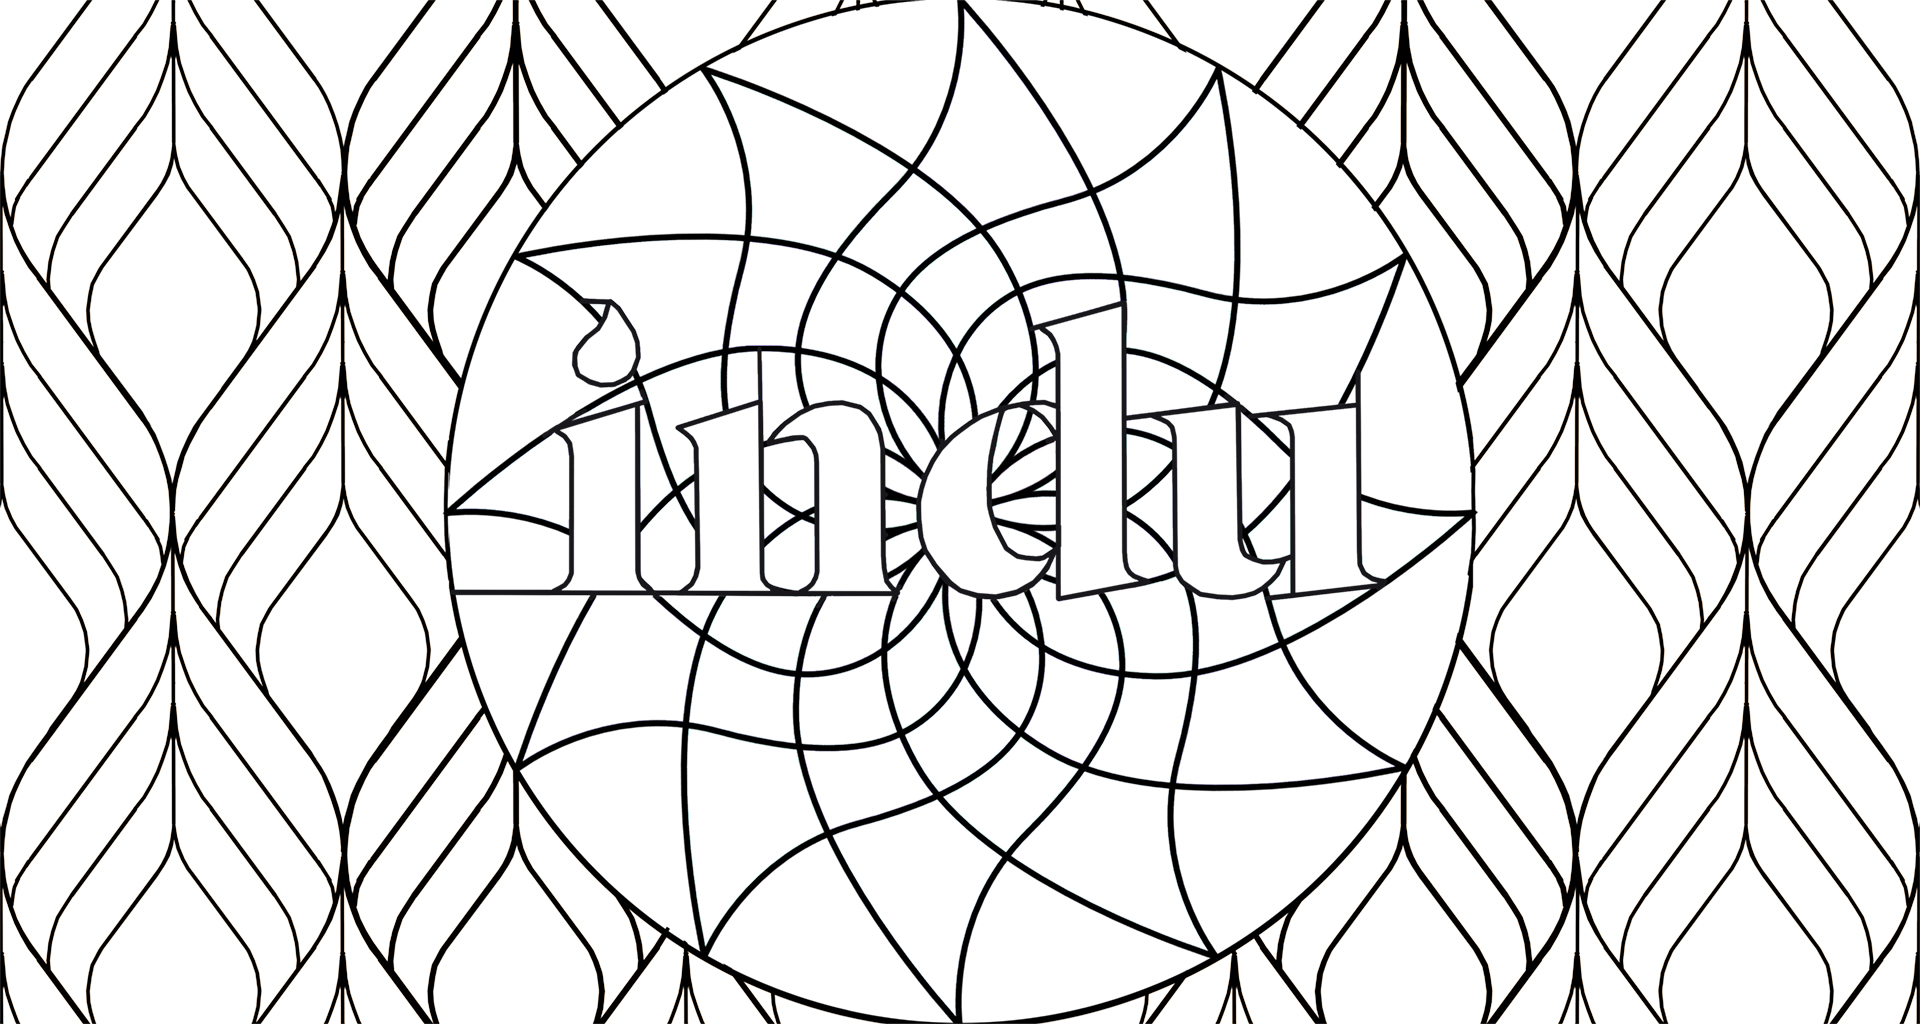
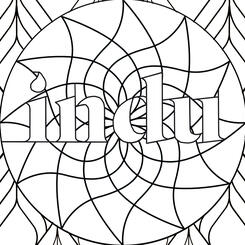
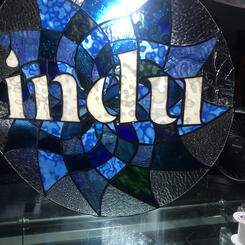
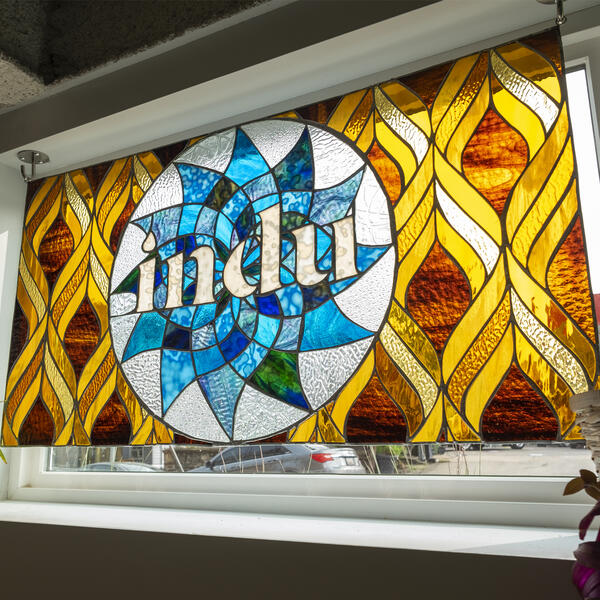 Indu WellnessHanging stained glass panel (24x45") commissioned by Indu Wellness and Massage in Baltimore MD. The client requested the incorporation of an existing logo and continuous background pattern, which I re-designed to work within the confines of the medium. The word indu means "sparkling drop", and references the Moon, which I represented by using moon-like white glass for the text and water-like blue shades for the surrounding droplets, to contrast the leaf pattern which incorporates colors traditionally associated with autumn. *Panels of similar size and complexity prices start at $1600 and must be installed by a professional contractor, shipping rates vary greatly depending on size and weight.
 -
 Syromkola Coat of ArmsOne of the most detailed stained glass pieces for its size that I have made since resuming the craft, this was created for a friend who recently learned that her ancestors had fought under the Syrokomla family's battle flag, and was a gift to her parents.


About Zachary
Zach has worked in a lot of mediums over the years. His parents are both artists that met at MICA in the late 60's, and made their livings as graphic designers until their retirements. Zach has studied drawing, painting, and design at MICA and Towson State, and then apprenticed with and worked for world-renowned glass artist Saul Farber, doing wholesale and retail stained glass production for most of the 90's. After his mentor's sudden death and the closing of Farberglass in 1998, he started… more
Bicycle Wheels
-
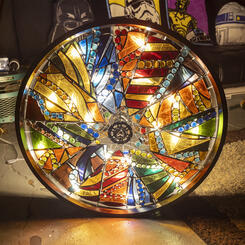
 Wheel #1Wanting to make the project as eco-friendly as possible, I decided to look for a used wheel, use only small pieces of scrap glass I was given by another artist, and older “expired” (oxidized) solder I had acquired for pennies on the dollar. The only new materials I used were flat/round and heart-shaped nuggets I had originally purchased for my fish tank and the copper foil, which needs to be pristine in order to accept the solder and create the strong bond between the metals (copper foil and tin/lead solder) needed for stability and safety.
 -
 Sample PhotoThe example photo I was originally sent (artist unknown) and based my own version of the design on.
 -
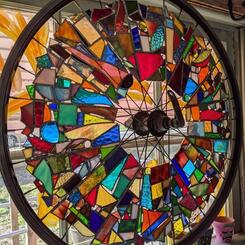
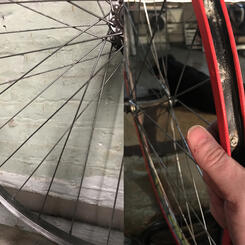
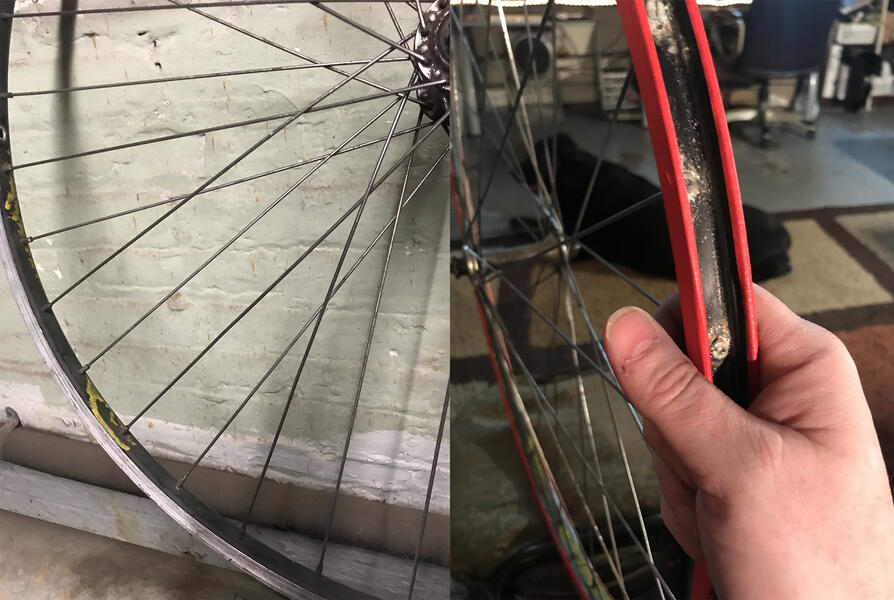 Base WheelAfter posting online about looking for an old large bicycle wheel and having no luck, I decided to go foraging on recycling day in Charles Village on my scooter, with the hopes of finding a trashed or abandoned bike with a usable wheel. After searching for an hour or so with no luck and about to give up and go home, I randomly encountered an artist friend I hadn’t seen in many years standing outside of his apartment in the alley I was cruising down. I actually passed him before I realized who he was, so I turned around to stop and say hello. After catching up for a few minutes I told him what I was doing, and he said “Hold on a sec”, went into his apartment, and came back out with 2 large bicycle wheels! I asked if he wanted something for them and he said “No, just pick one and I’ll use the other for something else”, so I returned home with my mission accomplished and got to work. The wheel was structurally sound, but dirty and with spilled paint on it, so first I cleaned the flat sides and hub with a wire wheel grinder and masked off the clean parts.
 -
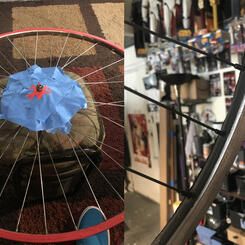
 Masking/PaintingI then used an enamel spray paint to black out the spokes and the tire groove, and then after removing the tape I had a much cleaner “frame” to begin with.
 -
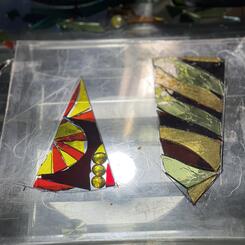
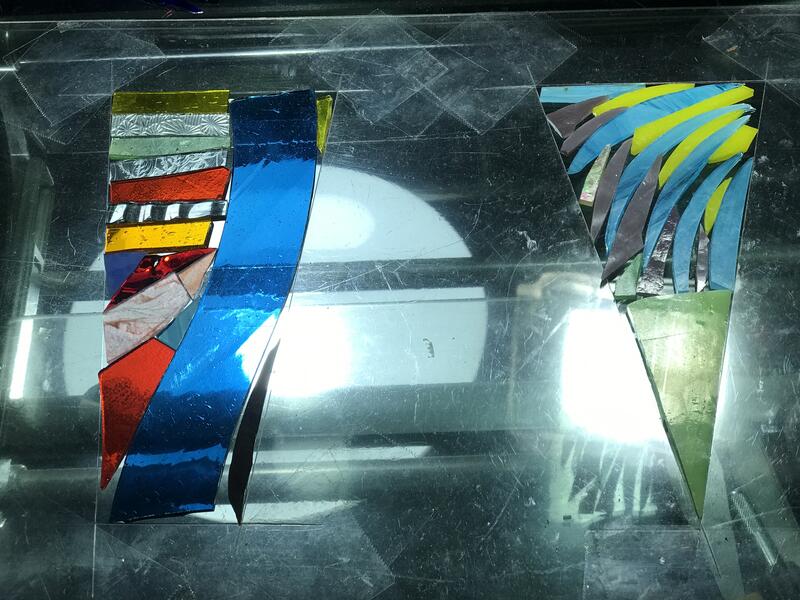 The ProcessTo design the panels, the first step was to create a jig by tracing the inside of the spokes onto a piece of plastic, and then cut out the 2 shapes the panels would need to be. Then I grabbed a box of scraps and made piles of different colors to play with, and arranged them in random patterns and designs. I also wanted to do minimal cutting, so most of the pieces I used were already in their existing shapes, I just had to figure out how they would fit together, starting with the larger pieces and filling in the gaps with smaller and smaller ones. It took a while to get a feel for it, because I was never a big fan of abstract art, until something clicked and then the process became almost completely automatic. The only thought I really put into the design was that I wanted the panels to each have their own individuality, so that while still very random, the overall look would feel much more intentional than the original wheel in the sample photo.
 -
 Panel ArrangementAfter settling on the individual designs of the 18 panels needed, I arranged them in an order that I felt would best provide a sense of motion and direct the around the piece rapidly to have a kaleidoscopic effect.
 -
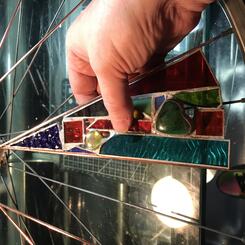
 Foil DetailEach piece's edge was then wrapped in adhesive-backed copper foil, and ready to assemble.
 -
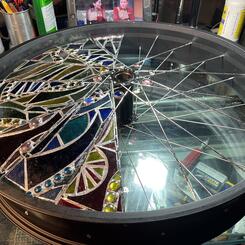
 Panel InsertionAfter assembling the single panels, I wrapped the spokes in copper foil, and started inserting the panels, with the first photo of this series being the end result.
 -
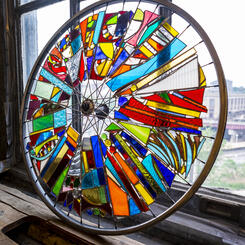
 Next OrderAfter shipping the first wheel and posting a photo of it, I was soon contacted by a woman who is the head of an arts organization in Catonsville MD, who commissioned 2 smaller wheels as gifts. One of them was for her brother, who happens to run a non-profit program that teaches teens and young adults how to build, repair, and maintain bicycles, so I instantly had a new source of unwanted extra wheels to use for my projects. I also contacted a similar organization called BYKE, located in Station North near my home/studio, and they also had a few smaller wheels to get rid of, so I am very stocked up now!
 -
 Baby BlingThis is my most recently commissioned sun catcher wheel, an odd unwanted 16'' children's bike wheel from BYKE, which I first completely spray painted with chrome enamel. I had been wanting to do a prismatic one and already had a box of diamond shaped bevels sitting around, a few bags of cabochons handy, and I used scrap architectural glass (the lined pieces) to fill in the extra spaces. Bling bling!


Shagadelic Chandeliers
-
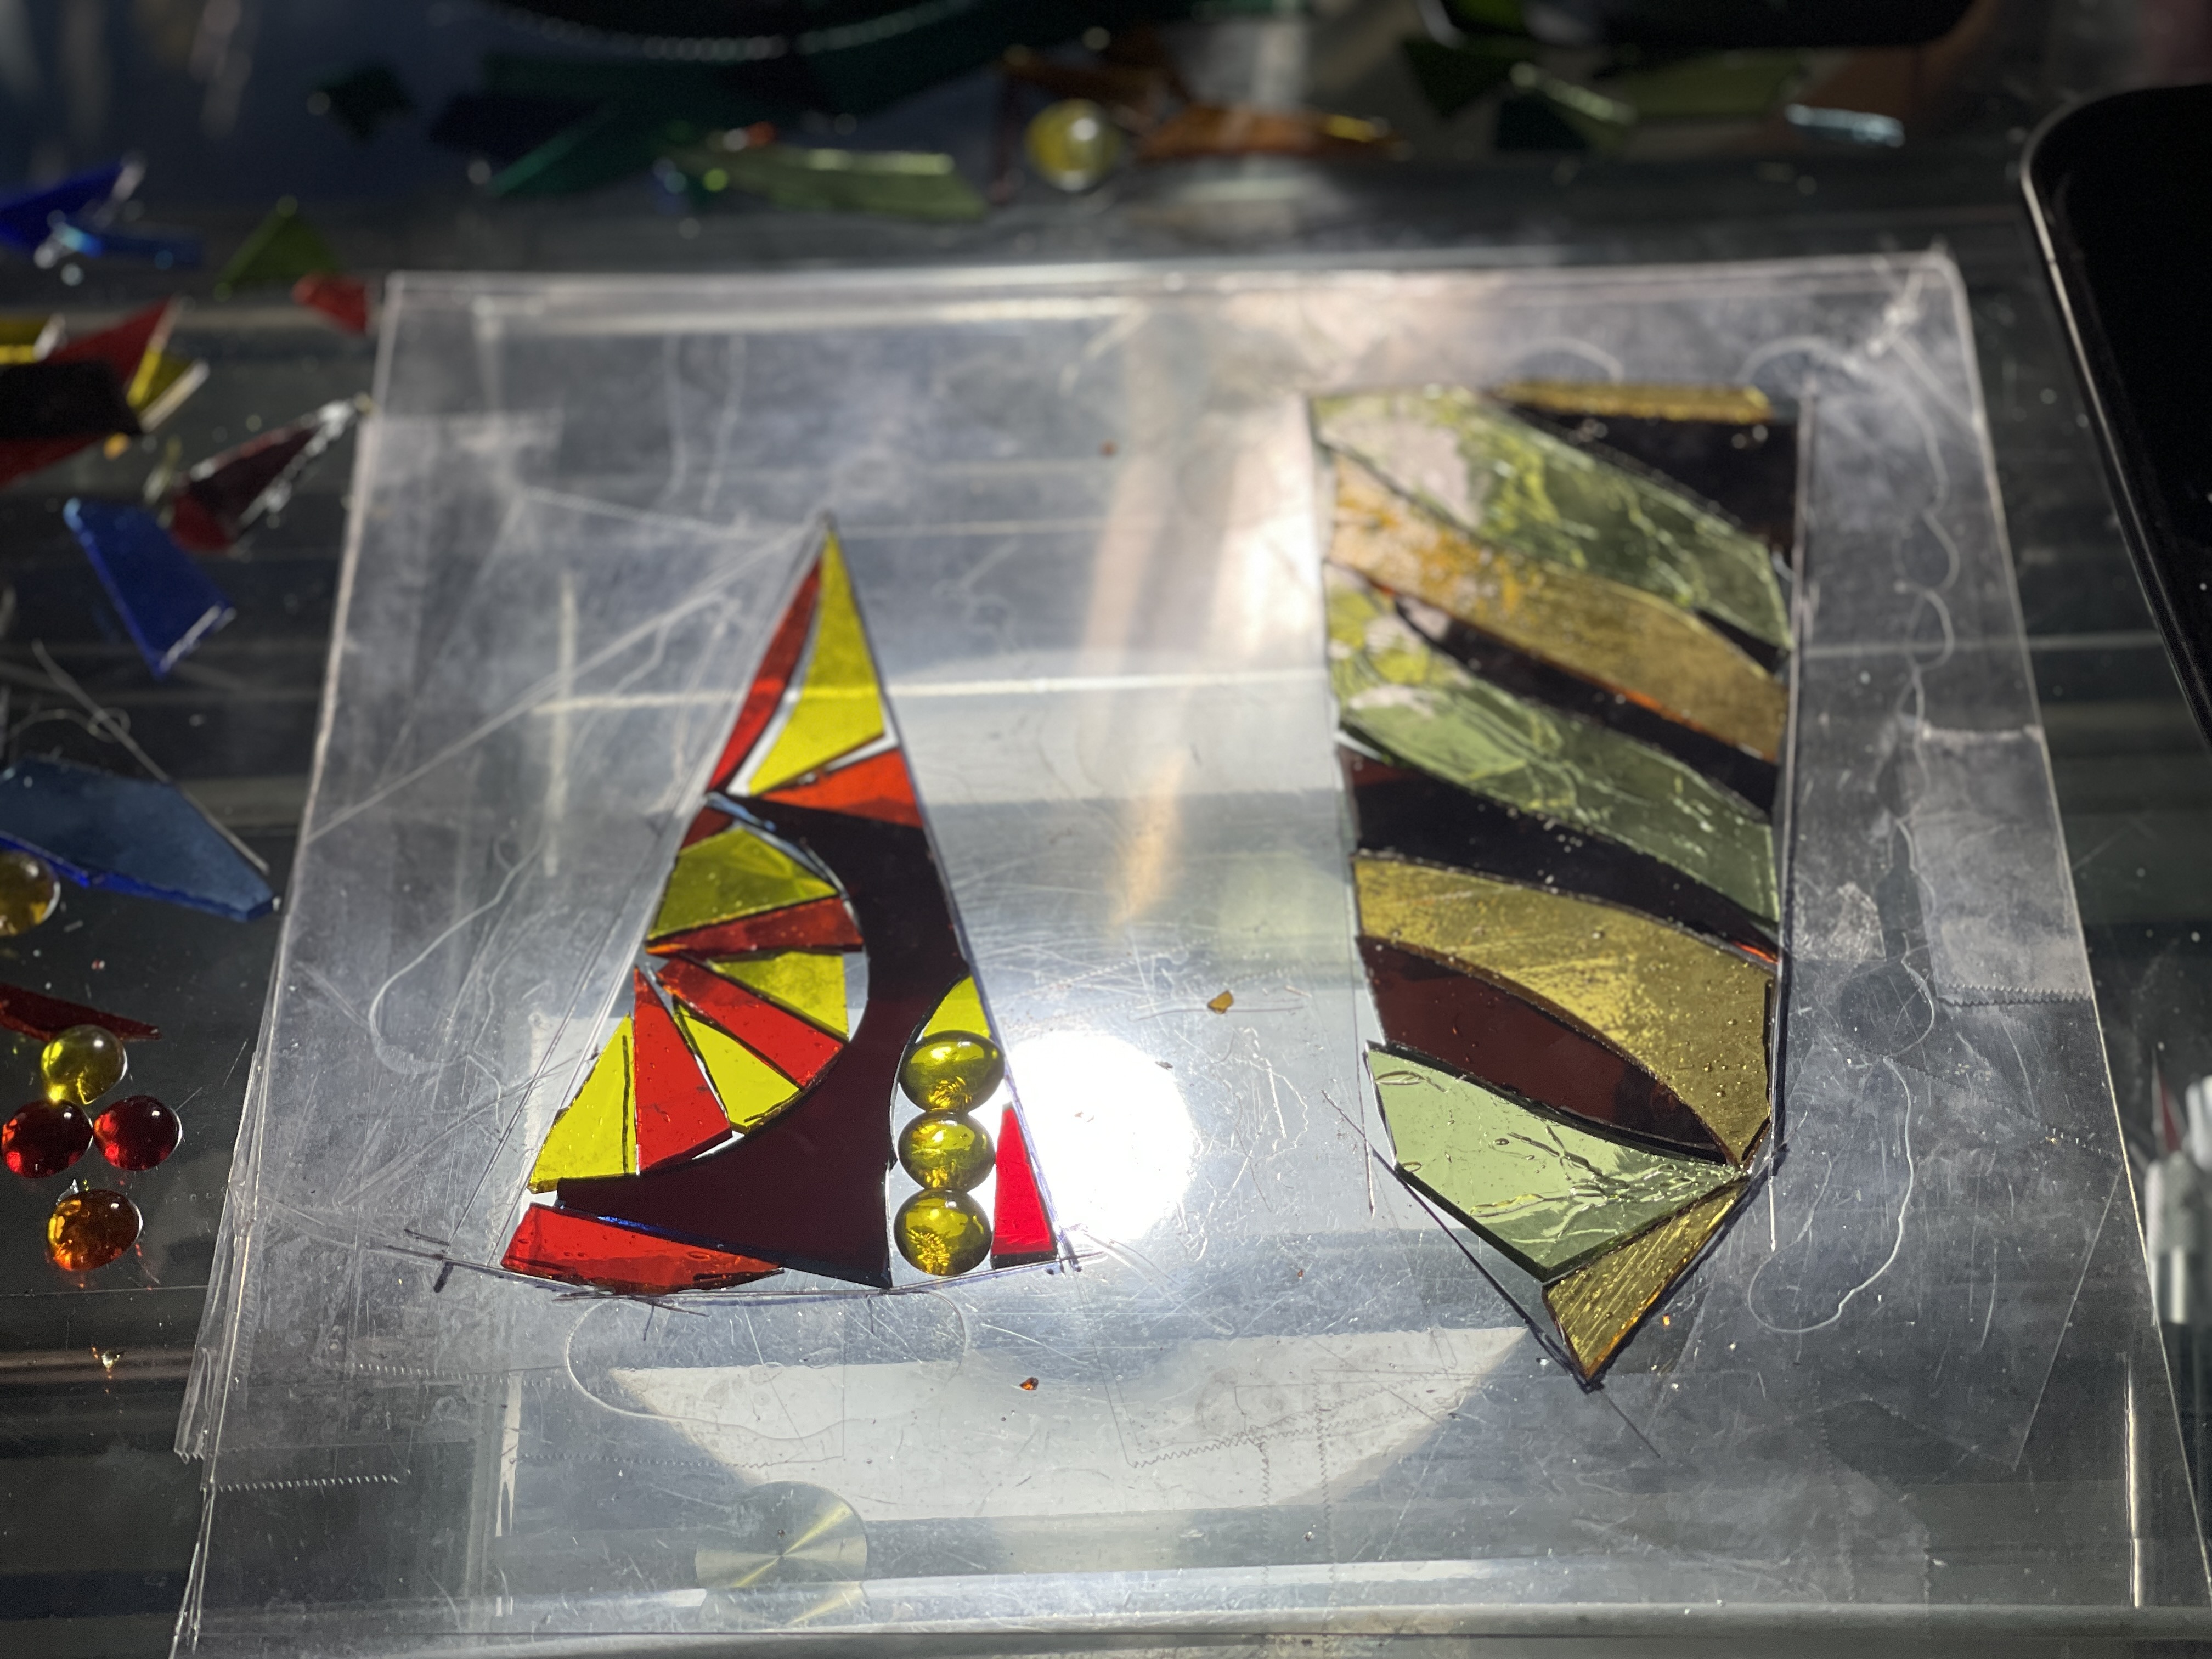
 Shagadelic Chandelier #1The first of a new series, the Shagadelic Chandelier was made using scrap glass and flat glass nuggets, firmly soldered into place between the spokes of a re-purposed "Fat Bike" (beach-cruiser) style wheel. The depth/width of the wheel allows the lights to all be sunk into the lamp, as opposed to sitting on top of it when viewed from its edge, giving it a neat and modern overall appearance. When selecting the glass, I chose a color palette reminiscent of 1970's design themes, with intentionally clashing warmer and cooler tones arranged so that not only is each panel inset into the spokes a unique piece of abstract art, but with all of the panel colors and shapes carefully balanced and arranged to work together cohesively as a whole.
 -
 Panel DesignUsing a completely different design process than traditional stained glass, I first made a template of the two shapes corresponding to the empty spaces between the spokes on one side of the wheel by tracing the spoke and rim edges onto 1/16" thick plastic, and then cut the plastic along those lines to make a "jig". Knowing the exact boundaries of the future individual panels, I was then free to play with random shape and color combinations until they felt right, and then the loose pieces were carefully removed and kept in the same arrangement with painter's tape to remain organized during the foiling process.
 -
 AsemblyAfter all of the individual panel shapes are foiled and soldered together, the panels are then soldered into place between the spokes, which have also been wrapped in copper foil for the solder to adhere to. The reverse side is also soldered, so that the panels are firmly in place, with solder completely engulfing the spokes for maximum durability and stability.
 -
 Shagadelic Chandelier #2The second version of the lamp is shown here in a free-standing position, and while the width of the wheel is enough to provide sufficient stability, due to the nature of a wheel's tendency to roll, it is best placed in a corner or other less-trafficked area with some additional form of support. The chain and included cord are easily removed, and the lamp can be plugged directly into a common household extension cord from behind the hub on the reverse side.
 -
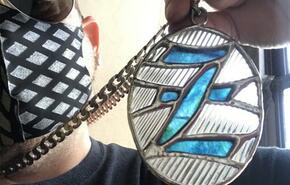
 Shagadelic Chandelier #2 (Installed)The second lamp was designed similarly to the first one, but with more thought put into the consistency of certain shapes and themes, and even includes a large cropped "Z" in one of the panels as a way of signing the piece. While the first lamp was an experiment I intended to keep for myself, I ended up having a friend express interest and arrange to come see it in person, and then shortly after had a friend of a friend also express interest. Since I had already offered my friend first dibs, I offered to make a similar one for the second party, but they were very insistent on obtaining the first one, so I offered my friend the option of letting me design one specifically for her if she wouldn't mind letting me sell the first one to the other interested party, which she gladly accepted. The photo on the right shows where it now hangs in her house after being installed by a licensed electrician.
 -
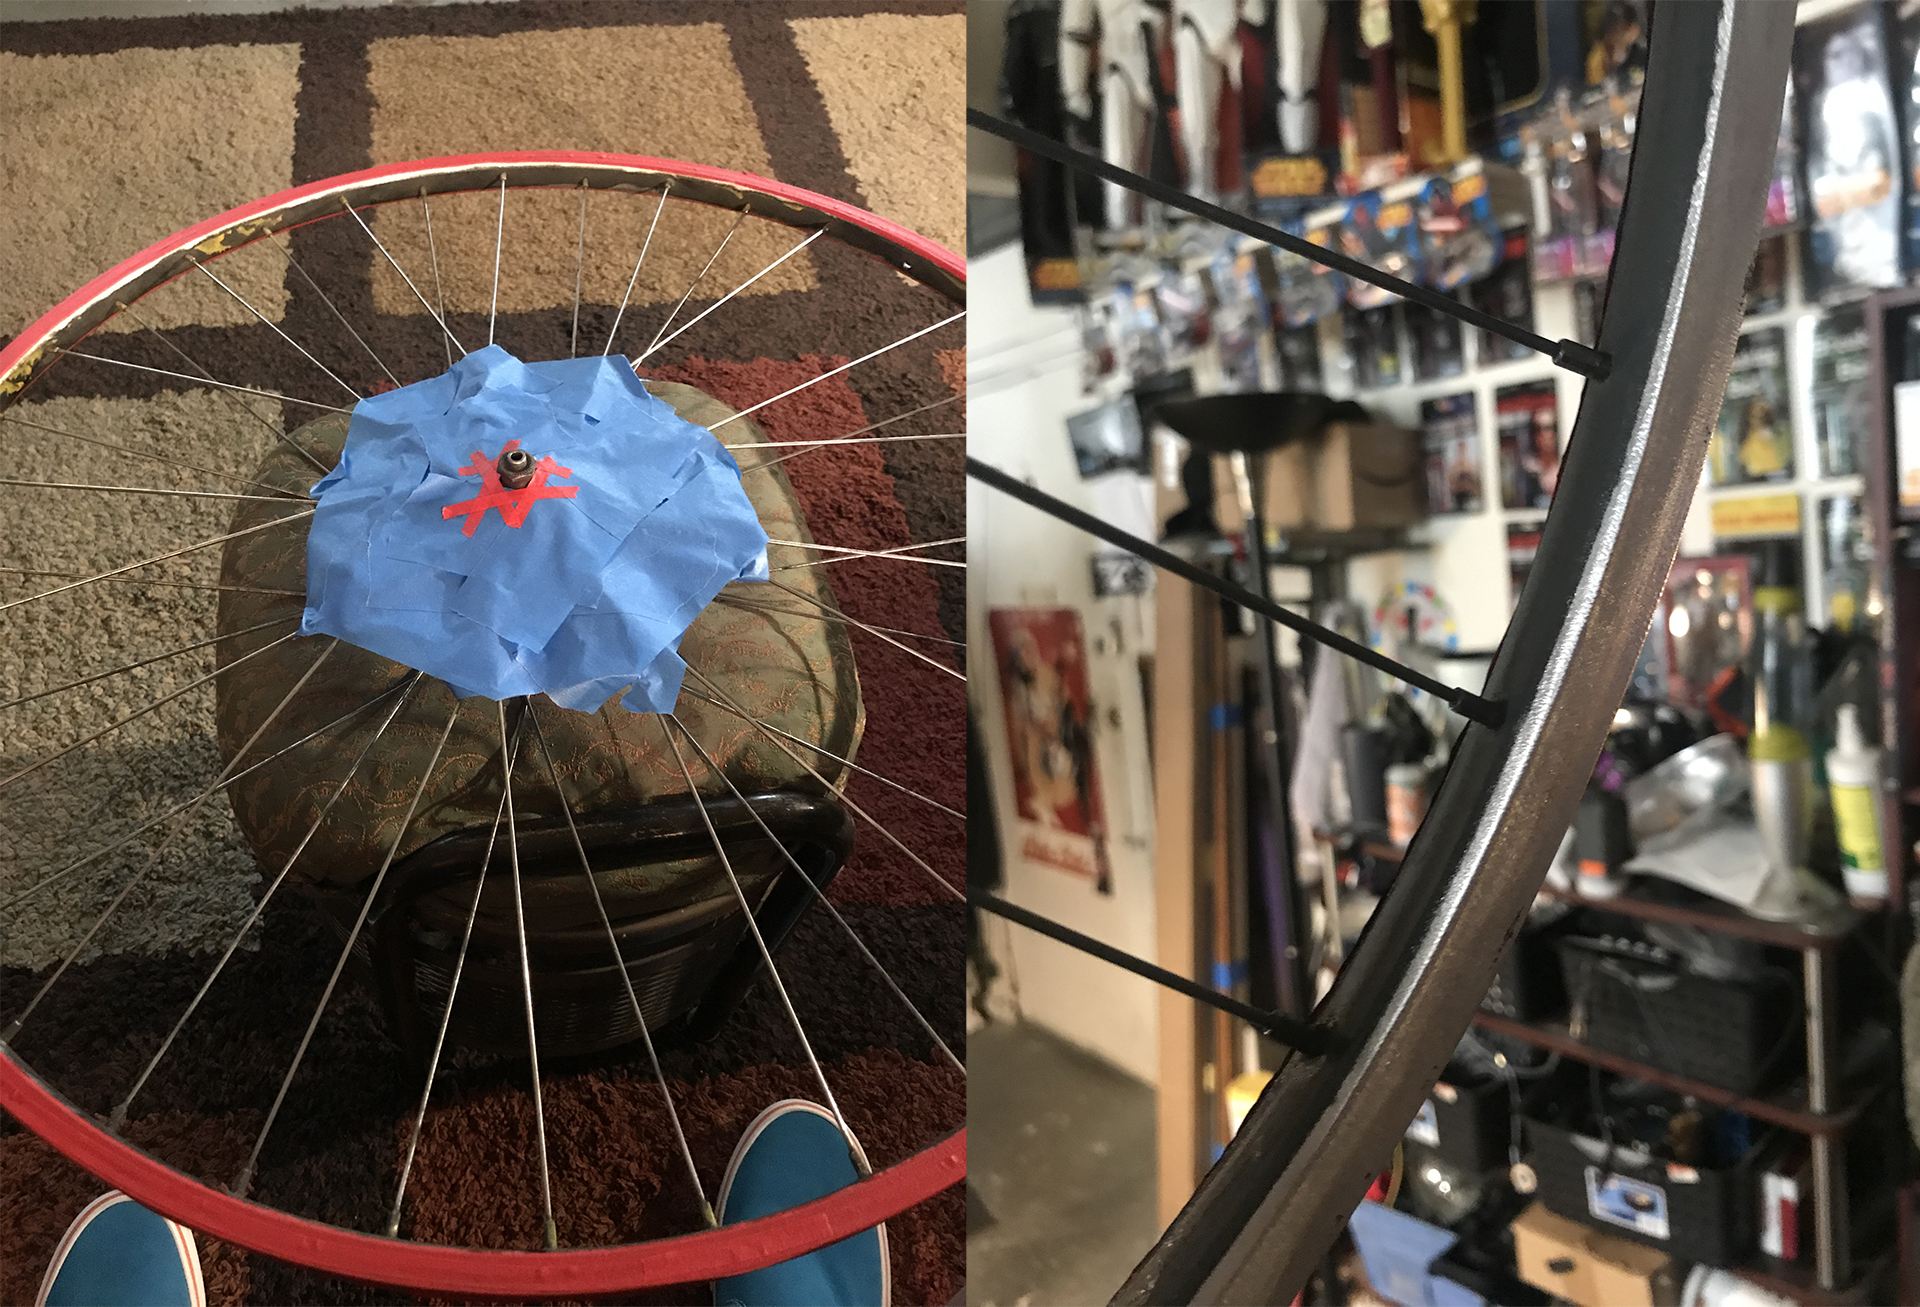
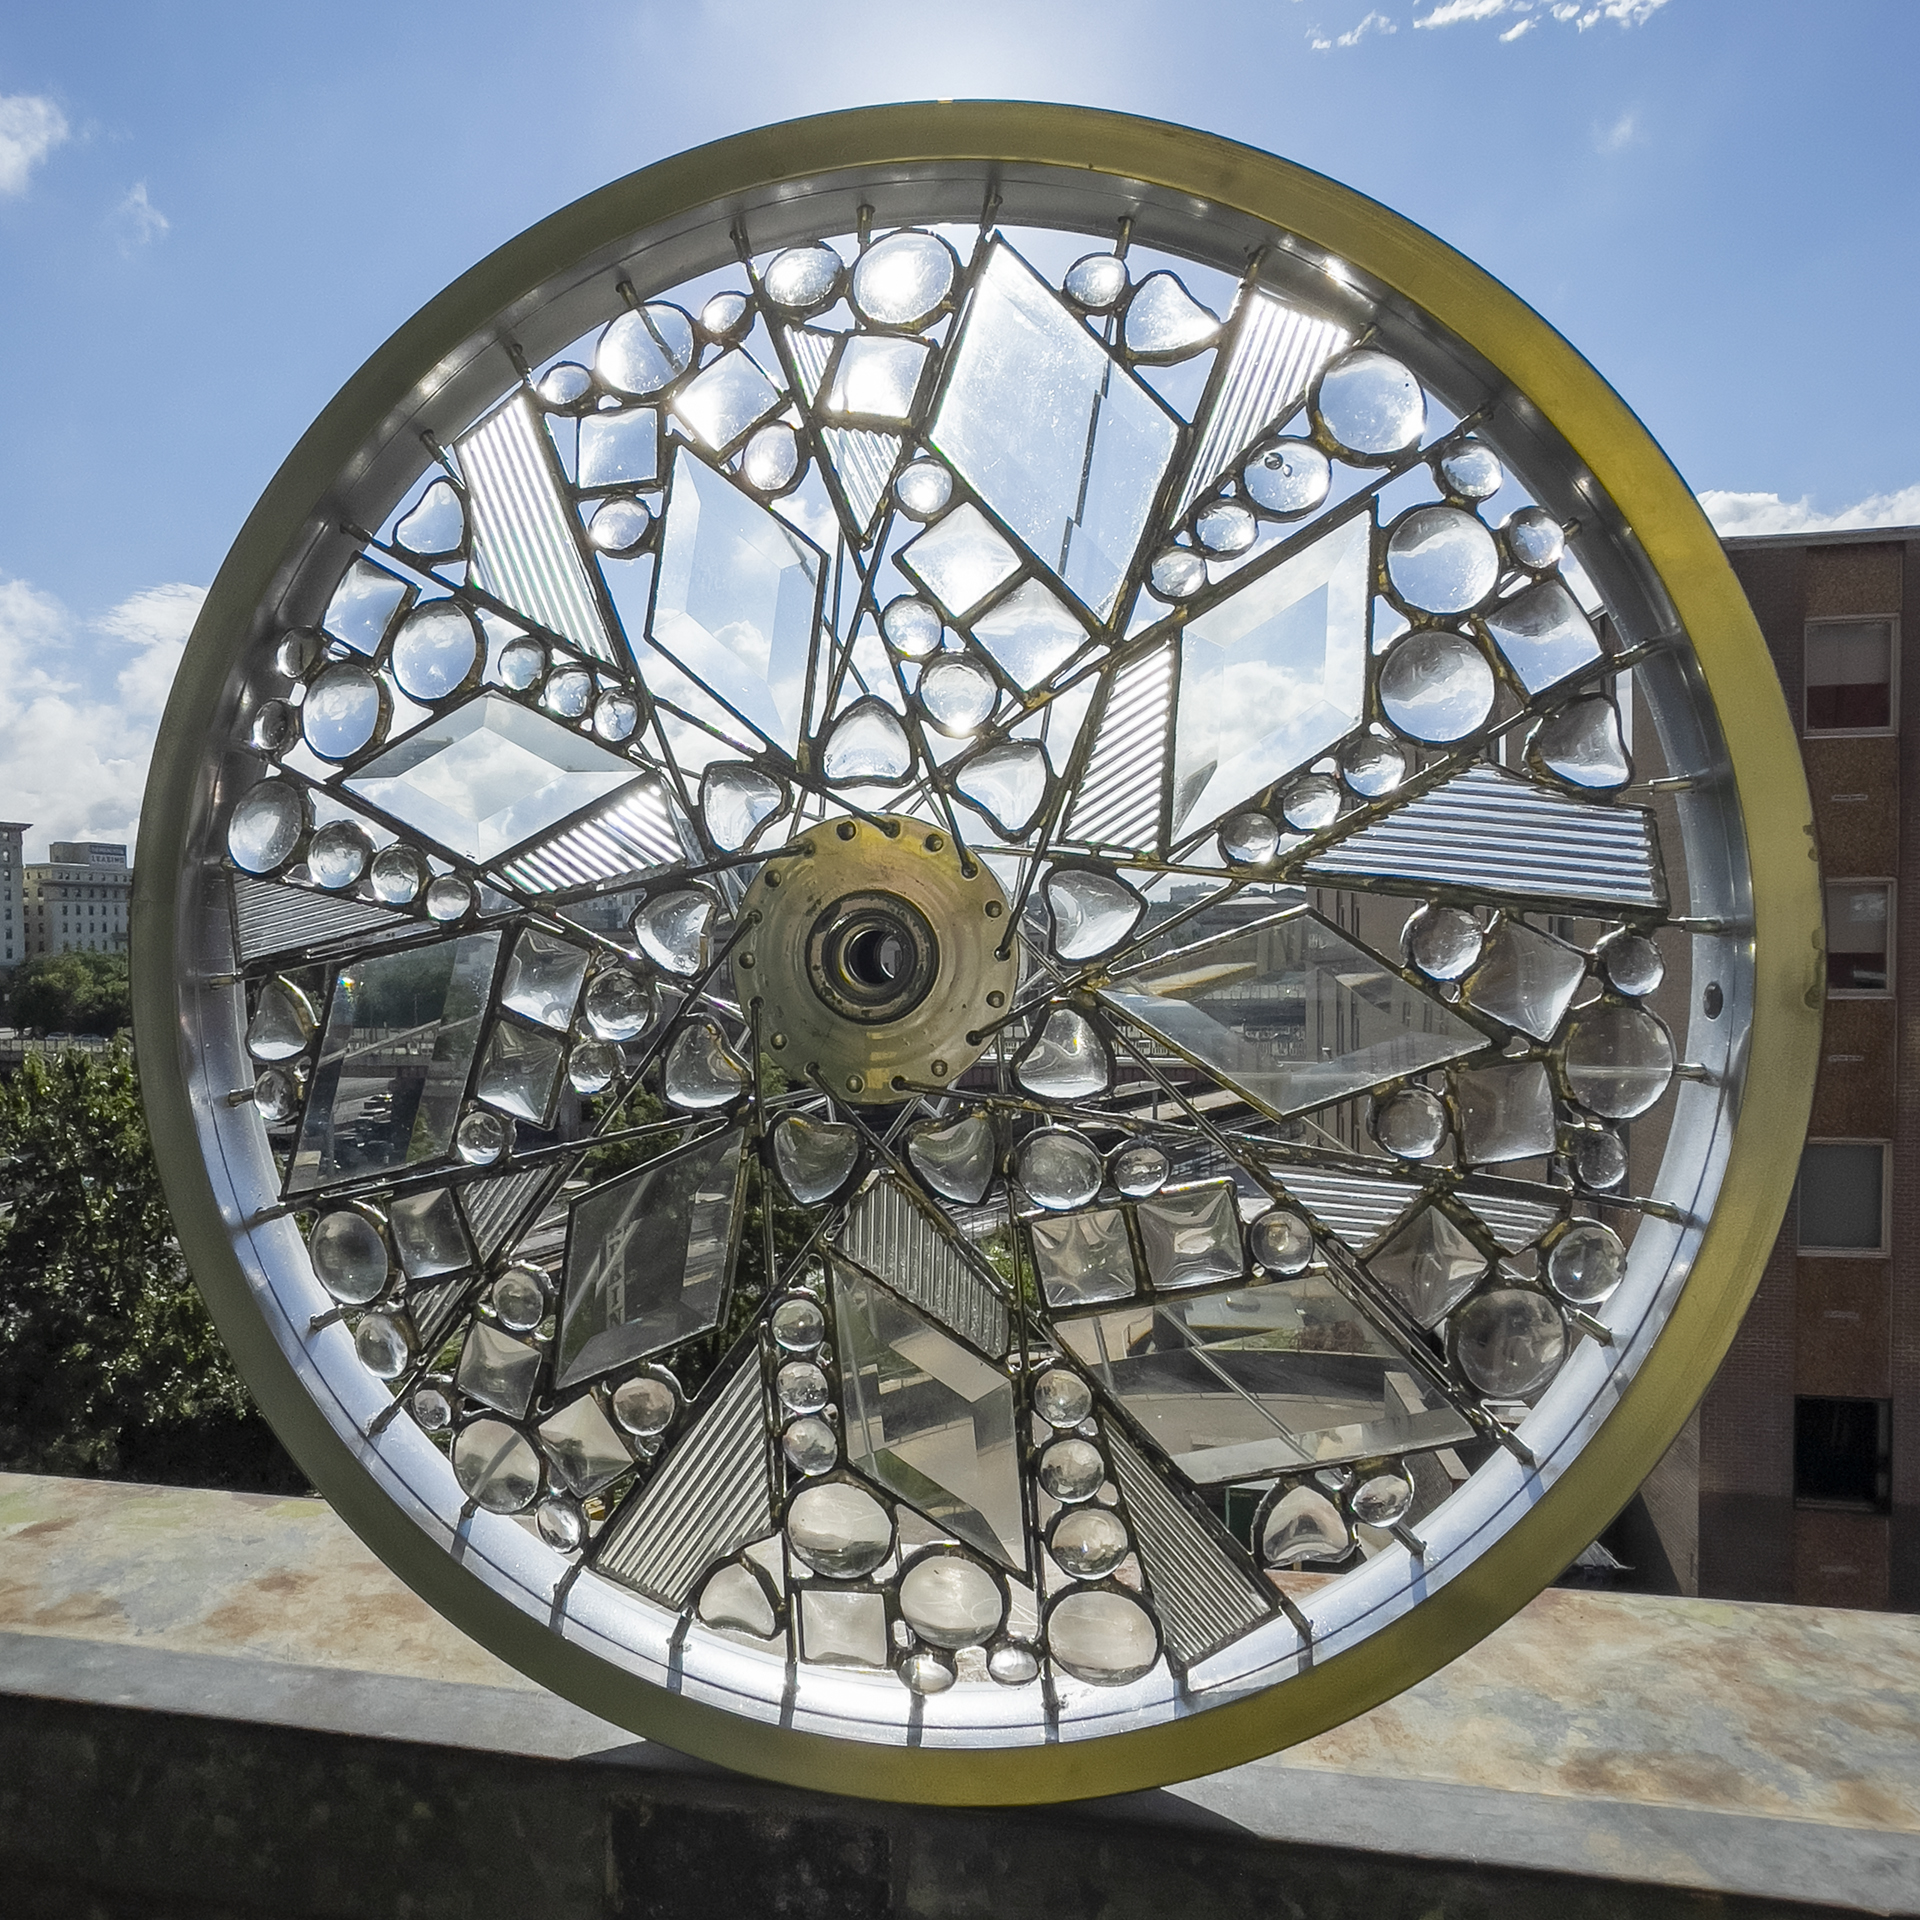
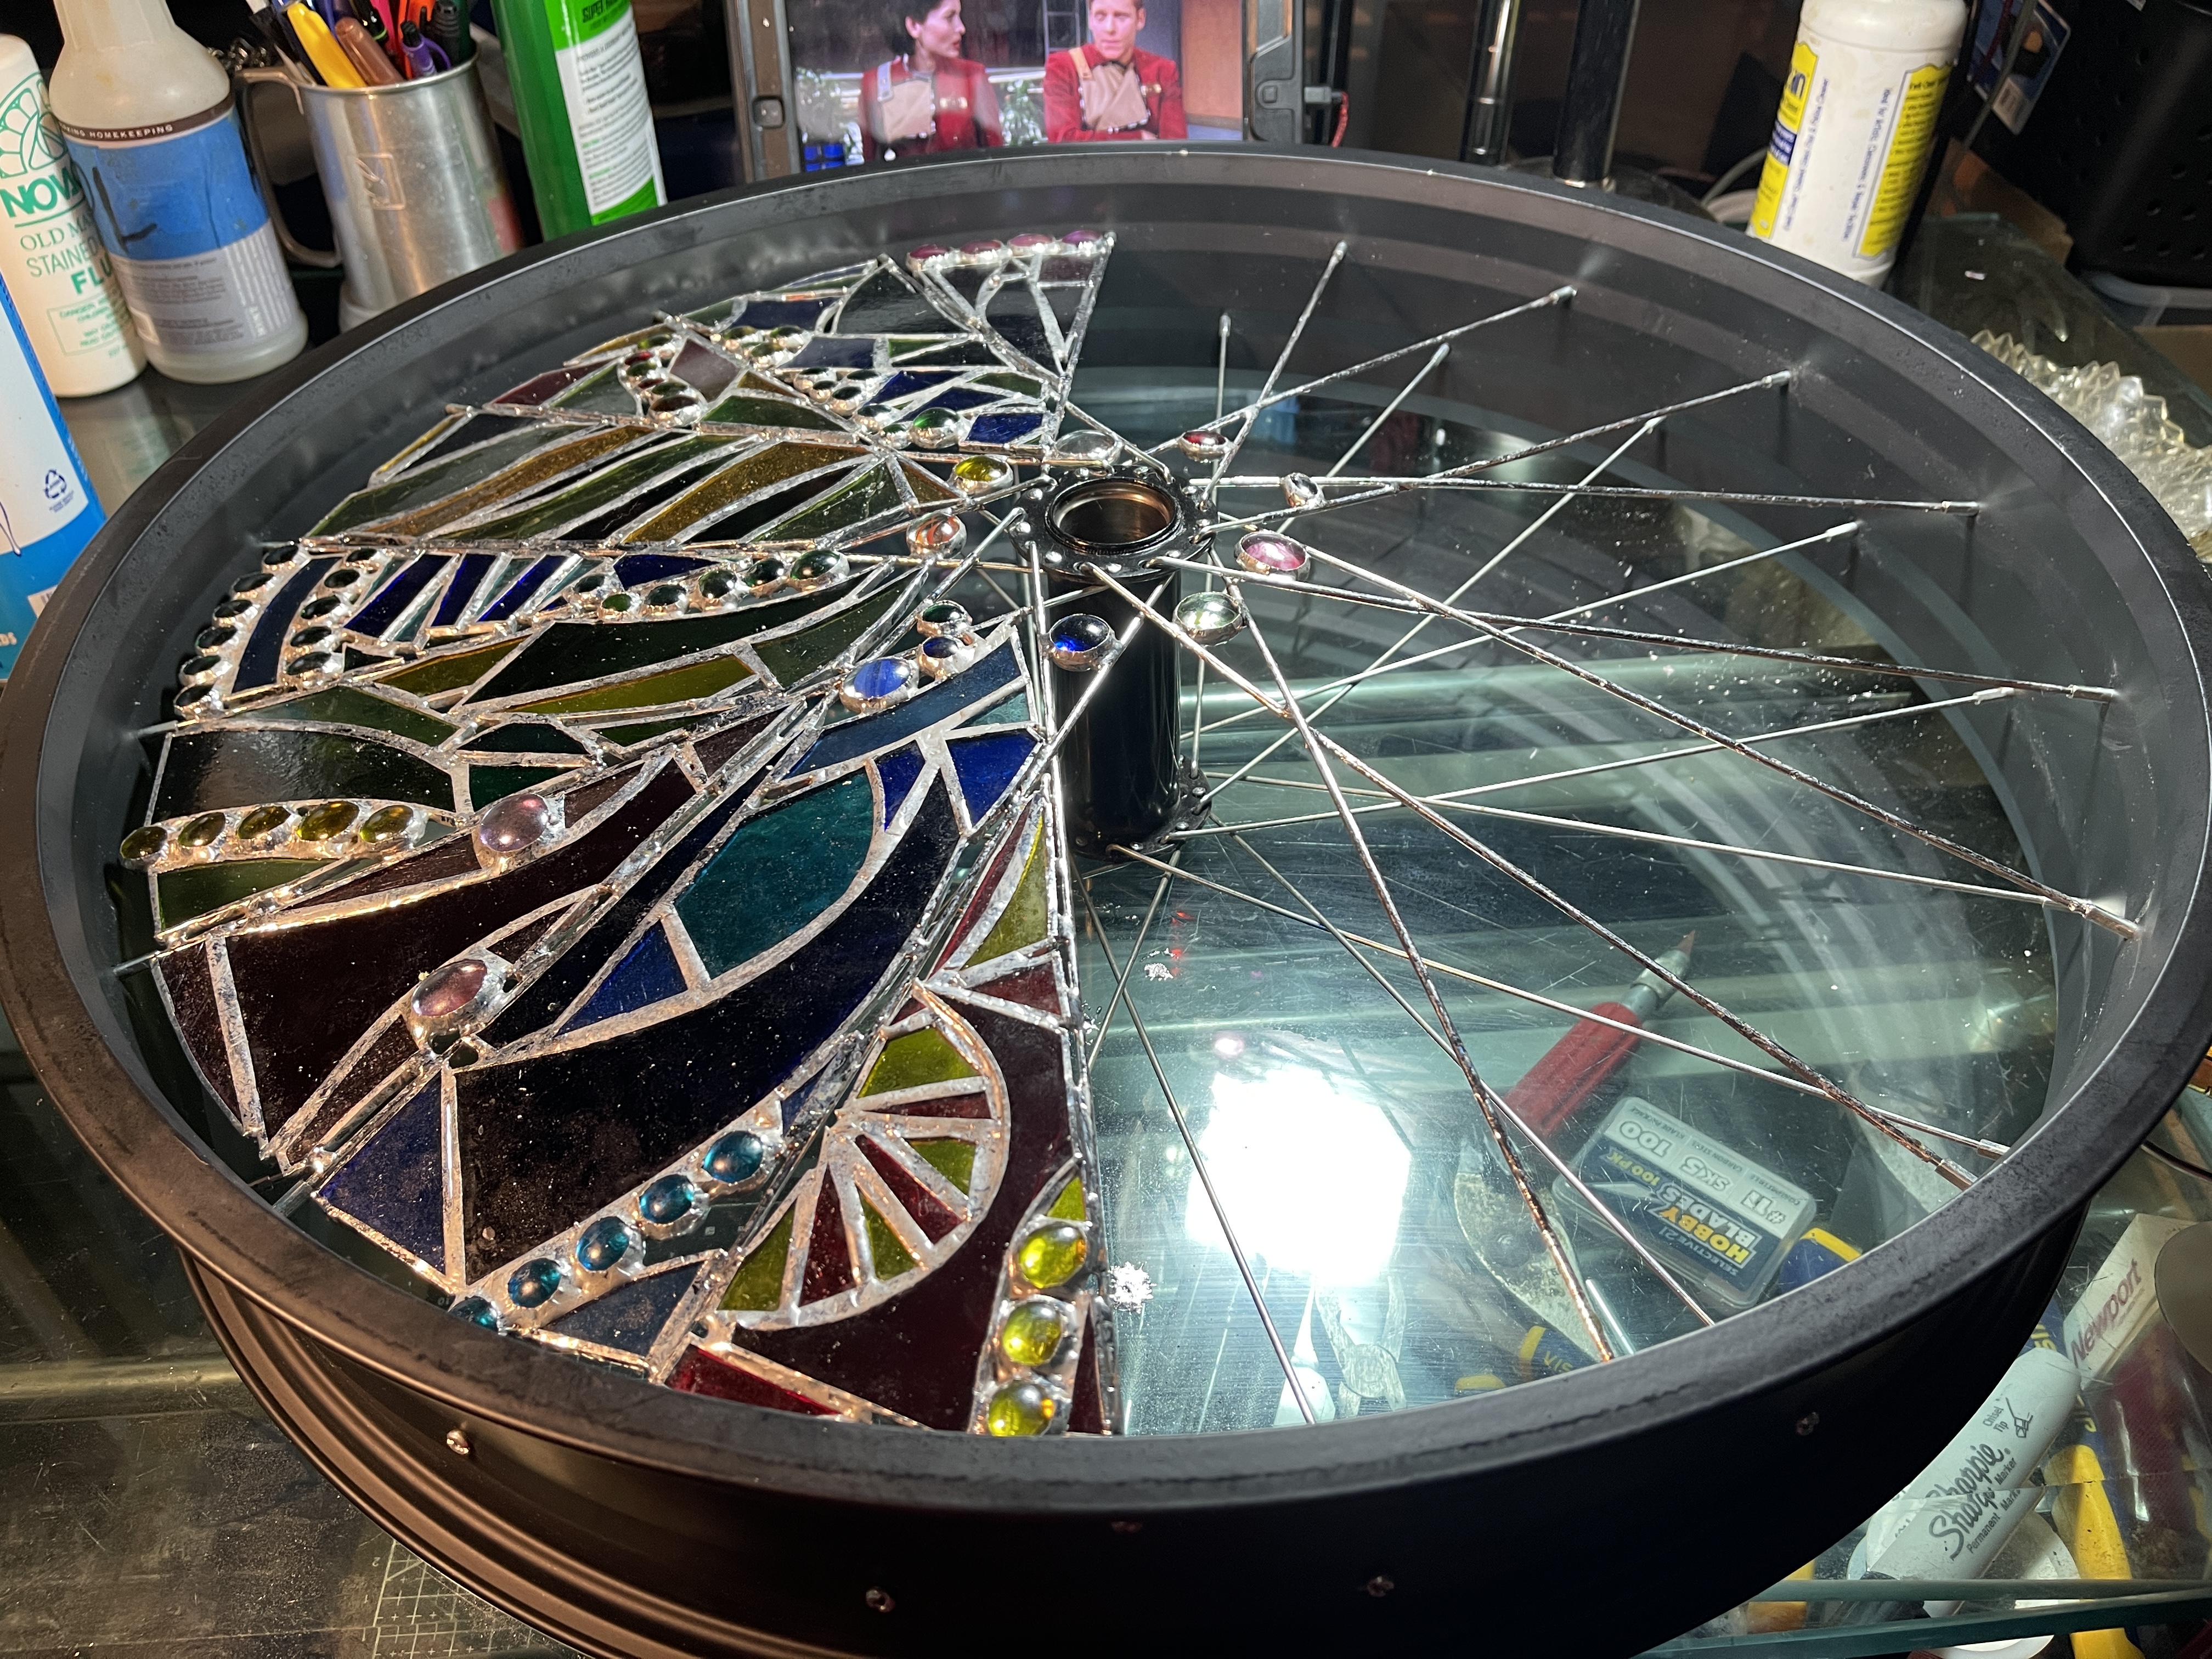
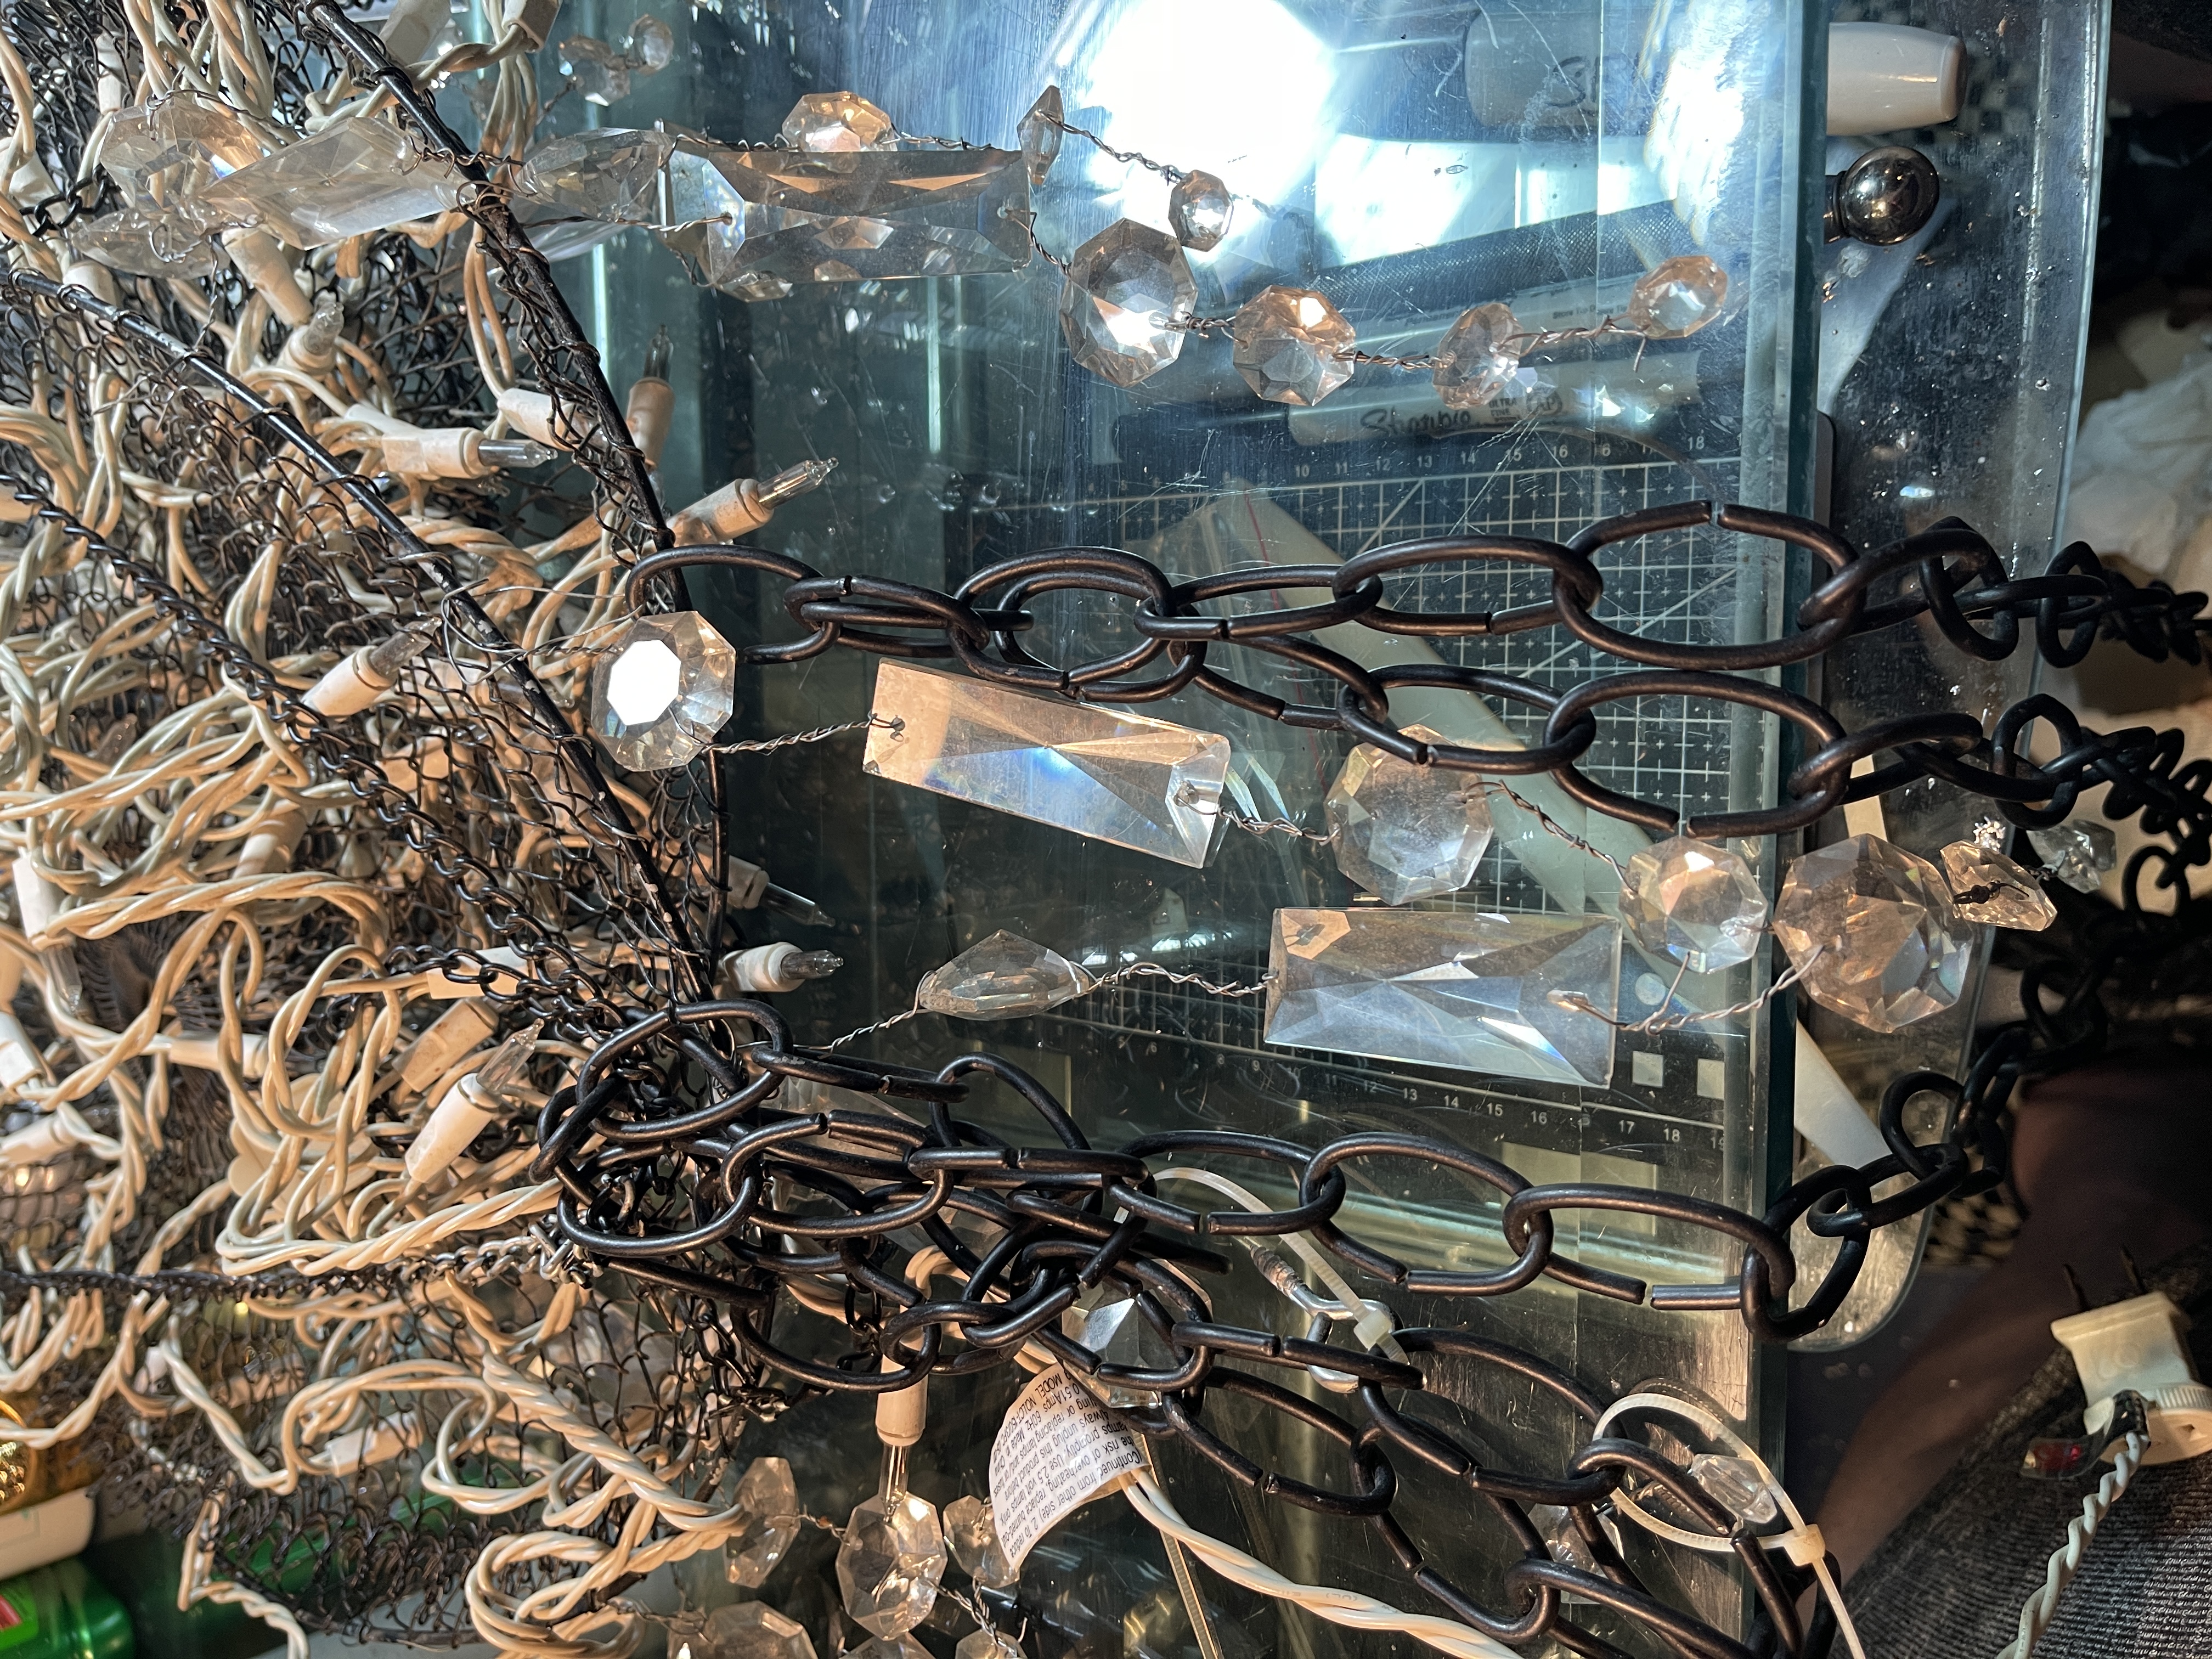
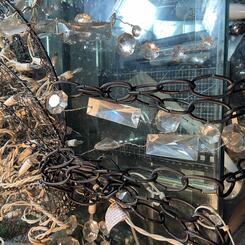
 Repurposing Salvaged CrystalsAfter being given a no-longer used homemade stage prop chandelier that was itself made from parts of an antique leaded glass chandelier, I decided to make an all clear glass chandelier, so first I disassembled the prop to retrieve all of the original lead crystals.
 -
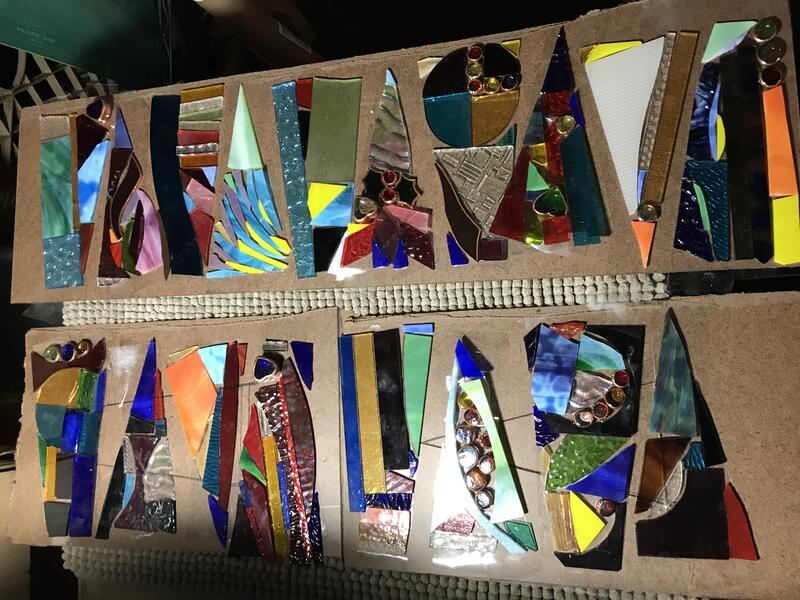
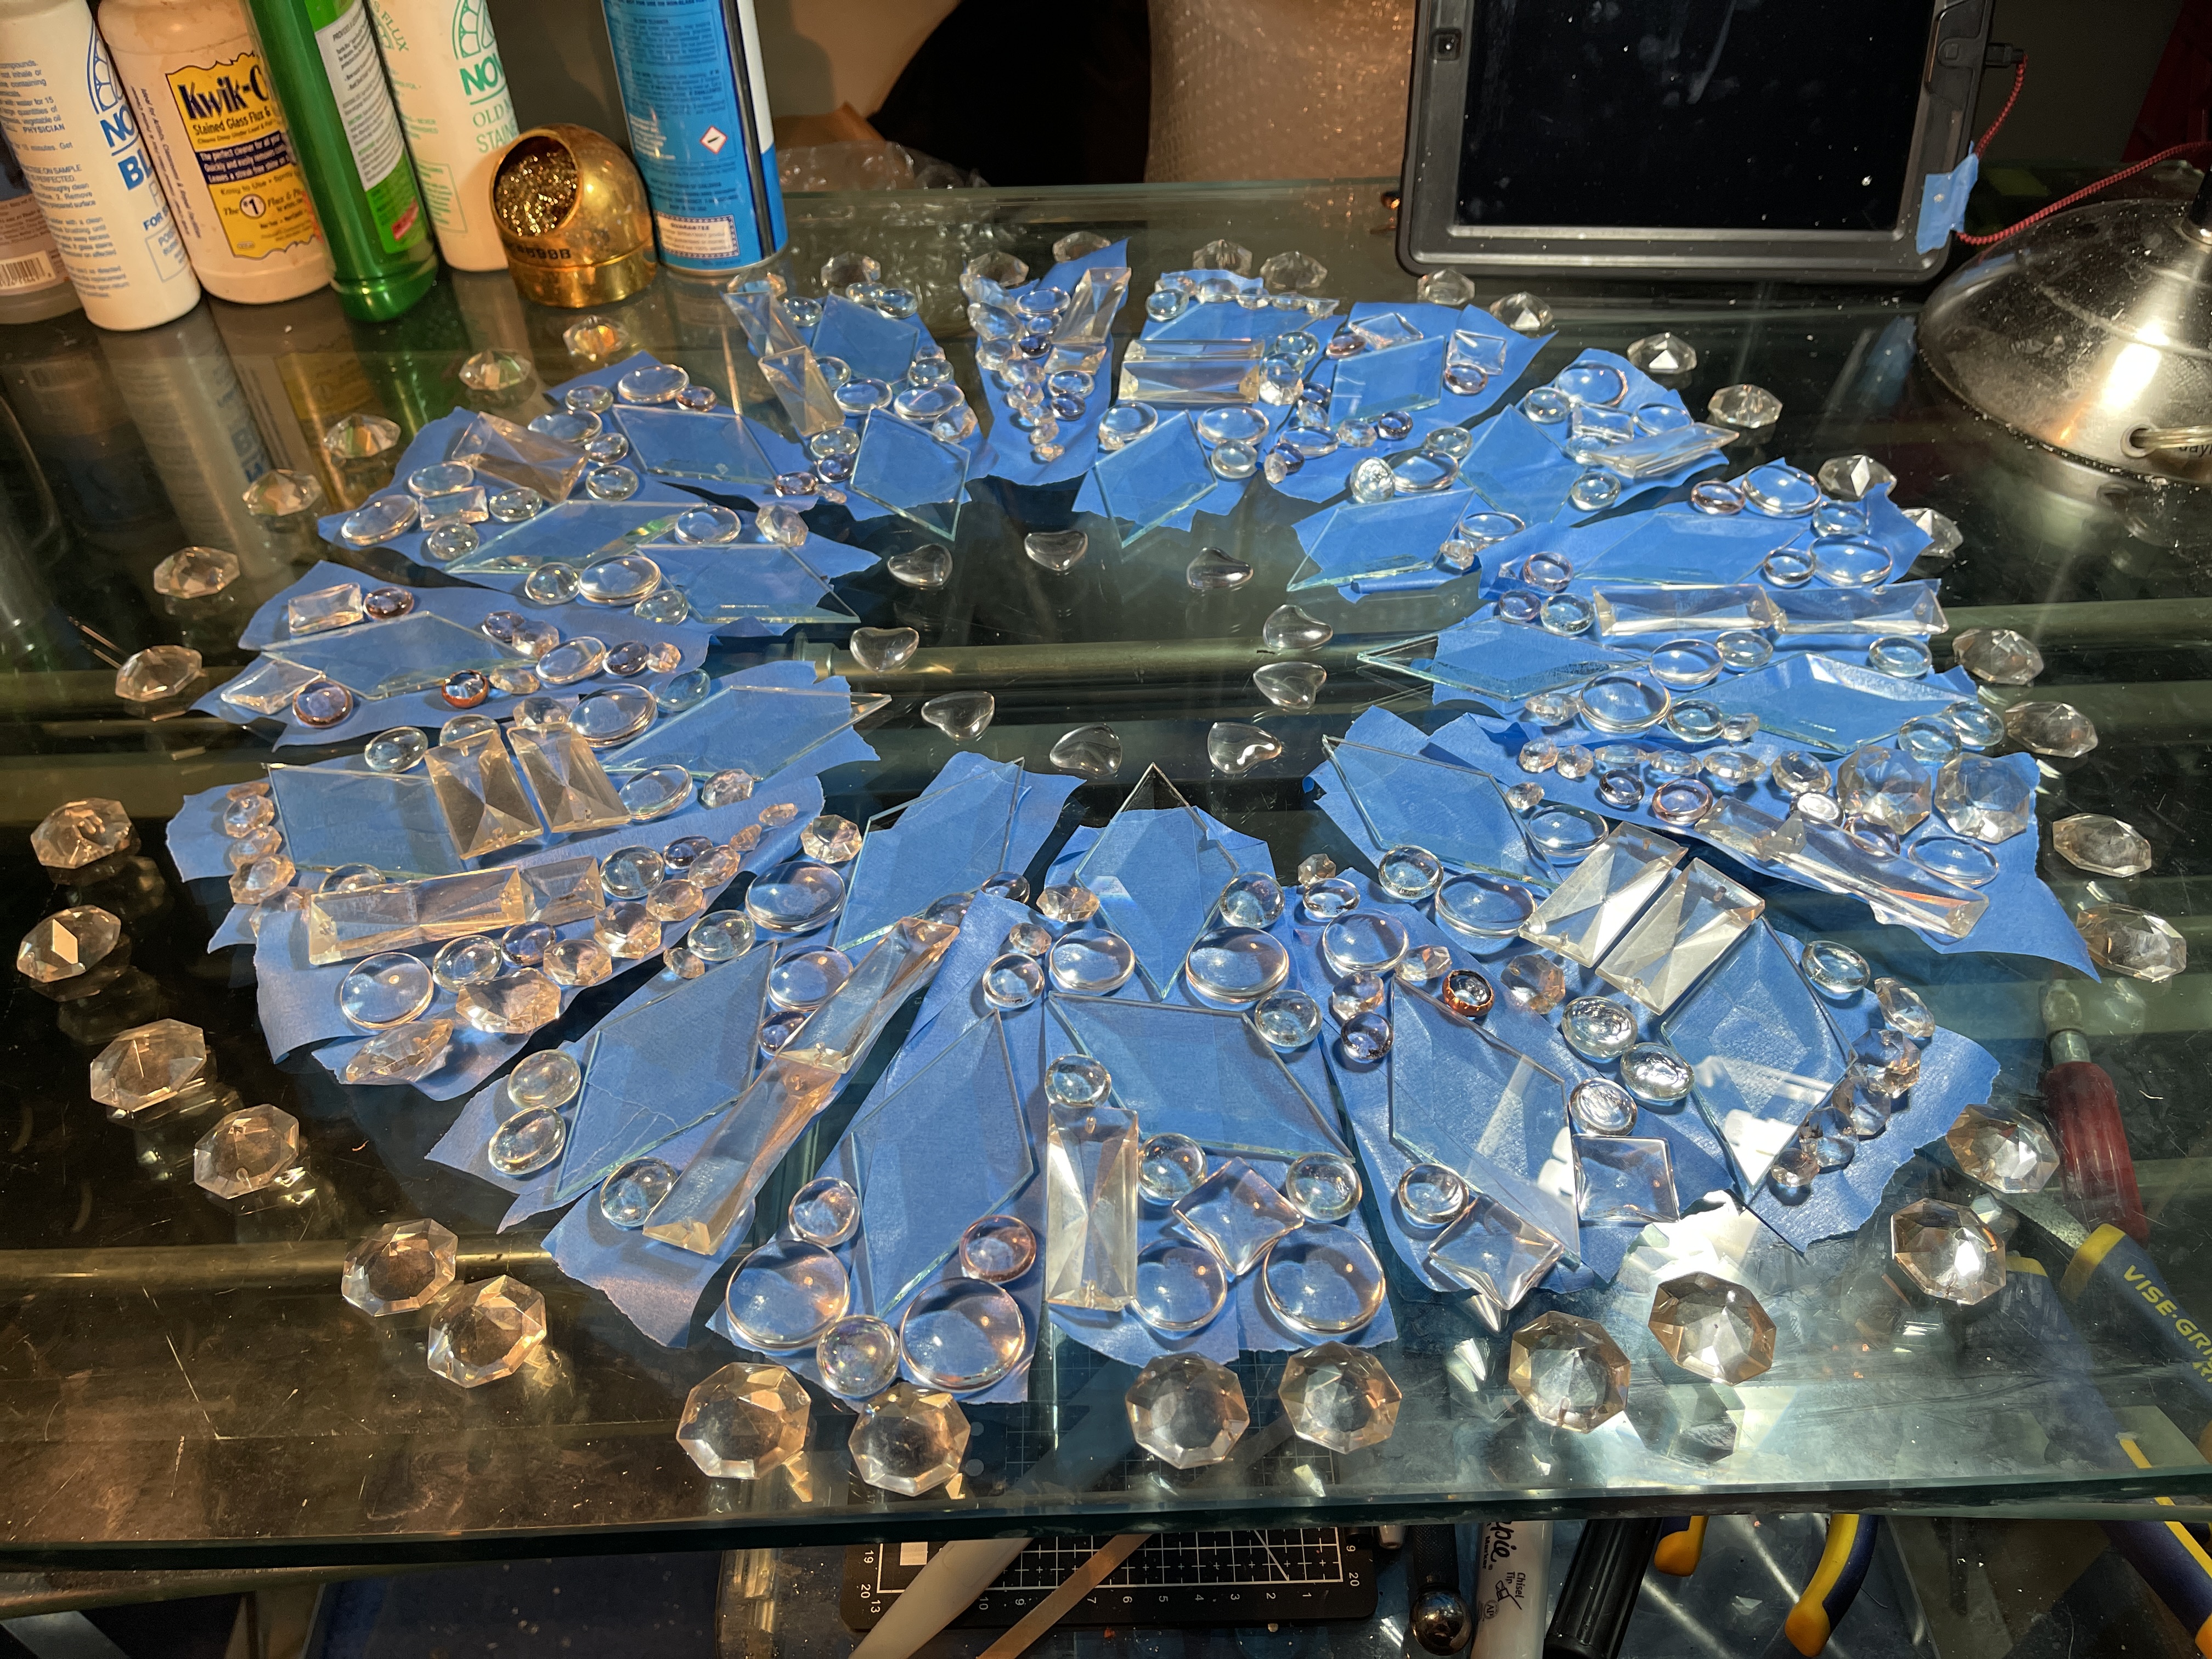
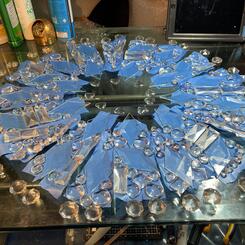
 The LayoutAfter separating and counting all of the individual crystals, I realized that due to the much thicker (and therefore heavier) pieces of glass being used, I would need to much more evenly disperse the pieces to maintain proper balance when hung. After doing a bit of math and evenly dispersing the existing crystals, I figured out a way to design the panels as two sets of nine panels each, with each set divided into three subsets of three identical panels, which I would then alternate accordingly. After cutting down additional long rectangular bevels into parallelograms, and adding round and shaped cabochons and glass nuggets to fill in the empty spaces and also be evenly dispersed, I laid them all out and played with the arrangement to create a random looking yet perfectly balanced and radially symmetrical pattern, as shown here using painter's tape to keep them organized.
 -
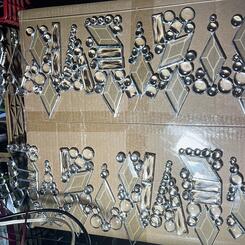
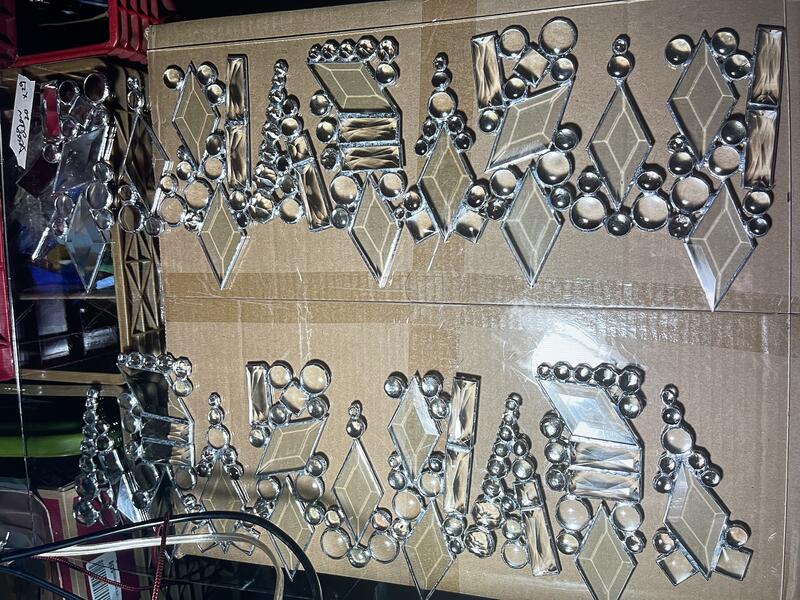 Soldered PanelsAfter foiling each piece and then soldering the panels together, I laid them out in two rows in the order I would be inserting them in, to form an alternating radially symmetrical pattern.
 -
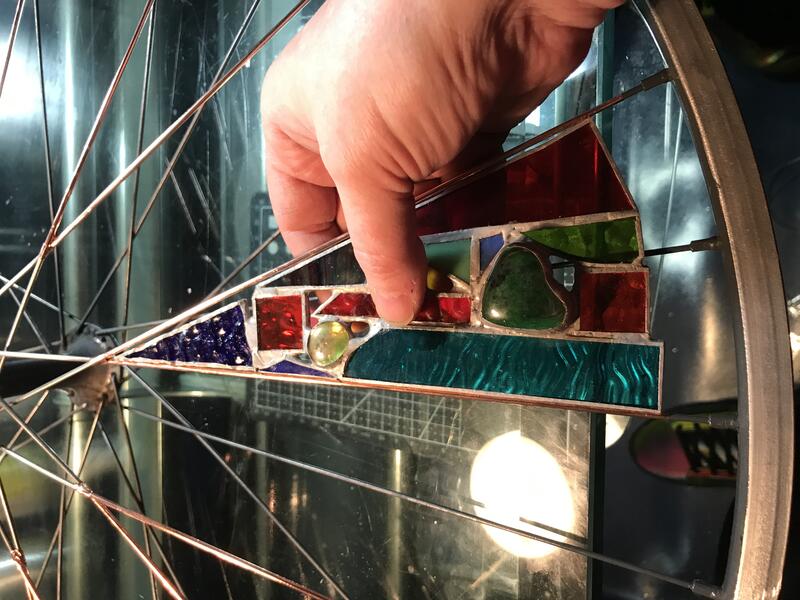
 Side DetailWanting to utilize the existing holes in the rim to cast more refracted light from the sides of the lamp, I discovered that I had exactly two more of the largest octagonal crystals than the number of holes to fill, and that they were just the right size to make them work in the oddly-shaped openings and still be sturdily attached.
 -
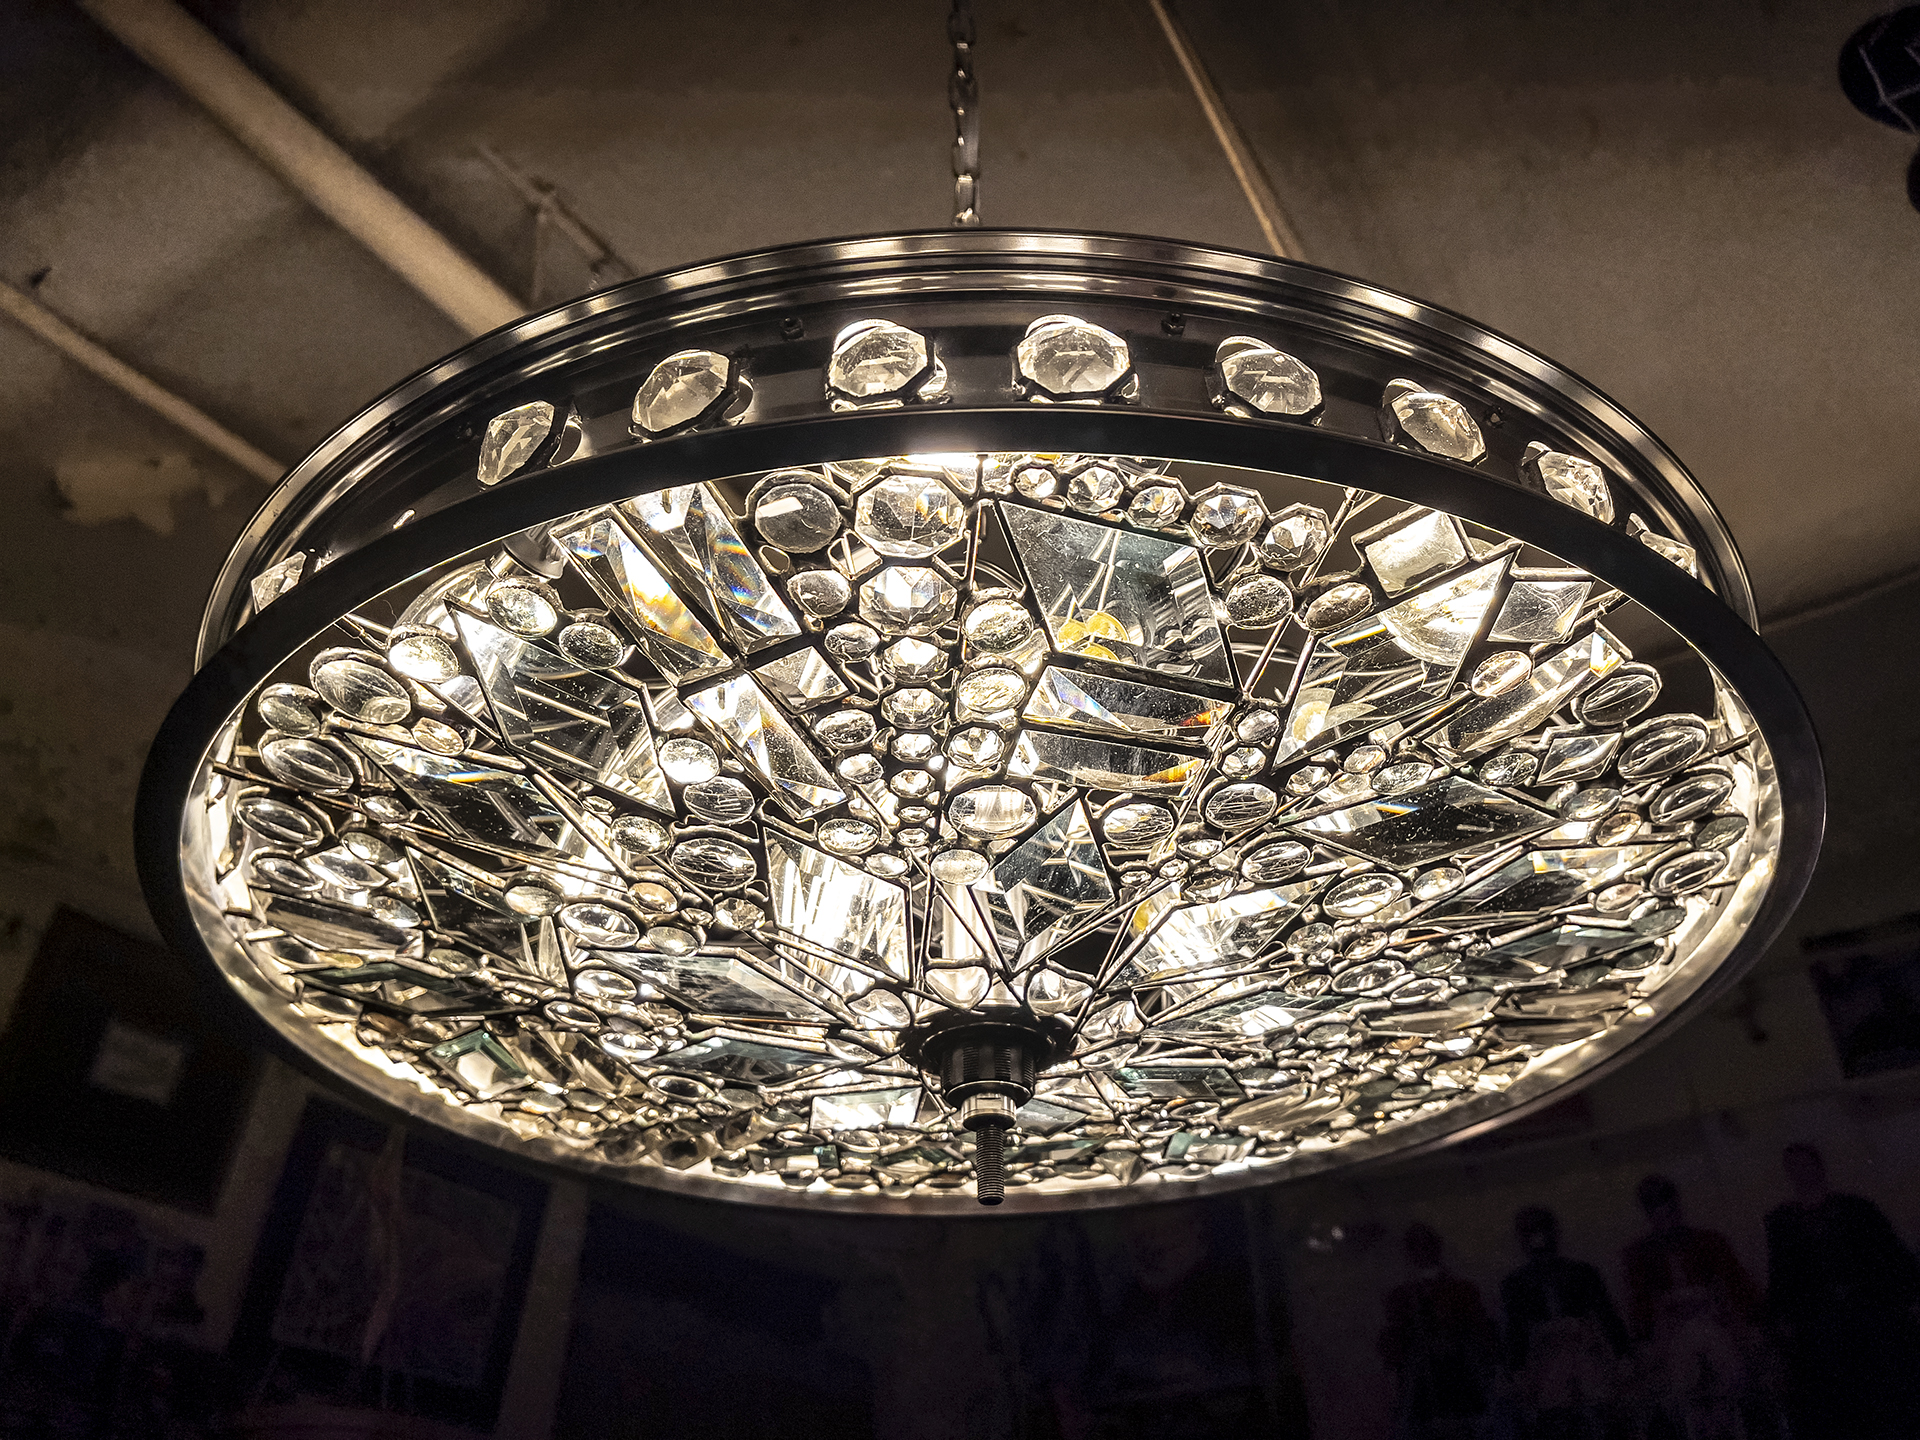
 The Blinginator (Bike Wheel Chandelier #3)After finding a chrome chain and silver cord to match and hanging it to test, the final assembled piece totally exceeded my wildest expectations, and it was one of very few times I actually sat back and admired my own work. The response to it online was also overwhelming, and received the most "likes" of anything I have posted so far on both my personal Facebook page and Instagram, as well as the several art and stained glass groups I belong to. It currently hangs in my apartment/studio, but either this exact piece or the next clear/chrome piece I will be making similar to it (but with patterned flat architectural glass scraps instead of crystals) will be shipped to Finland, where I will then be teaching private stained glass lessons to its purchaser for three months this coming Summer.


Pet Portraits
-
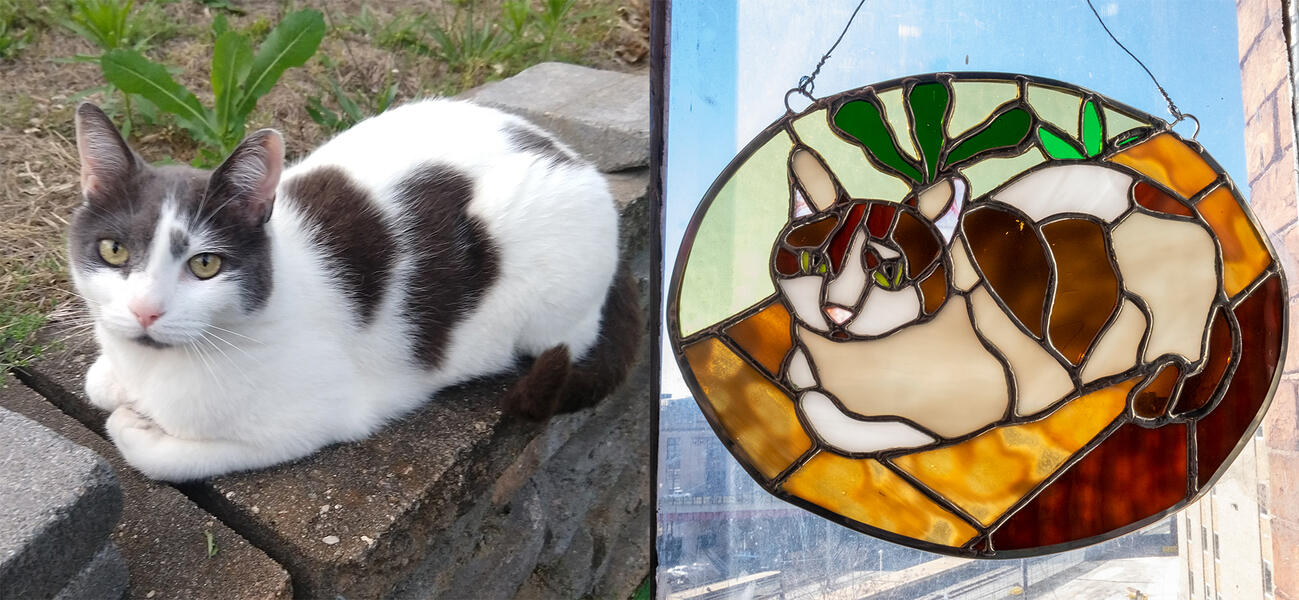
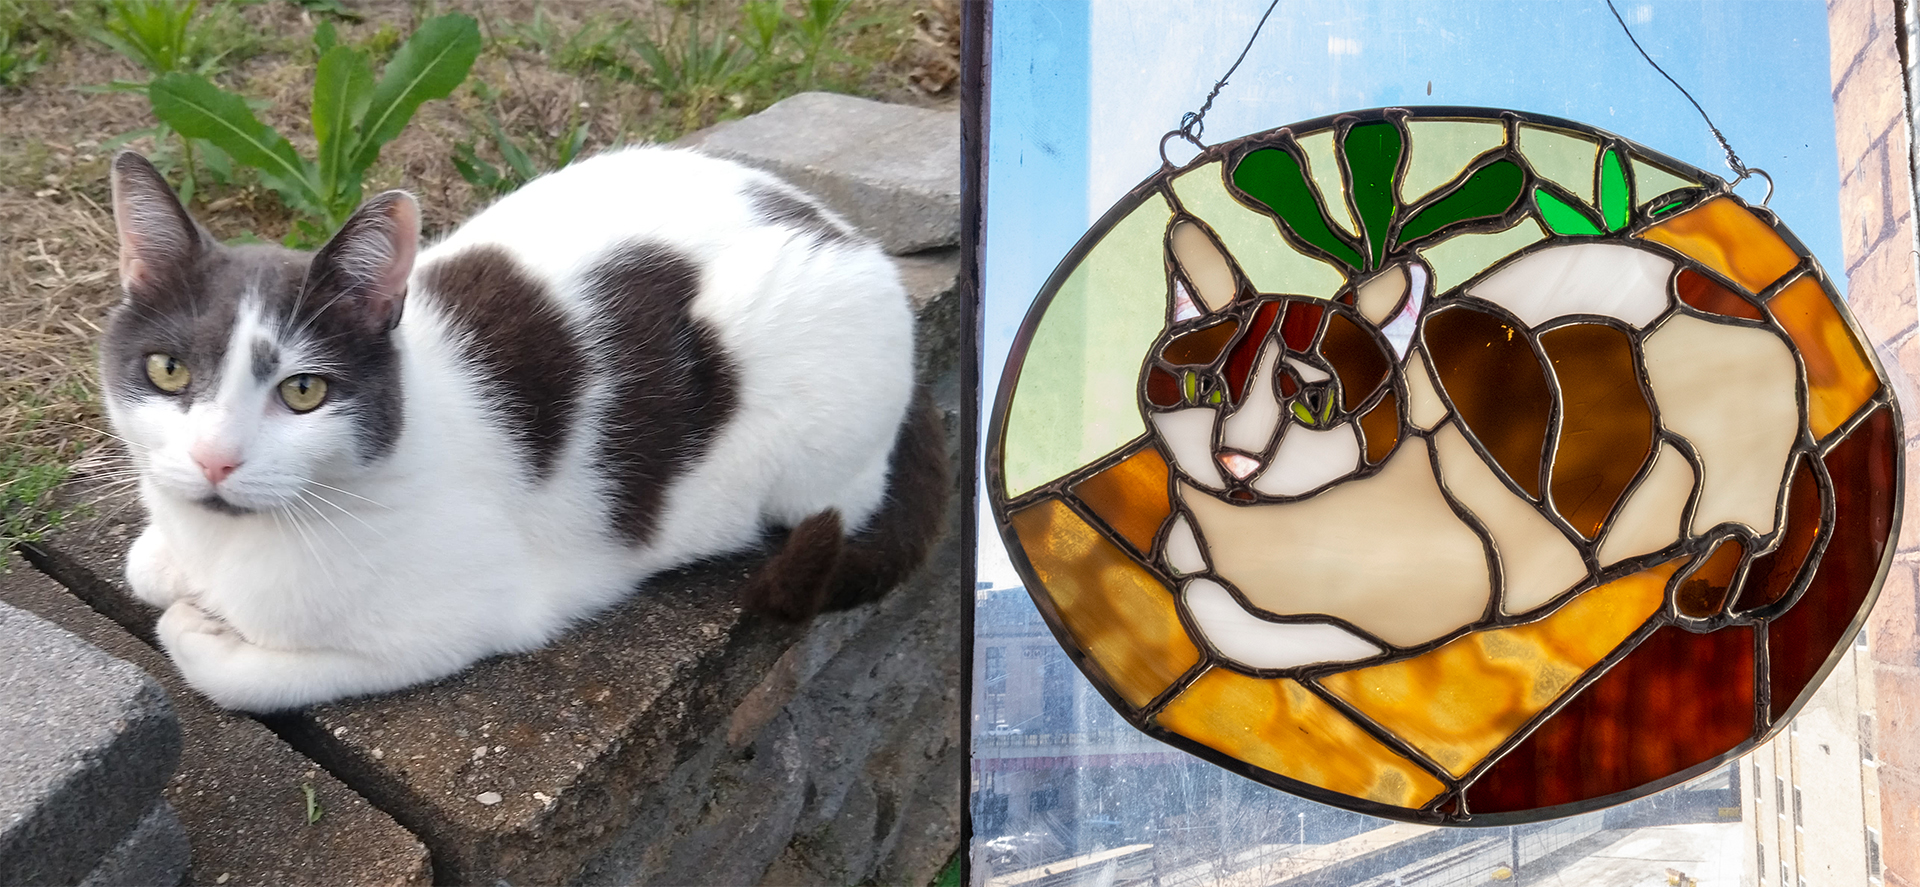
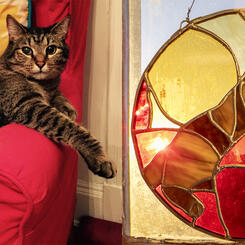
 Basil Brown
 -
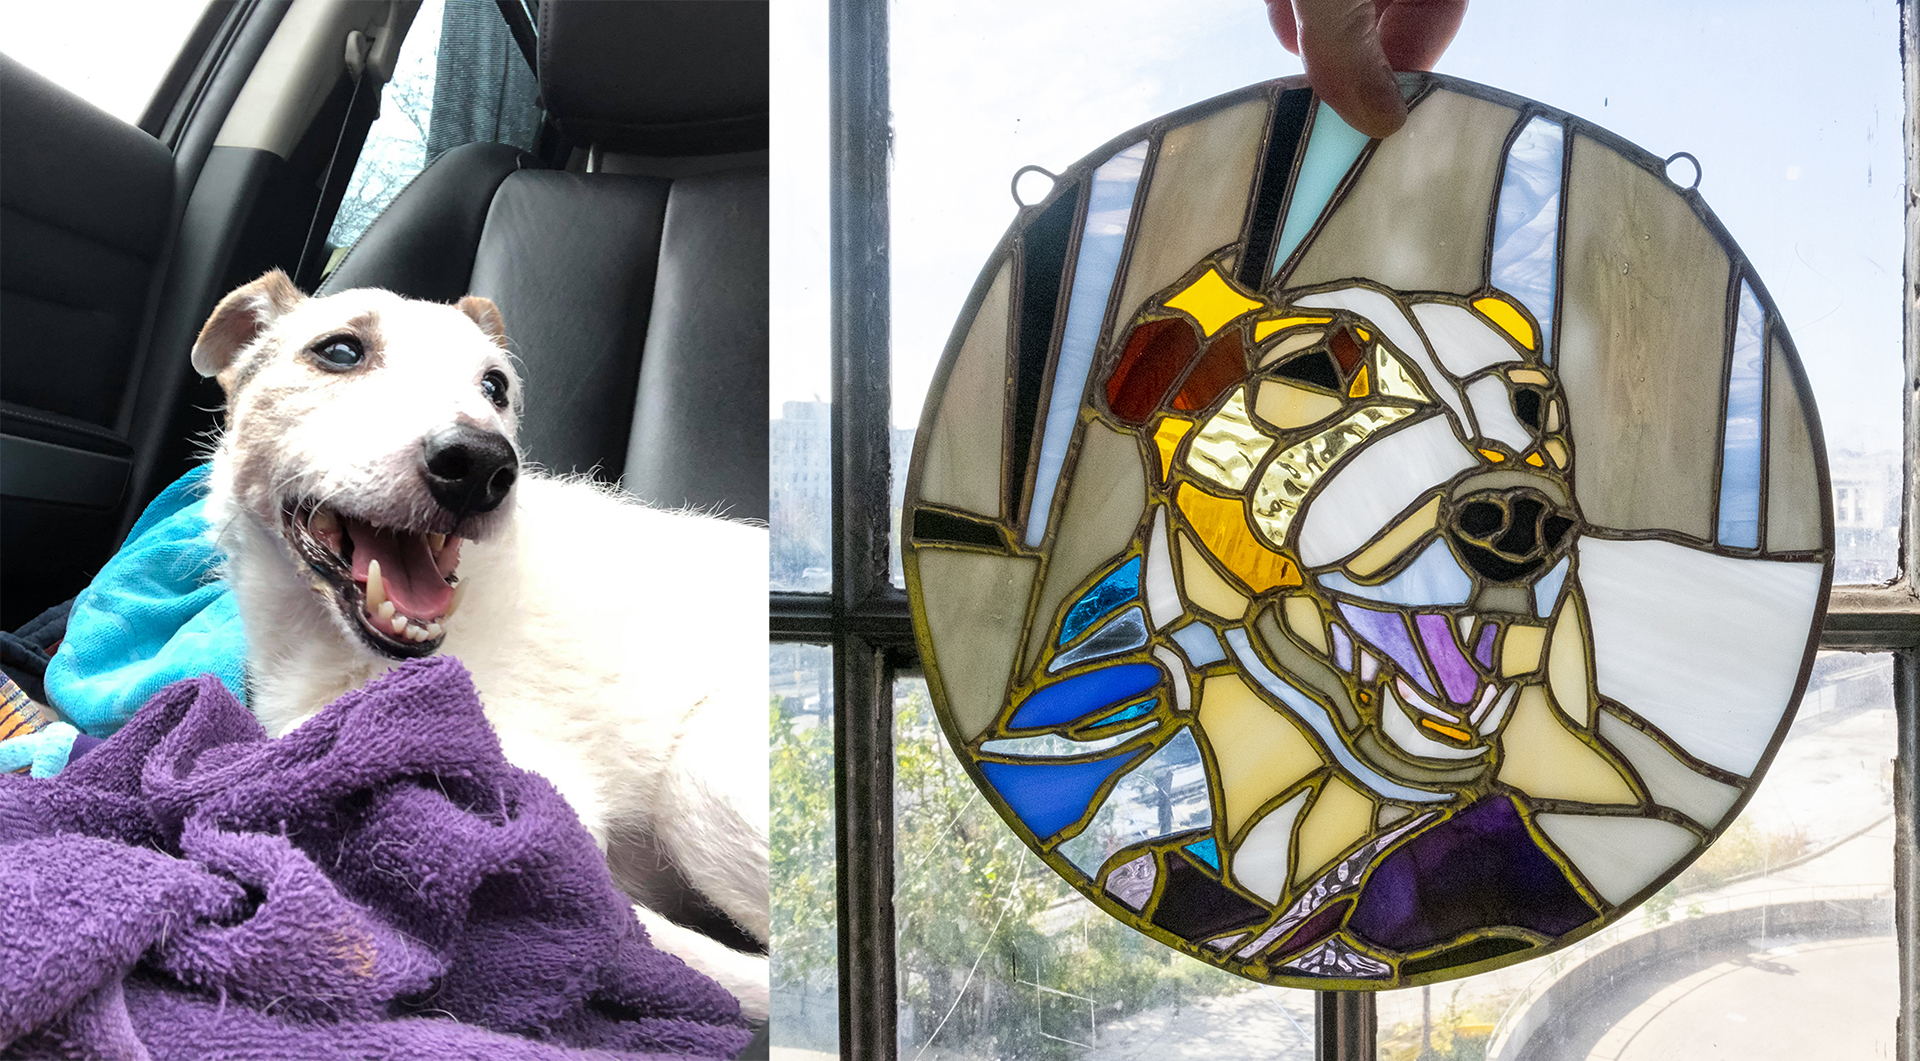
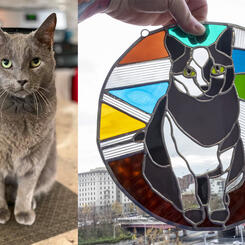
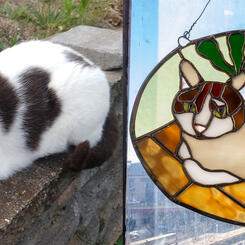
 Bogey
Bogey -
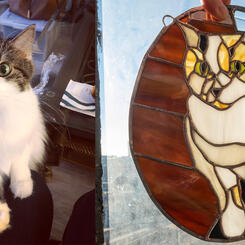
 Bubba
Bubba -
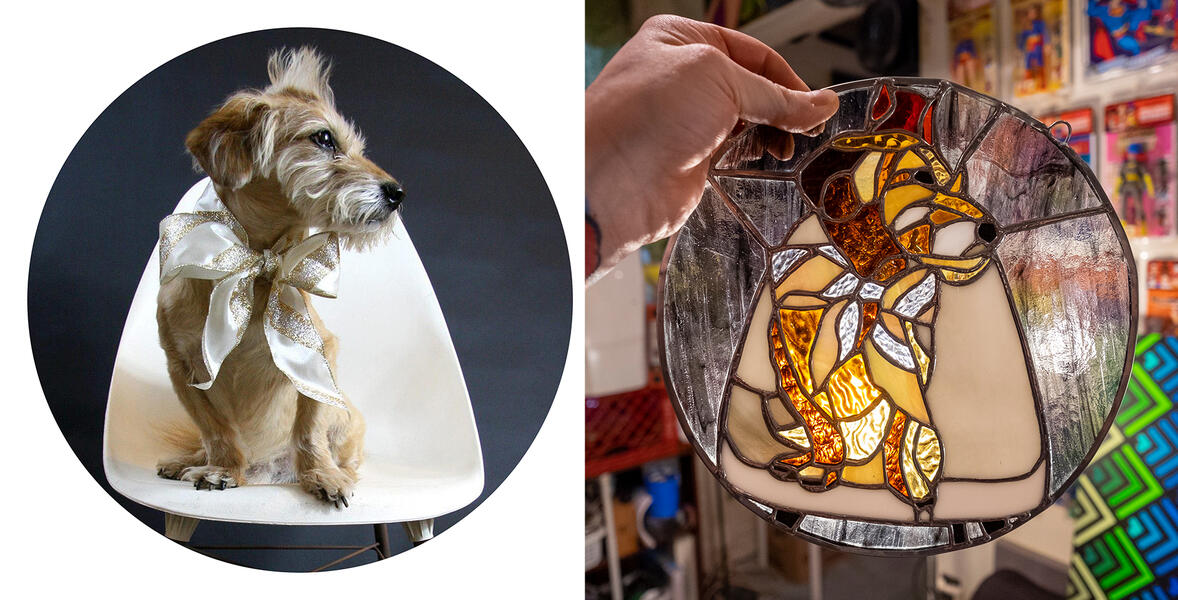
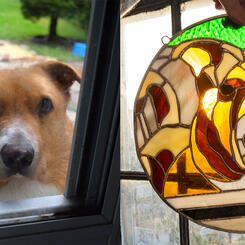
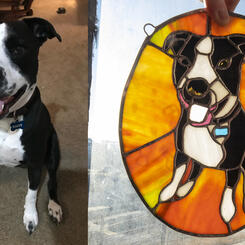
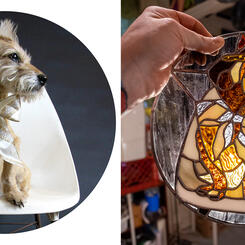
 Buddy
Buddy -
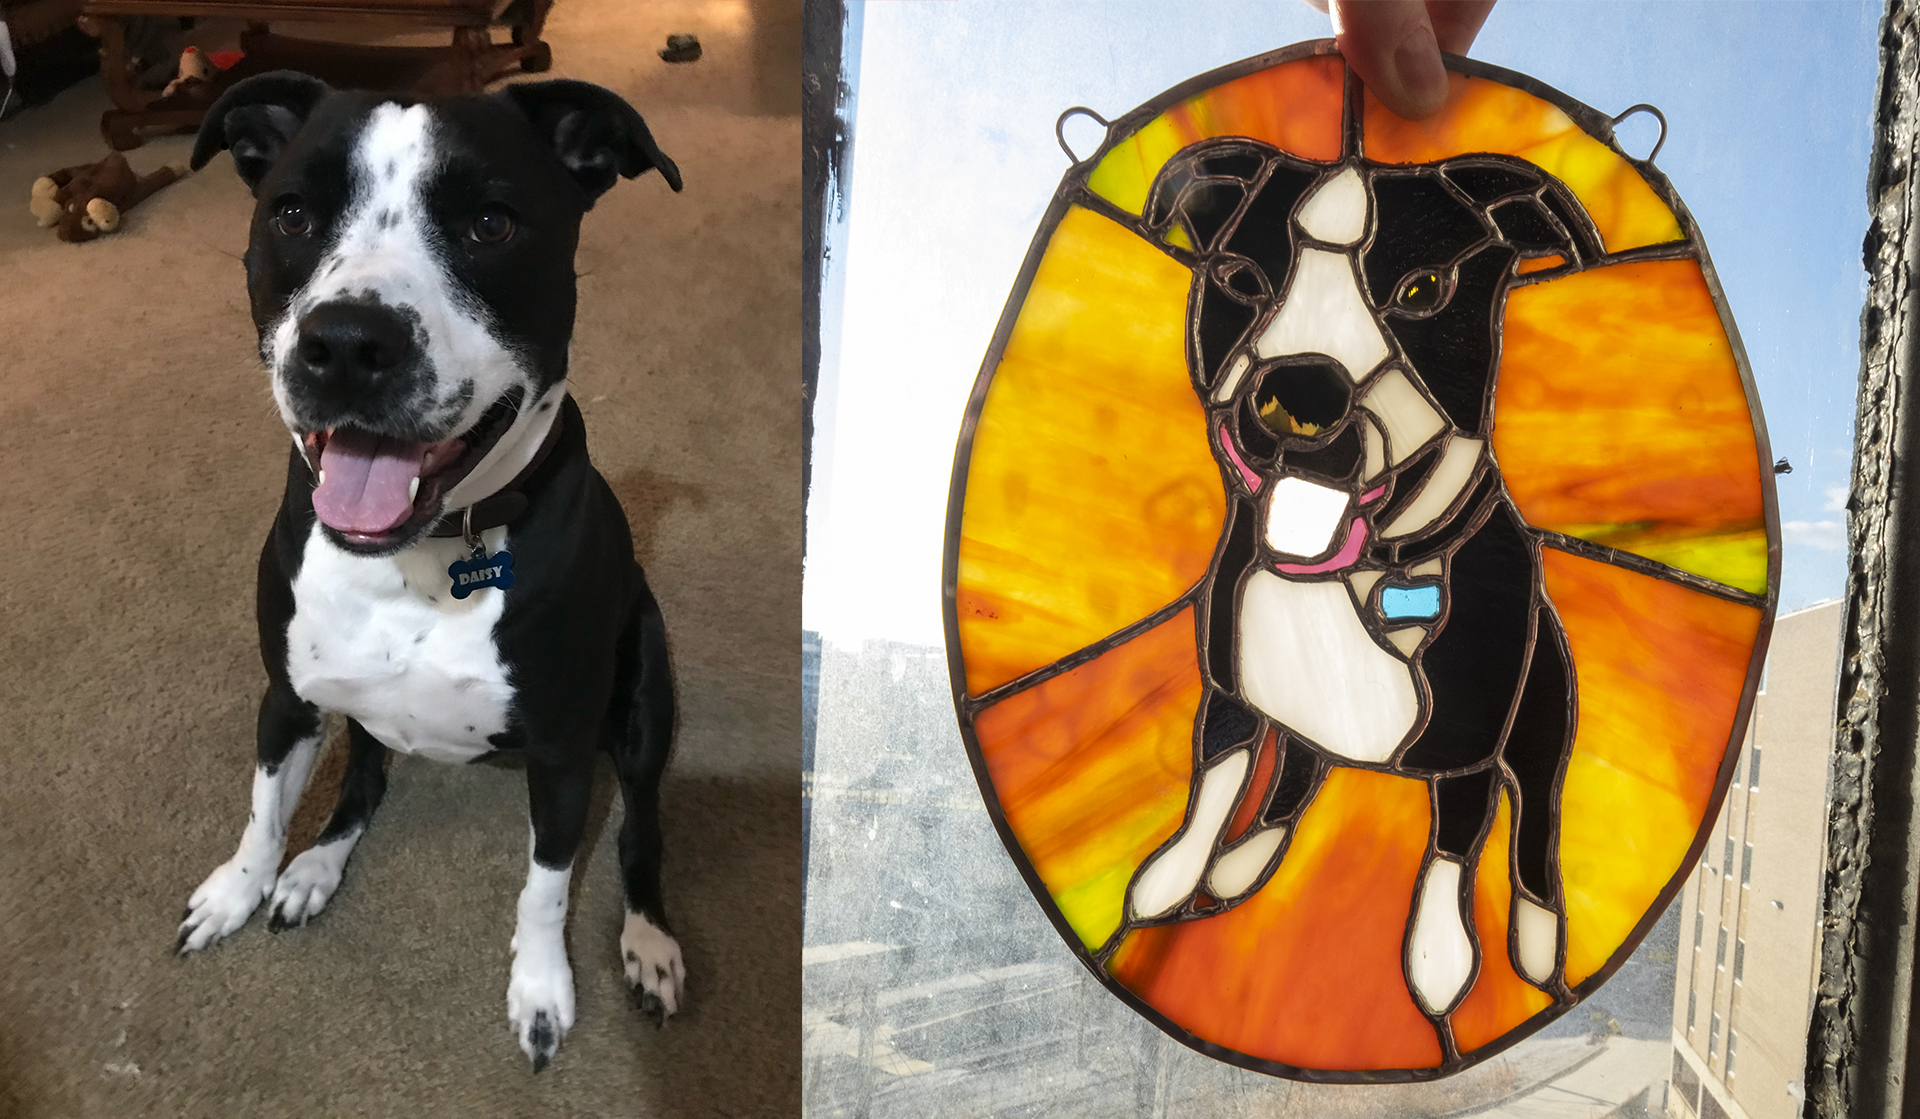
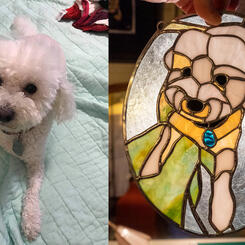
 Daisy
Daisy -
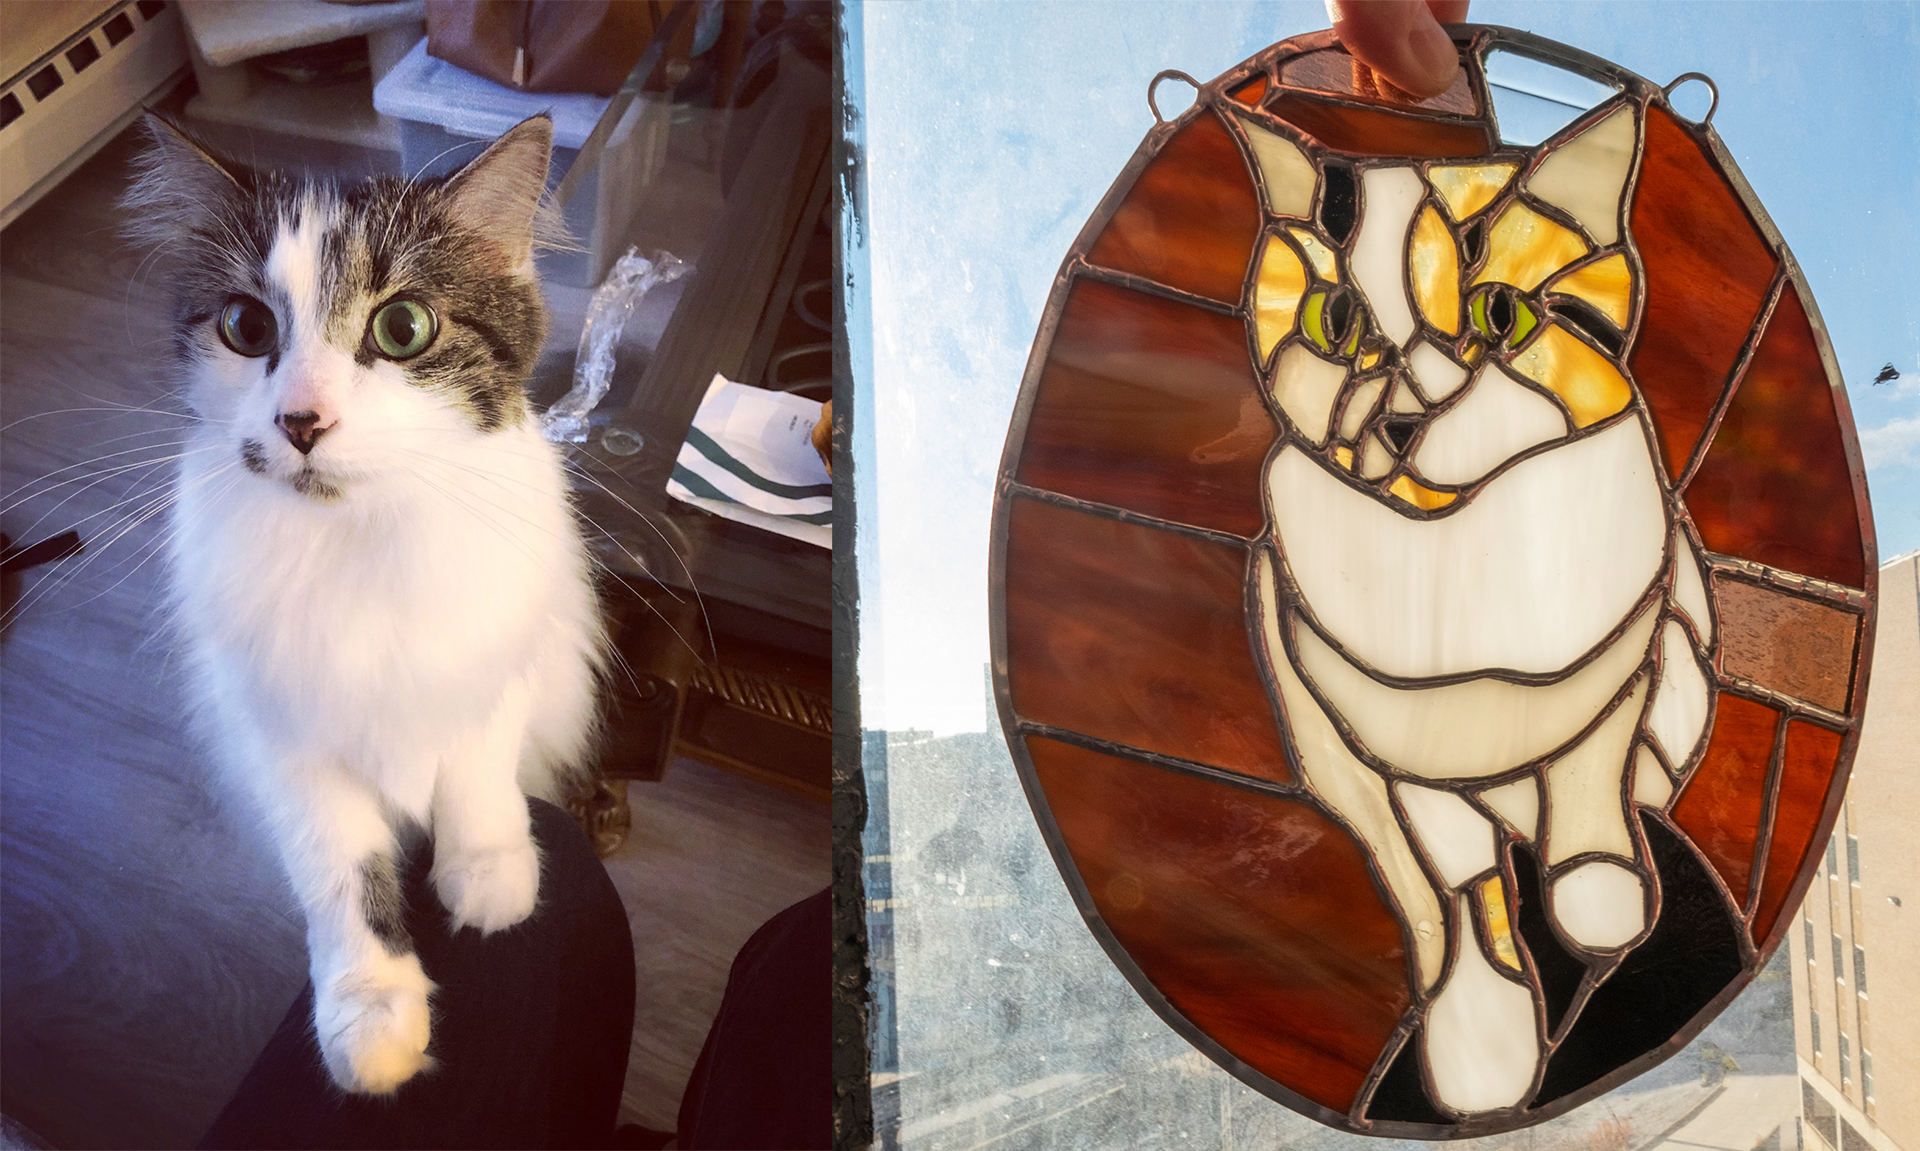
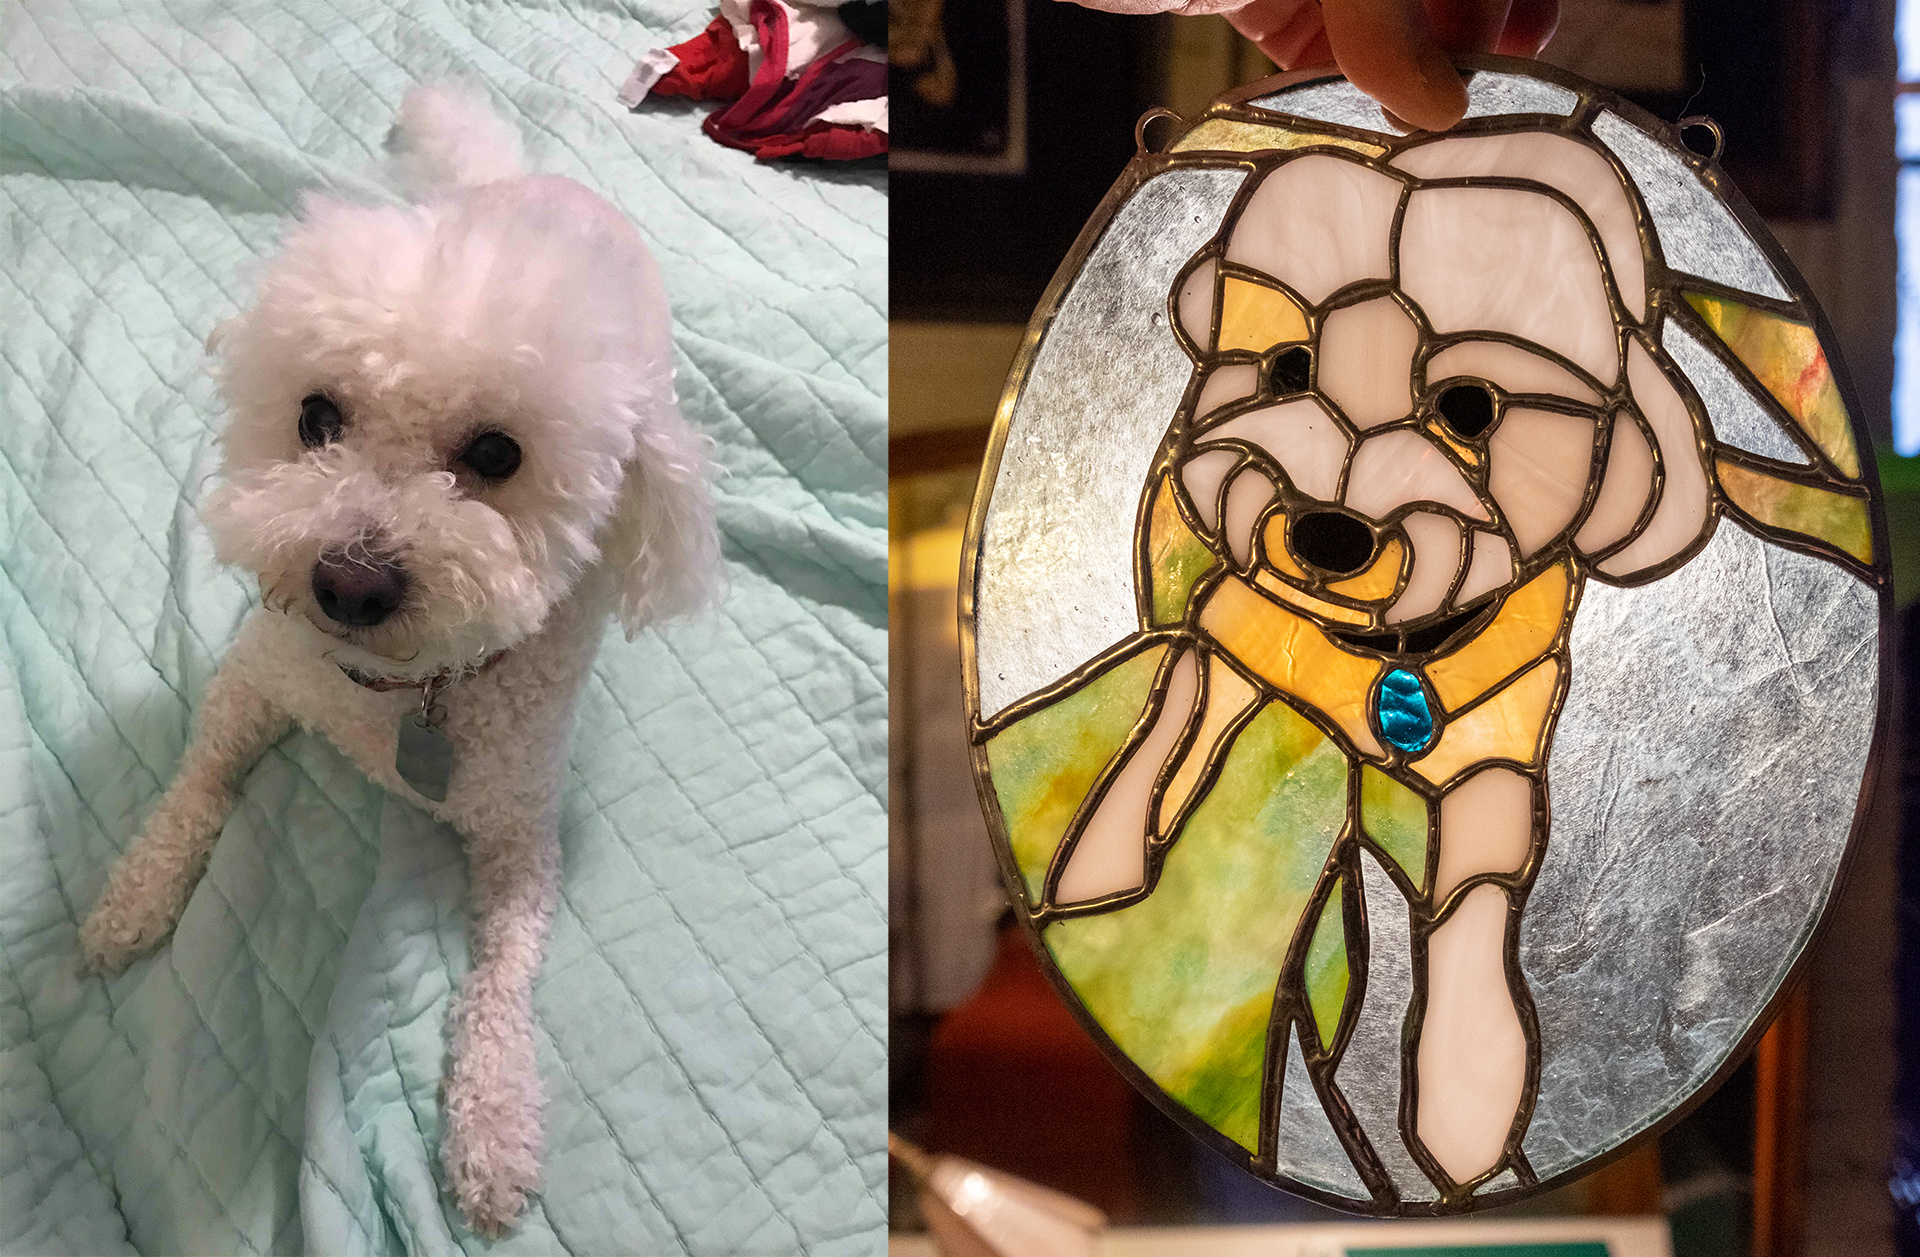
 Lumen
Lumen -
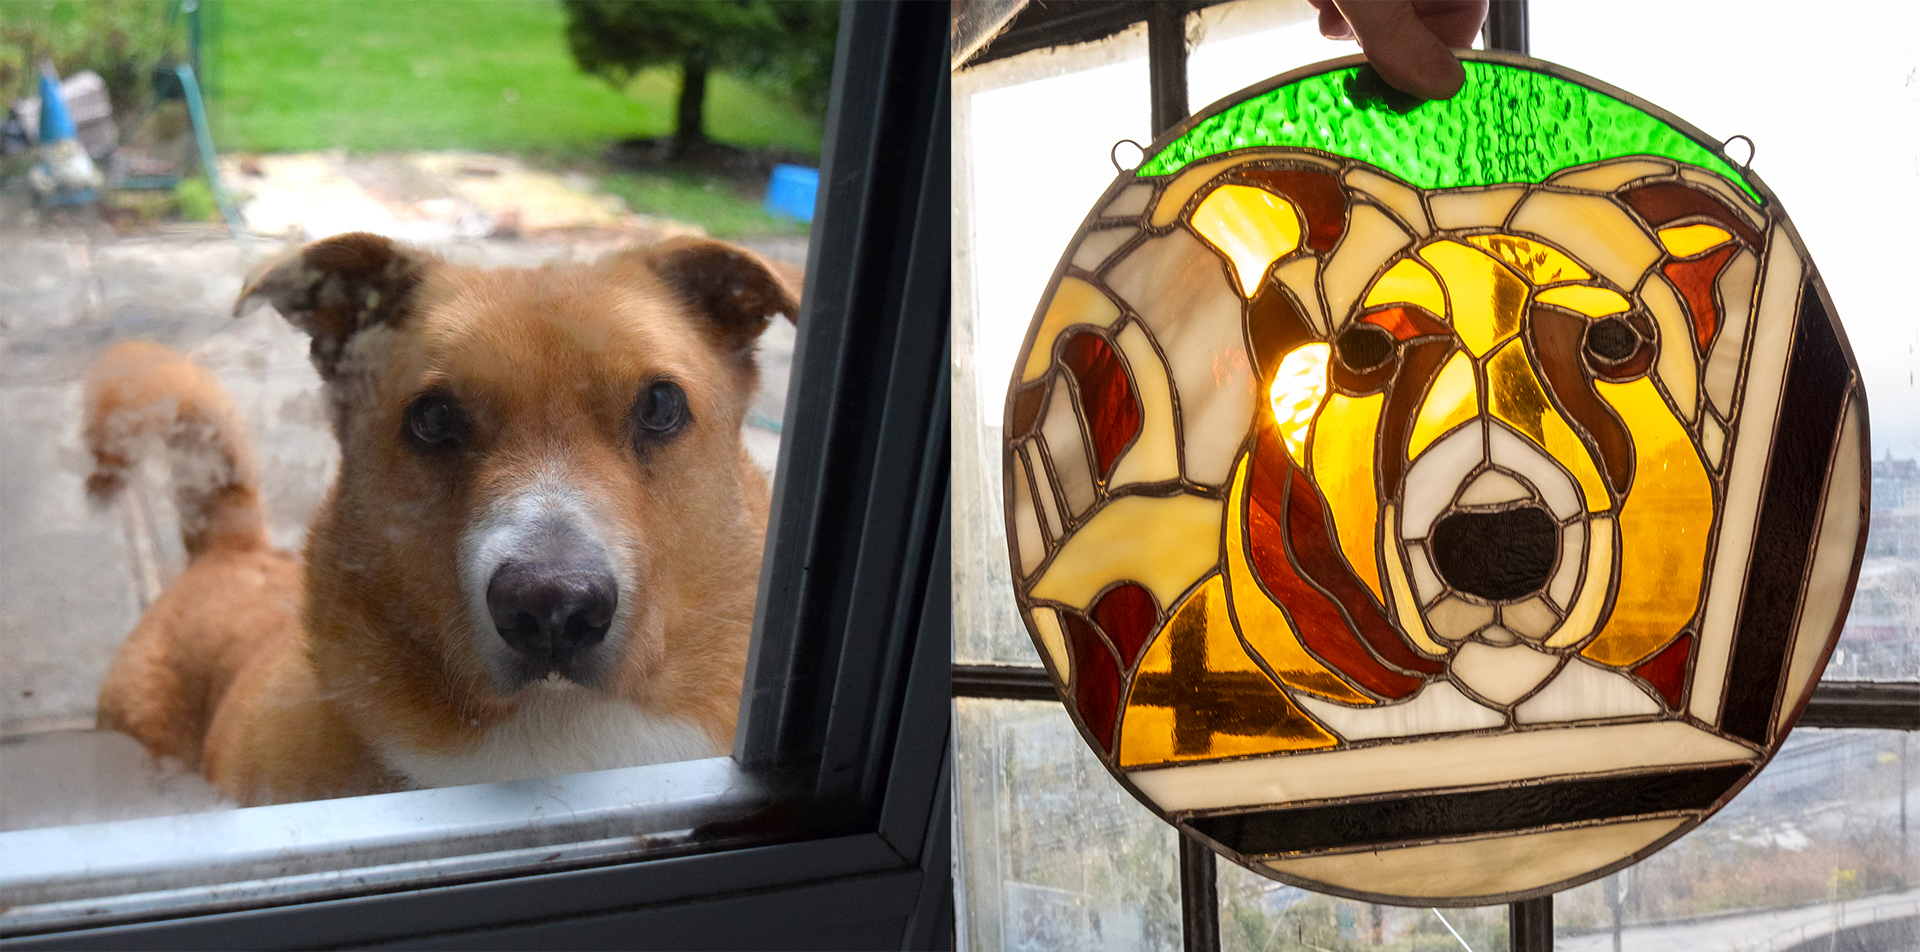
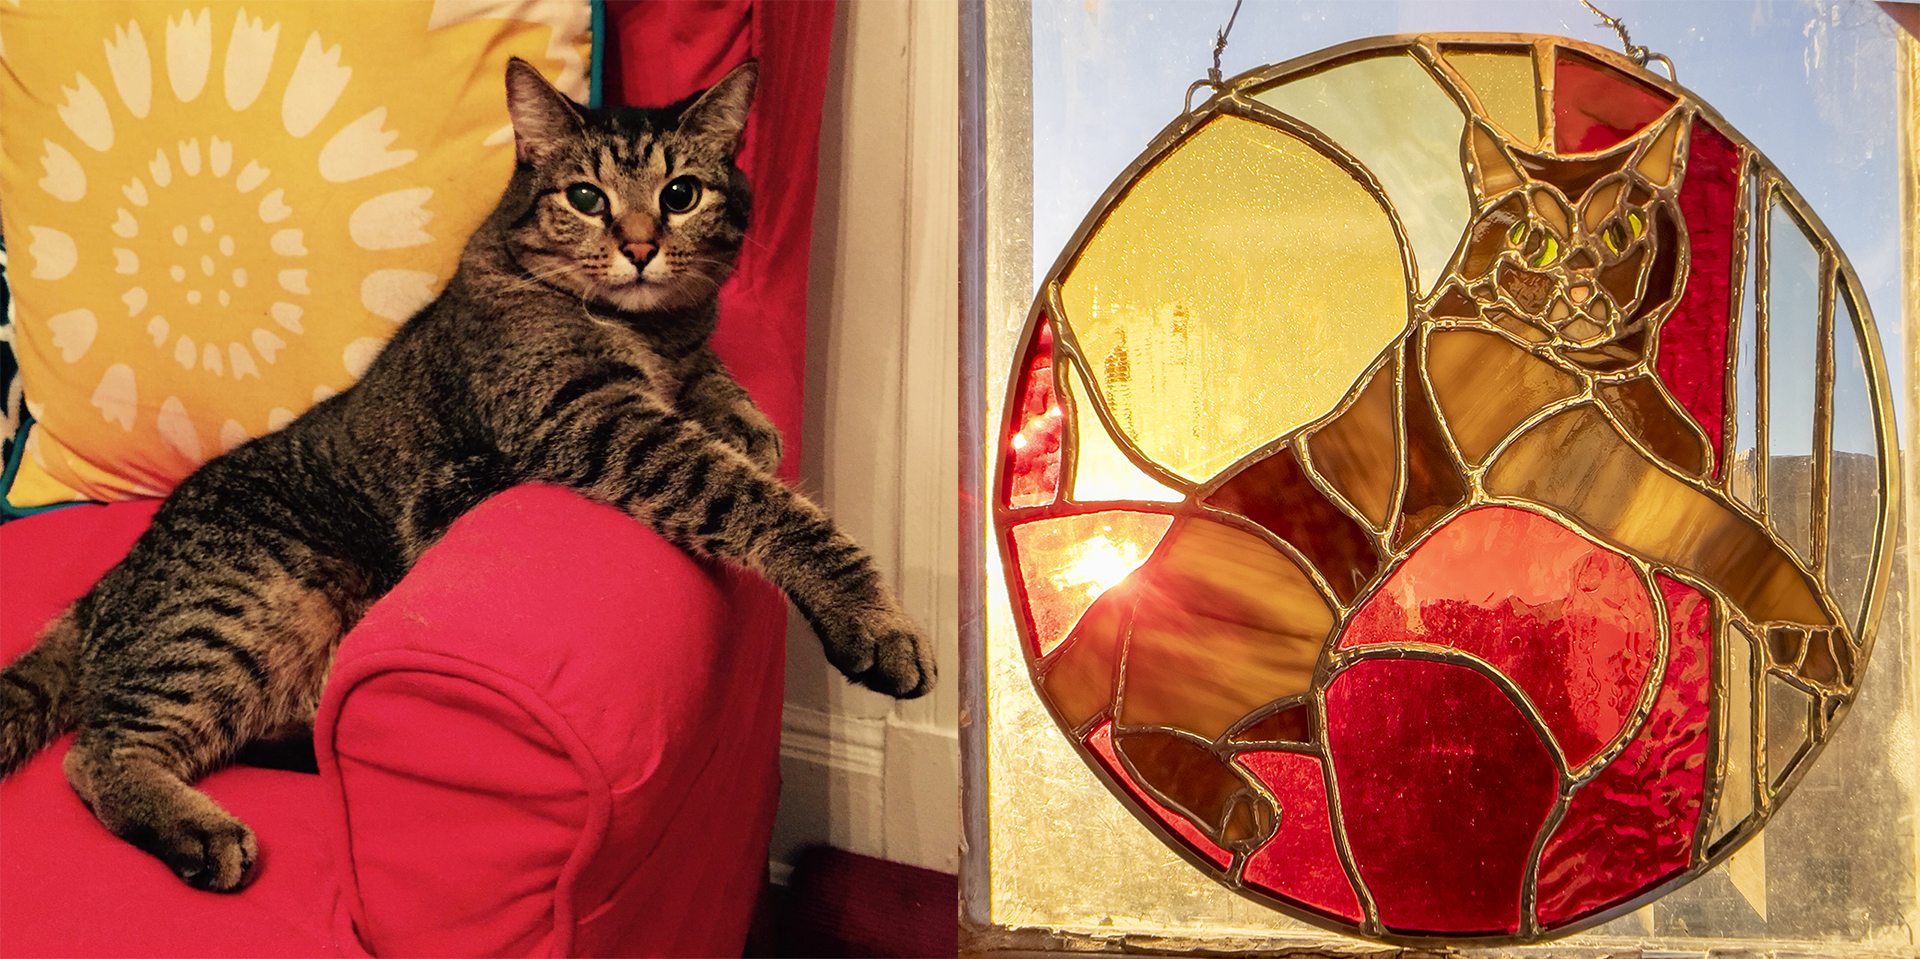
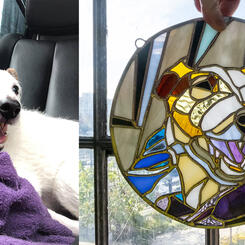
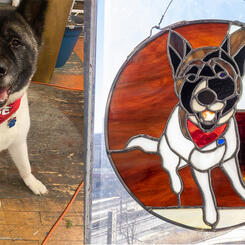
 Major
Major -
 Pedro
Pedro -
 Rocky
Rocky -
 Thurber


Brood X
-
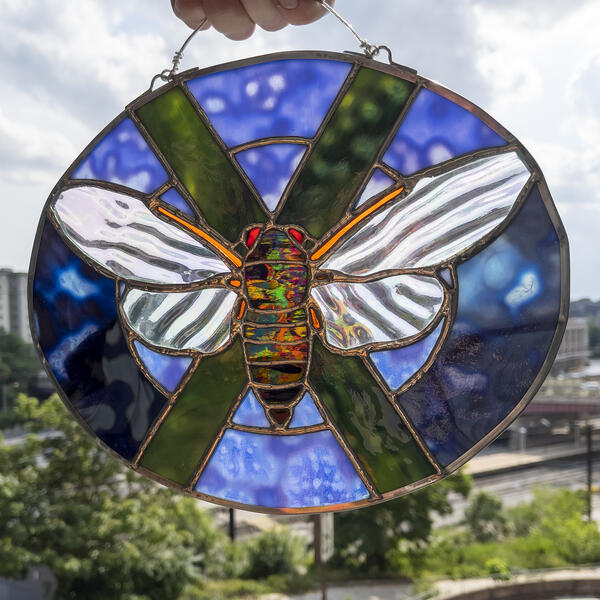
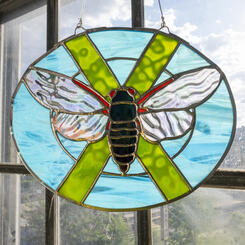
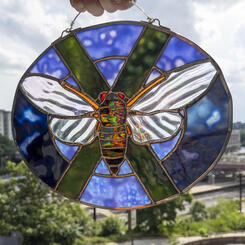
 Brood X #1The first cicada I designed to look as naturalistic as possible within the small space and shape (8x10” oval) settled on, with a sky-like wispy blue background, and and a green X that represented the fresh branches they lay there eggs in as well as the obvious denotation of “Brood X”. I chose bright red for the eyes, and orange wing accents to match the local variety of the insects, and had recently purchased a large amount of thick iridescent rippled glass at a liquidation sale so I knew I would have enough stock to reproduce the cicada itself again, and be able to experiment with different background combinations for more variety later on.This was the first piece that I ever used the same template for again, but I still wanted each one to be unique so even the similar ones are different enough to satisfy my “one-of-a-kind” motto. Having worked in production originally, I didn’t want to repeat the same designs over and over for wholesaling, so this was the one time I made a compromise and each piece afterward was still individually commissioned. Although I work like a machine, I refuse to be a mindless drone ever again.
 -
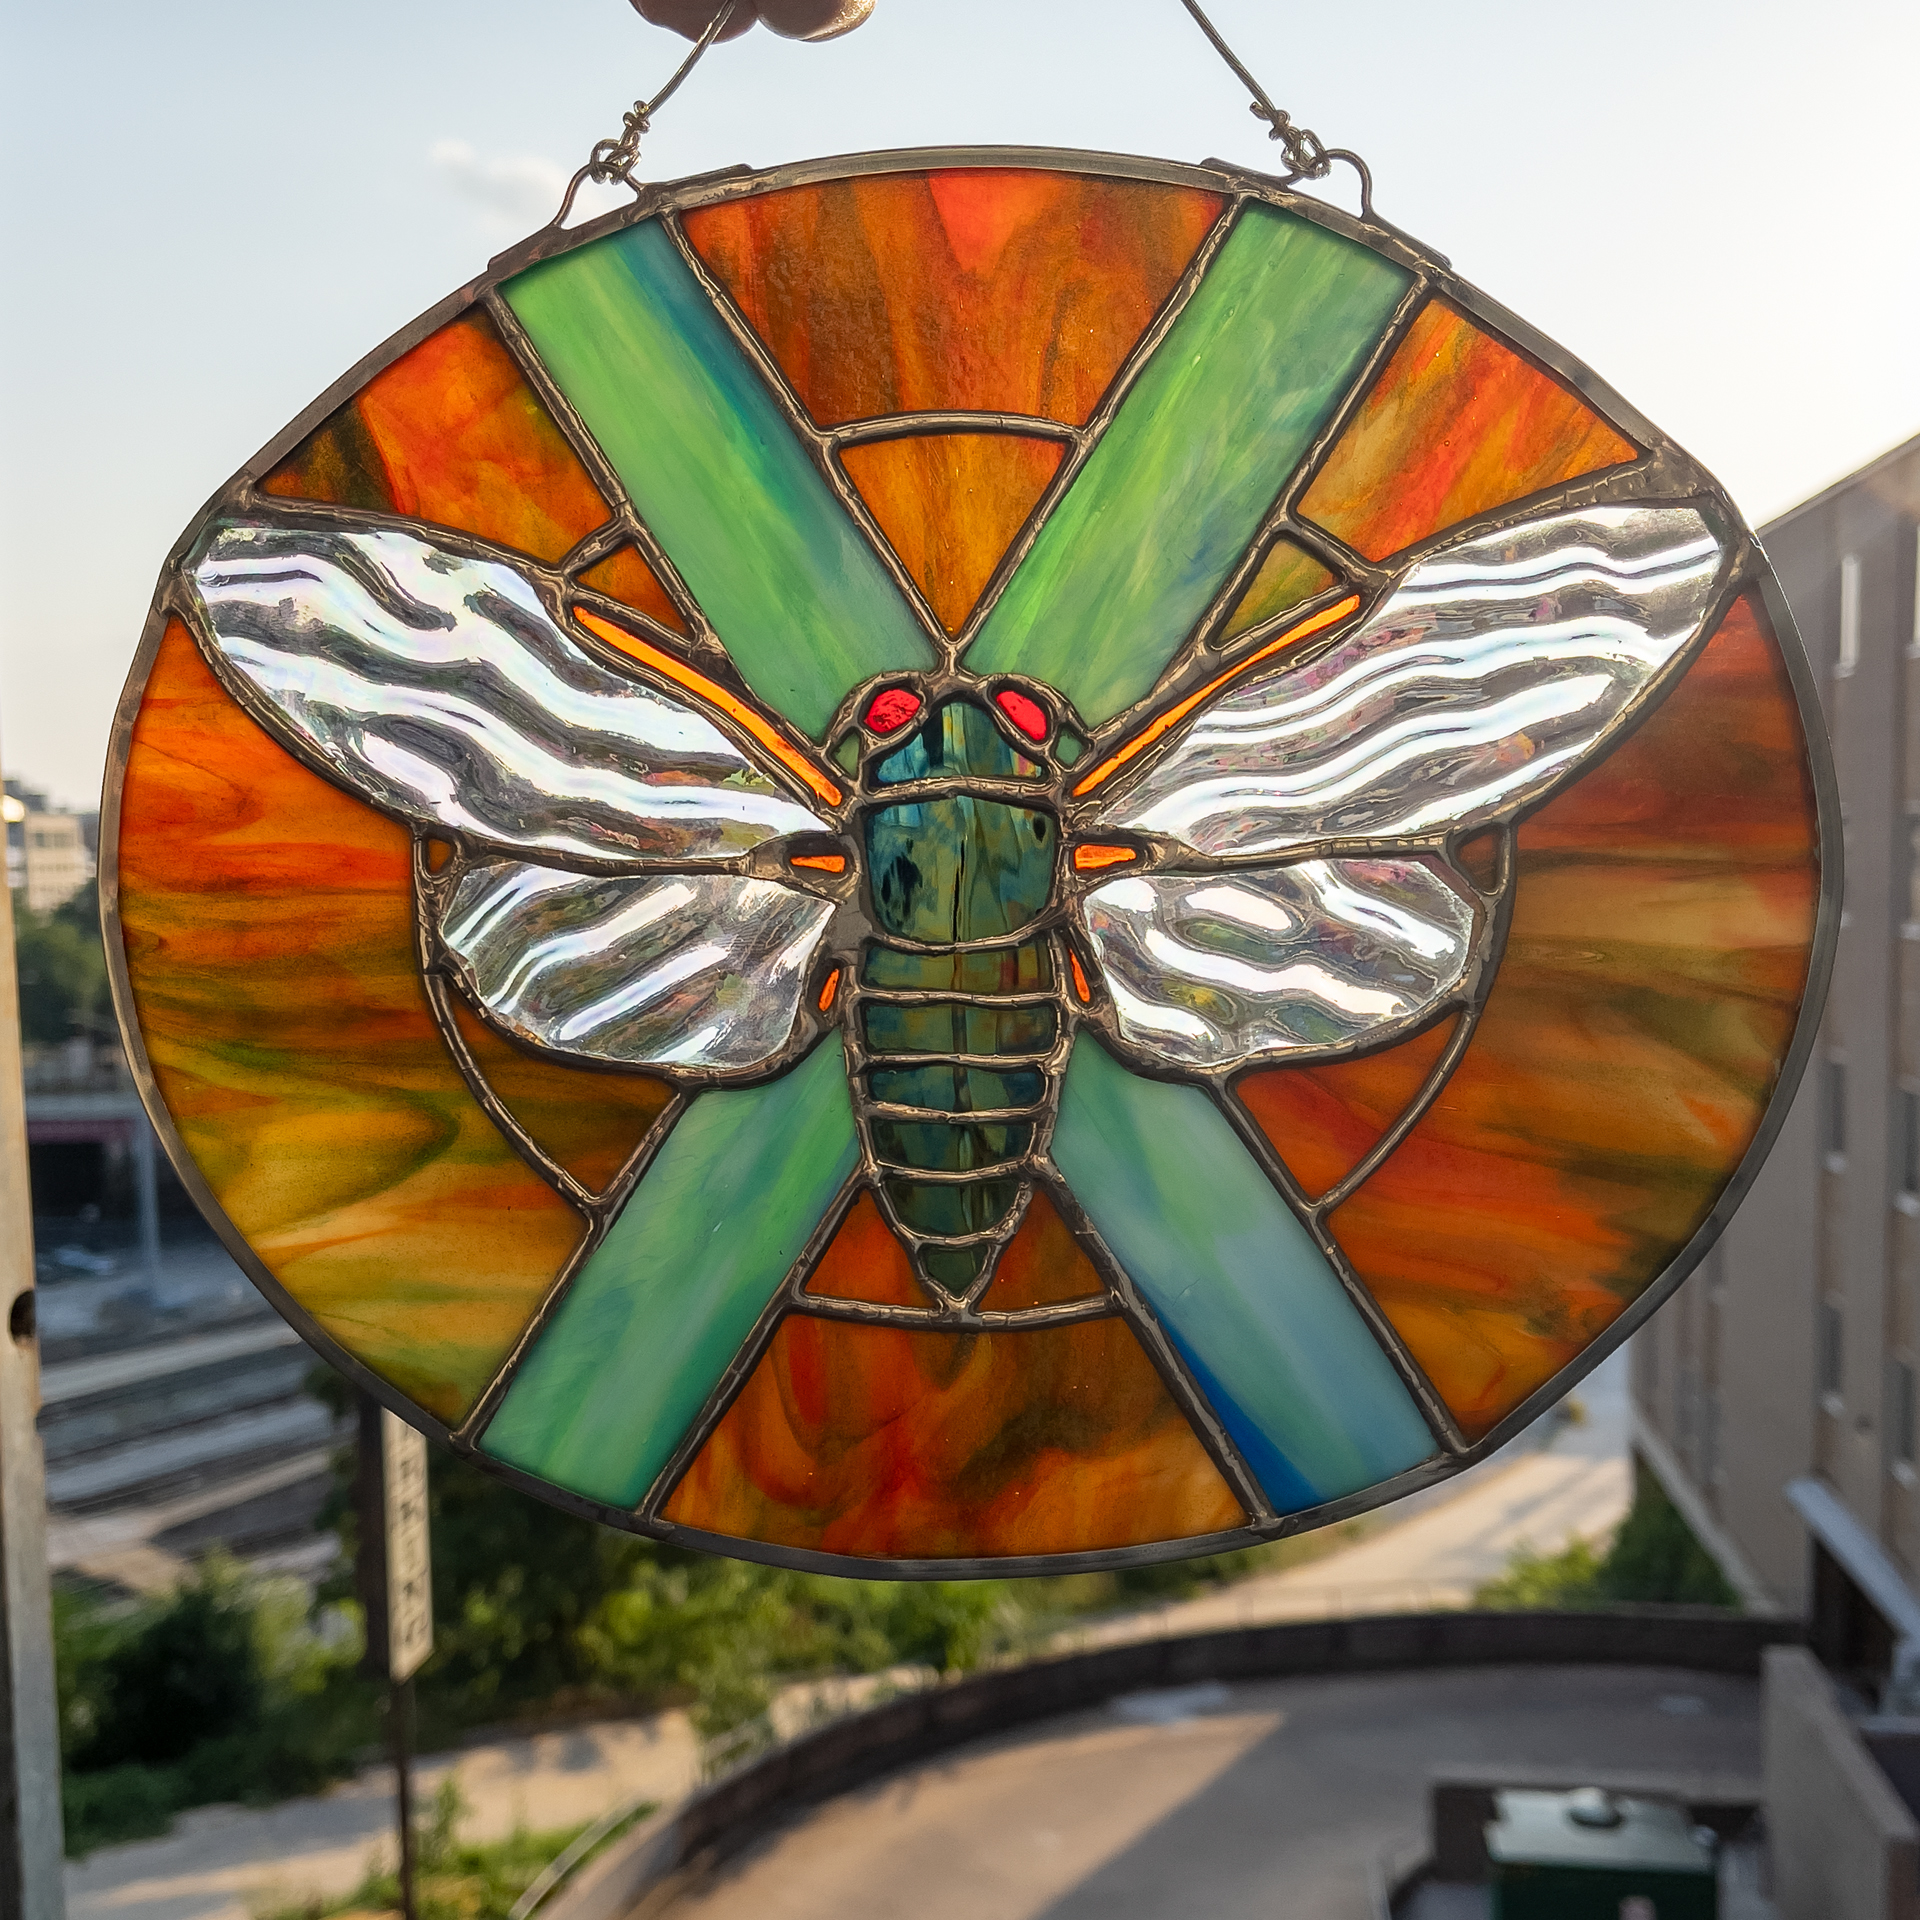
 ScreamerFor the next cicada, it was requested that I somehow give it the appearance of “screaming”, so I selected this orange/rainbow glass that definitely screamed! The client absolutely loved it, and so do I.
 -
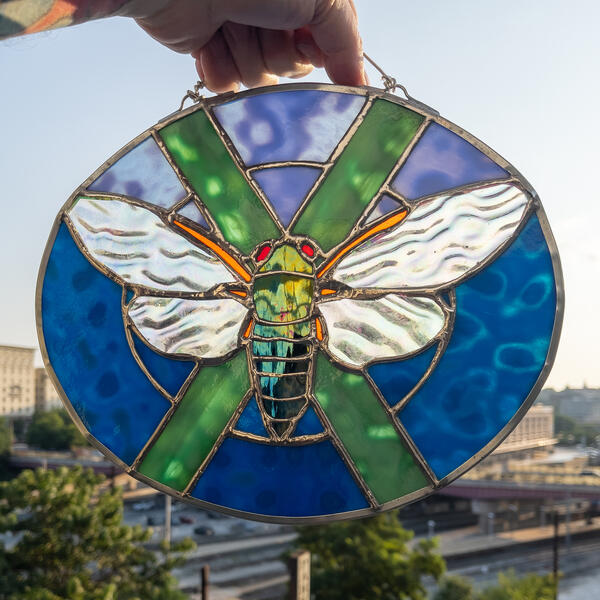
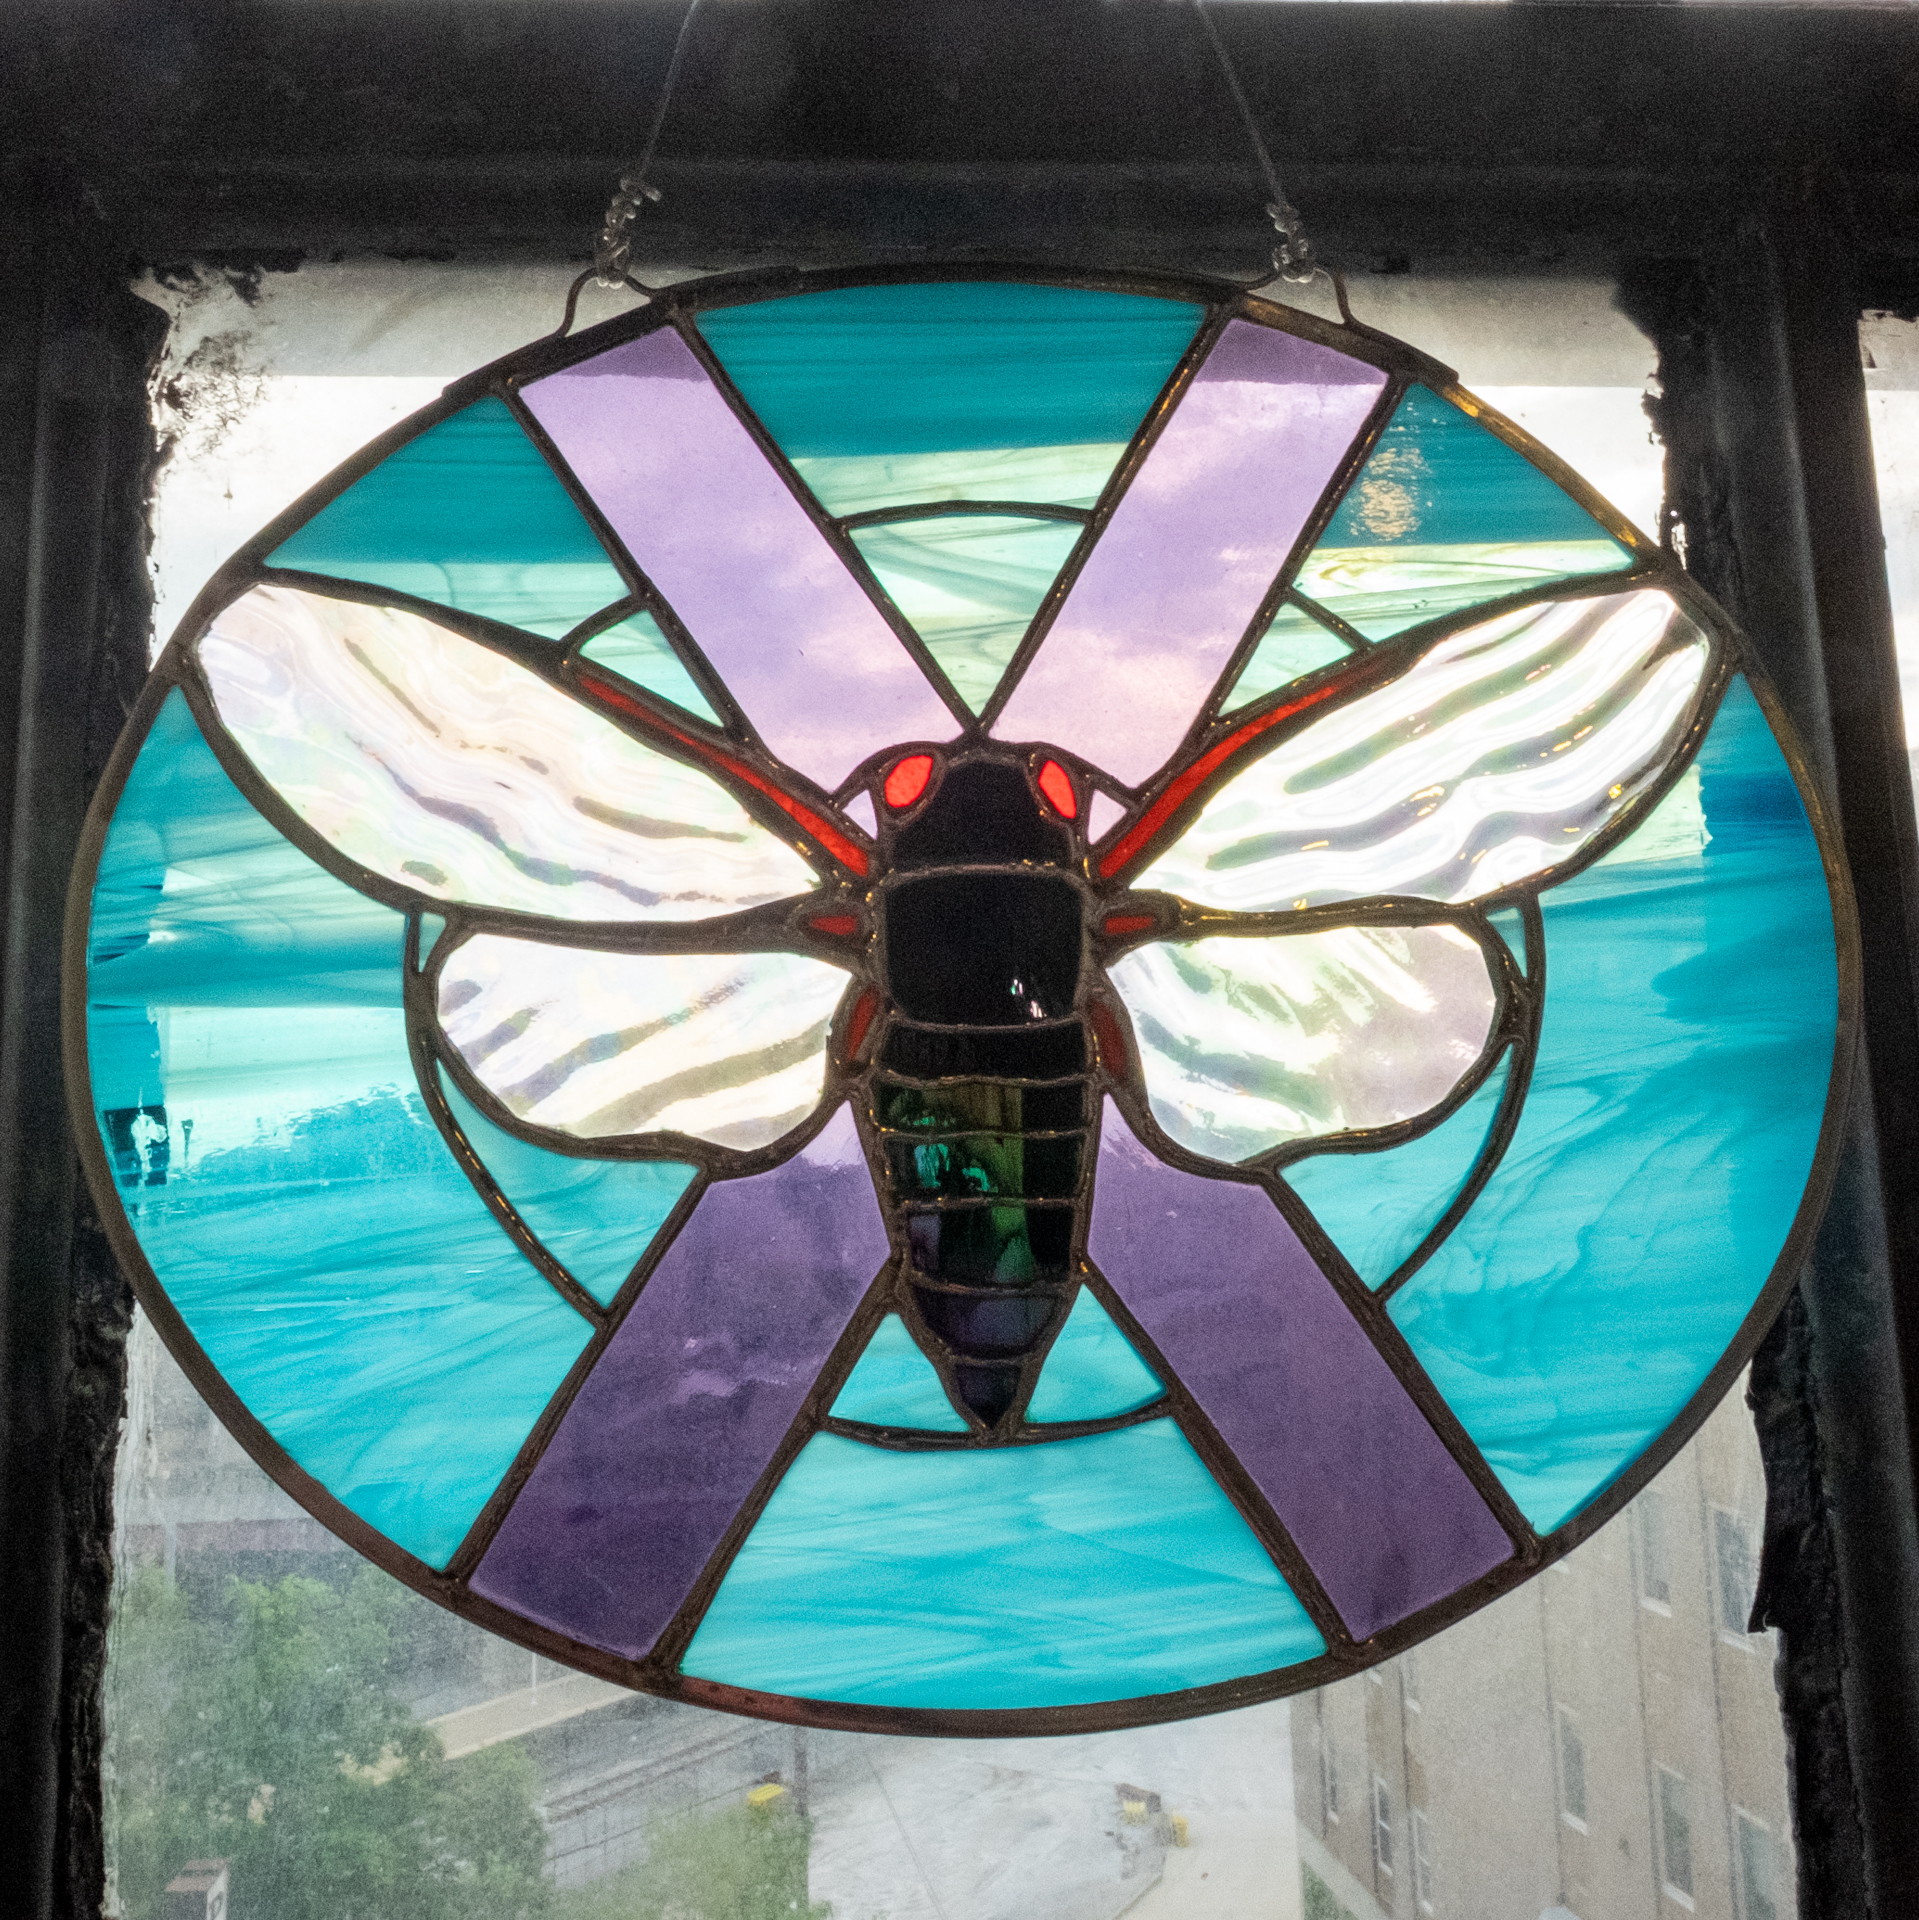
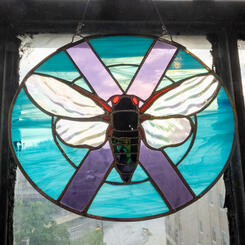
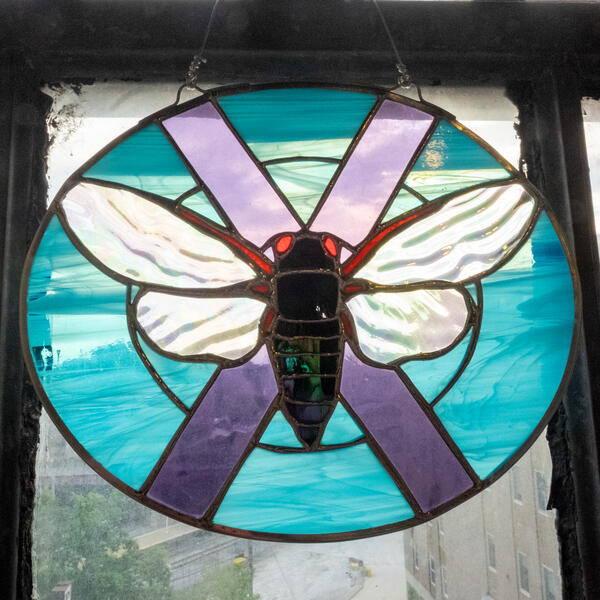 Football FanThe third cicada was commissioned for a Ravens fan, so a purple X was added.
 -
 Psycho ScreamerAfter making 2 similar orange Screamers, I was out of the original rainbow glass I had in stock, and was unable to purchase any more as the factory that made it had been shut down due to Covid and my supplier had none left in their stock. I selected another type of glass that I felt would best have a similar effect, and Screamer #3 was born.
 -
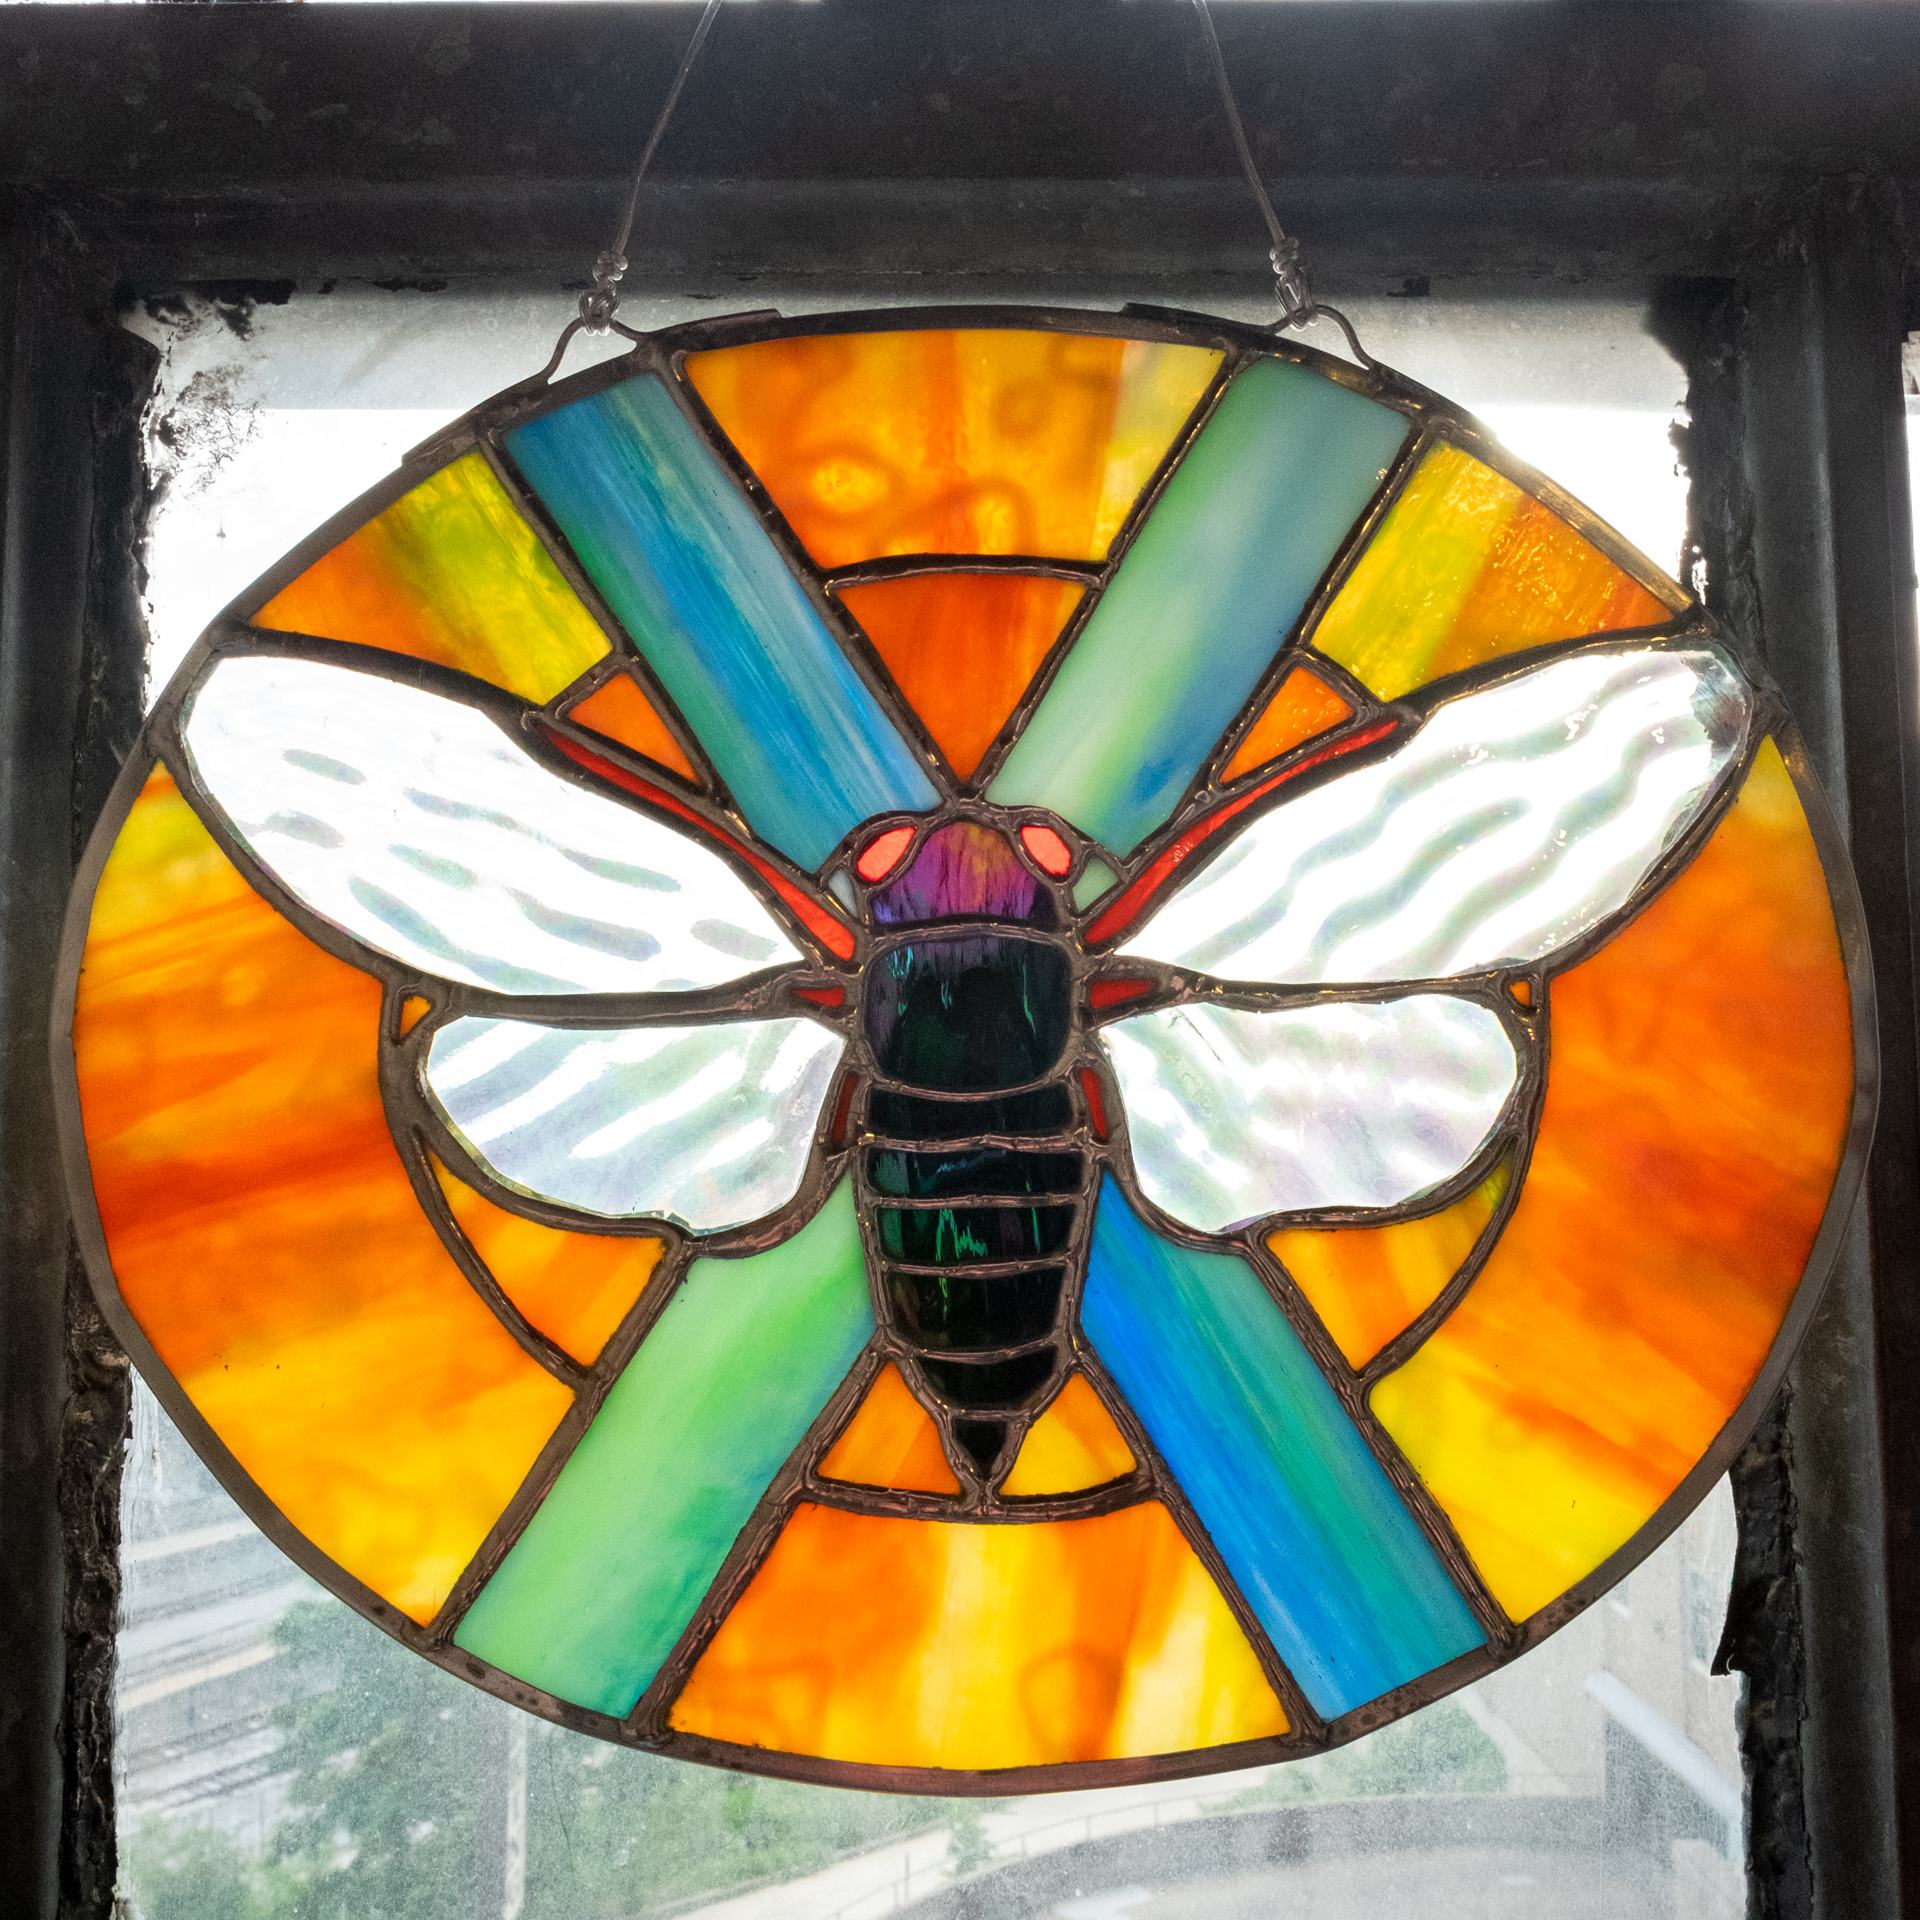
 StormyFor the next one it was requested that I make the sky look “stormy”, and I had purchased this purple glass similar to the orange/rainbow glass from the original Screamer. I intentionally alternated the darker and lighter shades to reproduce a stormcloud reflecting a lightning flash, and it came out even better than expected!
 -
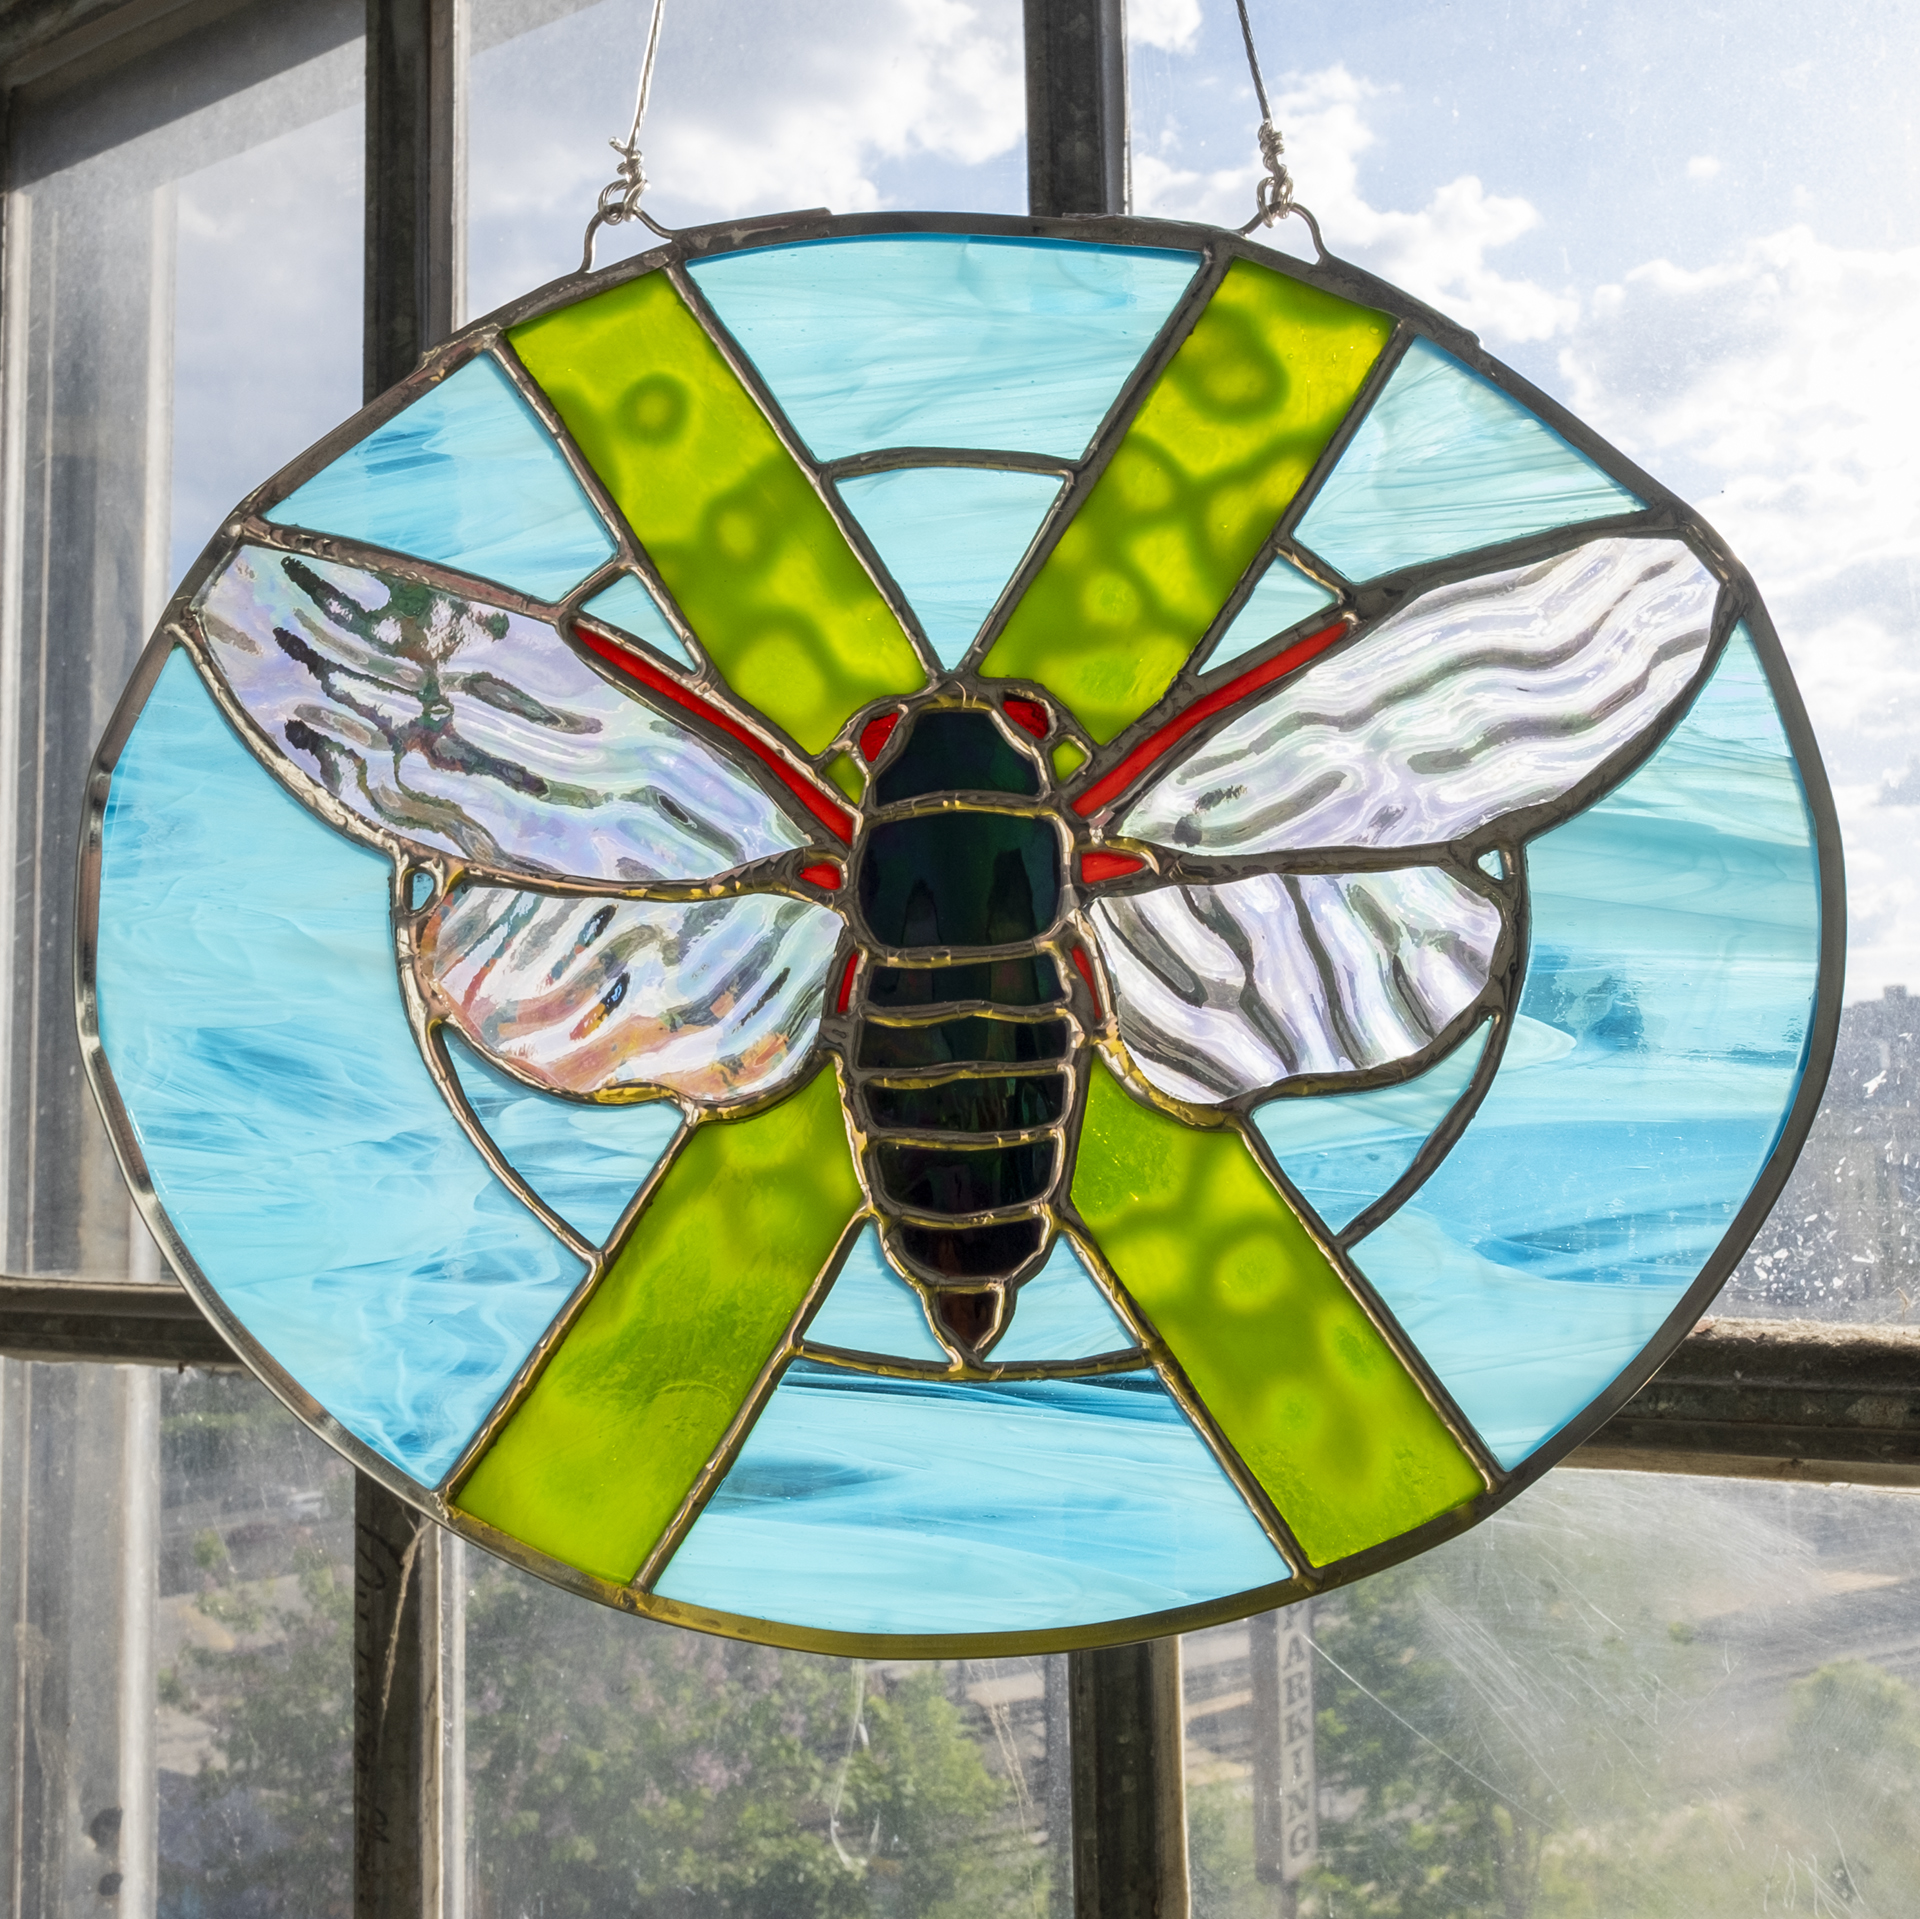
 Stormy #2The last variation of the series is another Stormy, but this one represents a passing storm and brighter future, so I selected a lighter blue for the top to suggest clearer skies ahead.


Saint Christopher (Biggie Smalls/Notorious B.I.G. Portrait)
-
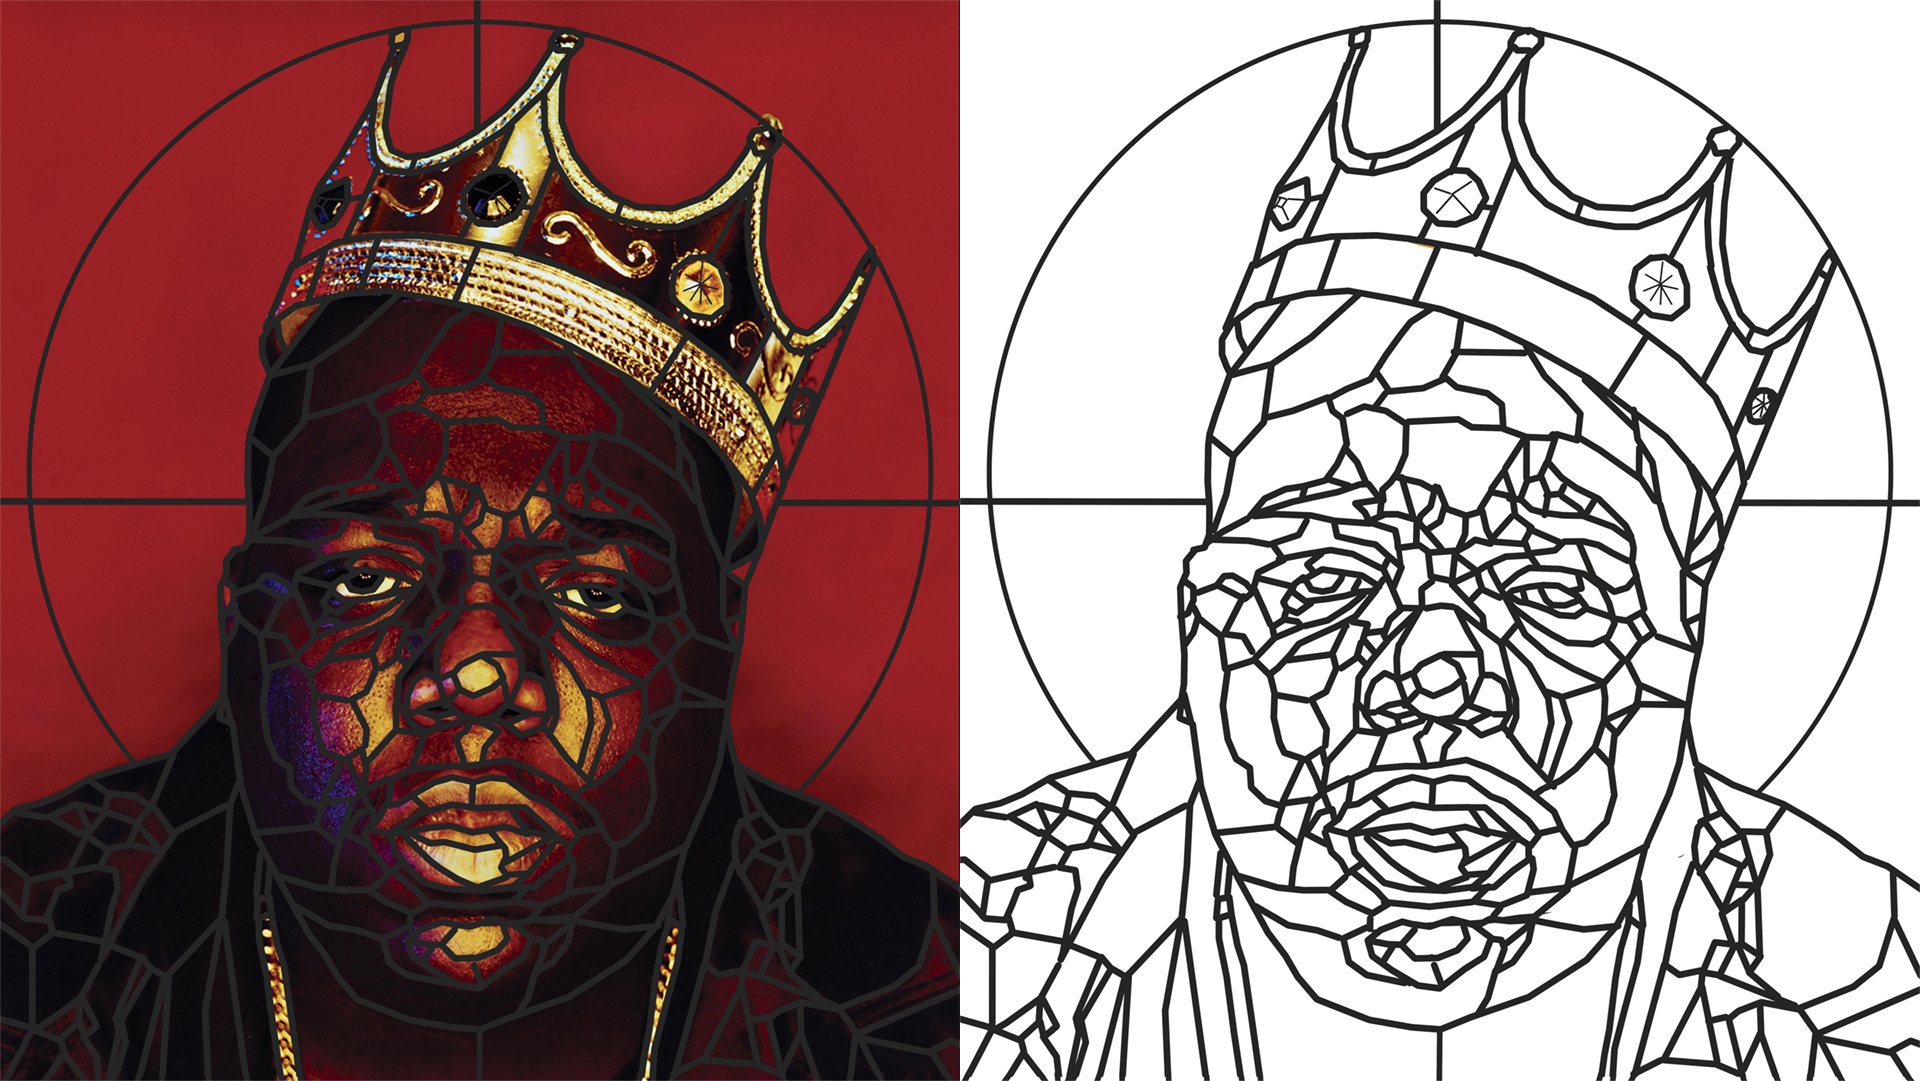
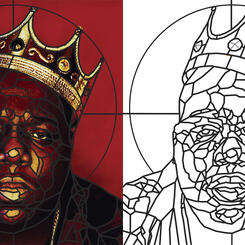
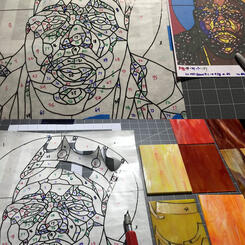
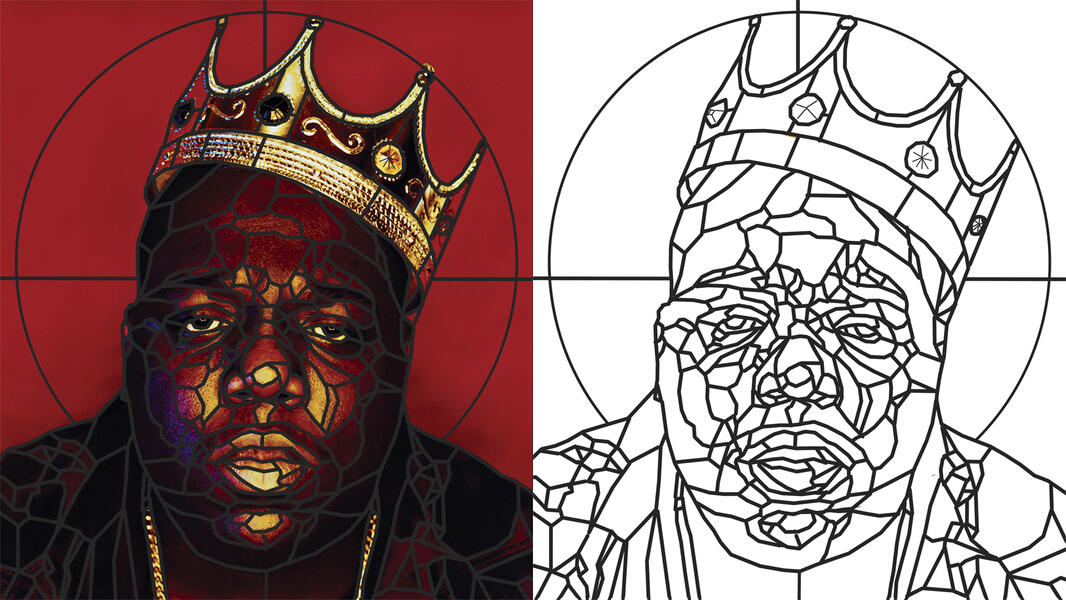 Design Step 1The image is cropped to the same proportions as the frame I will use, then traced with the pen tool at color/contrast points to create a line drawing template which is then printed out to be traced onto contact paper in the 3rd step. (Original photo ©Barron Claiborne)
 -
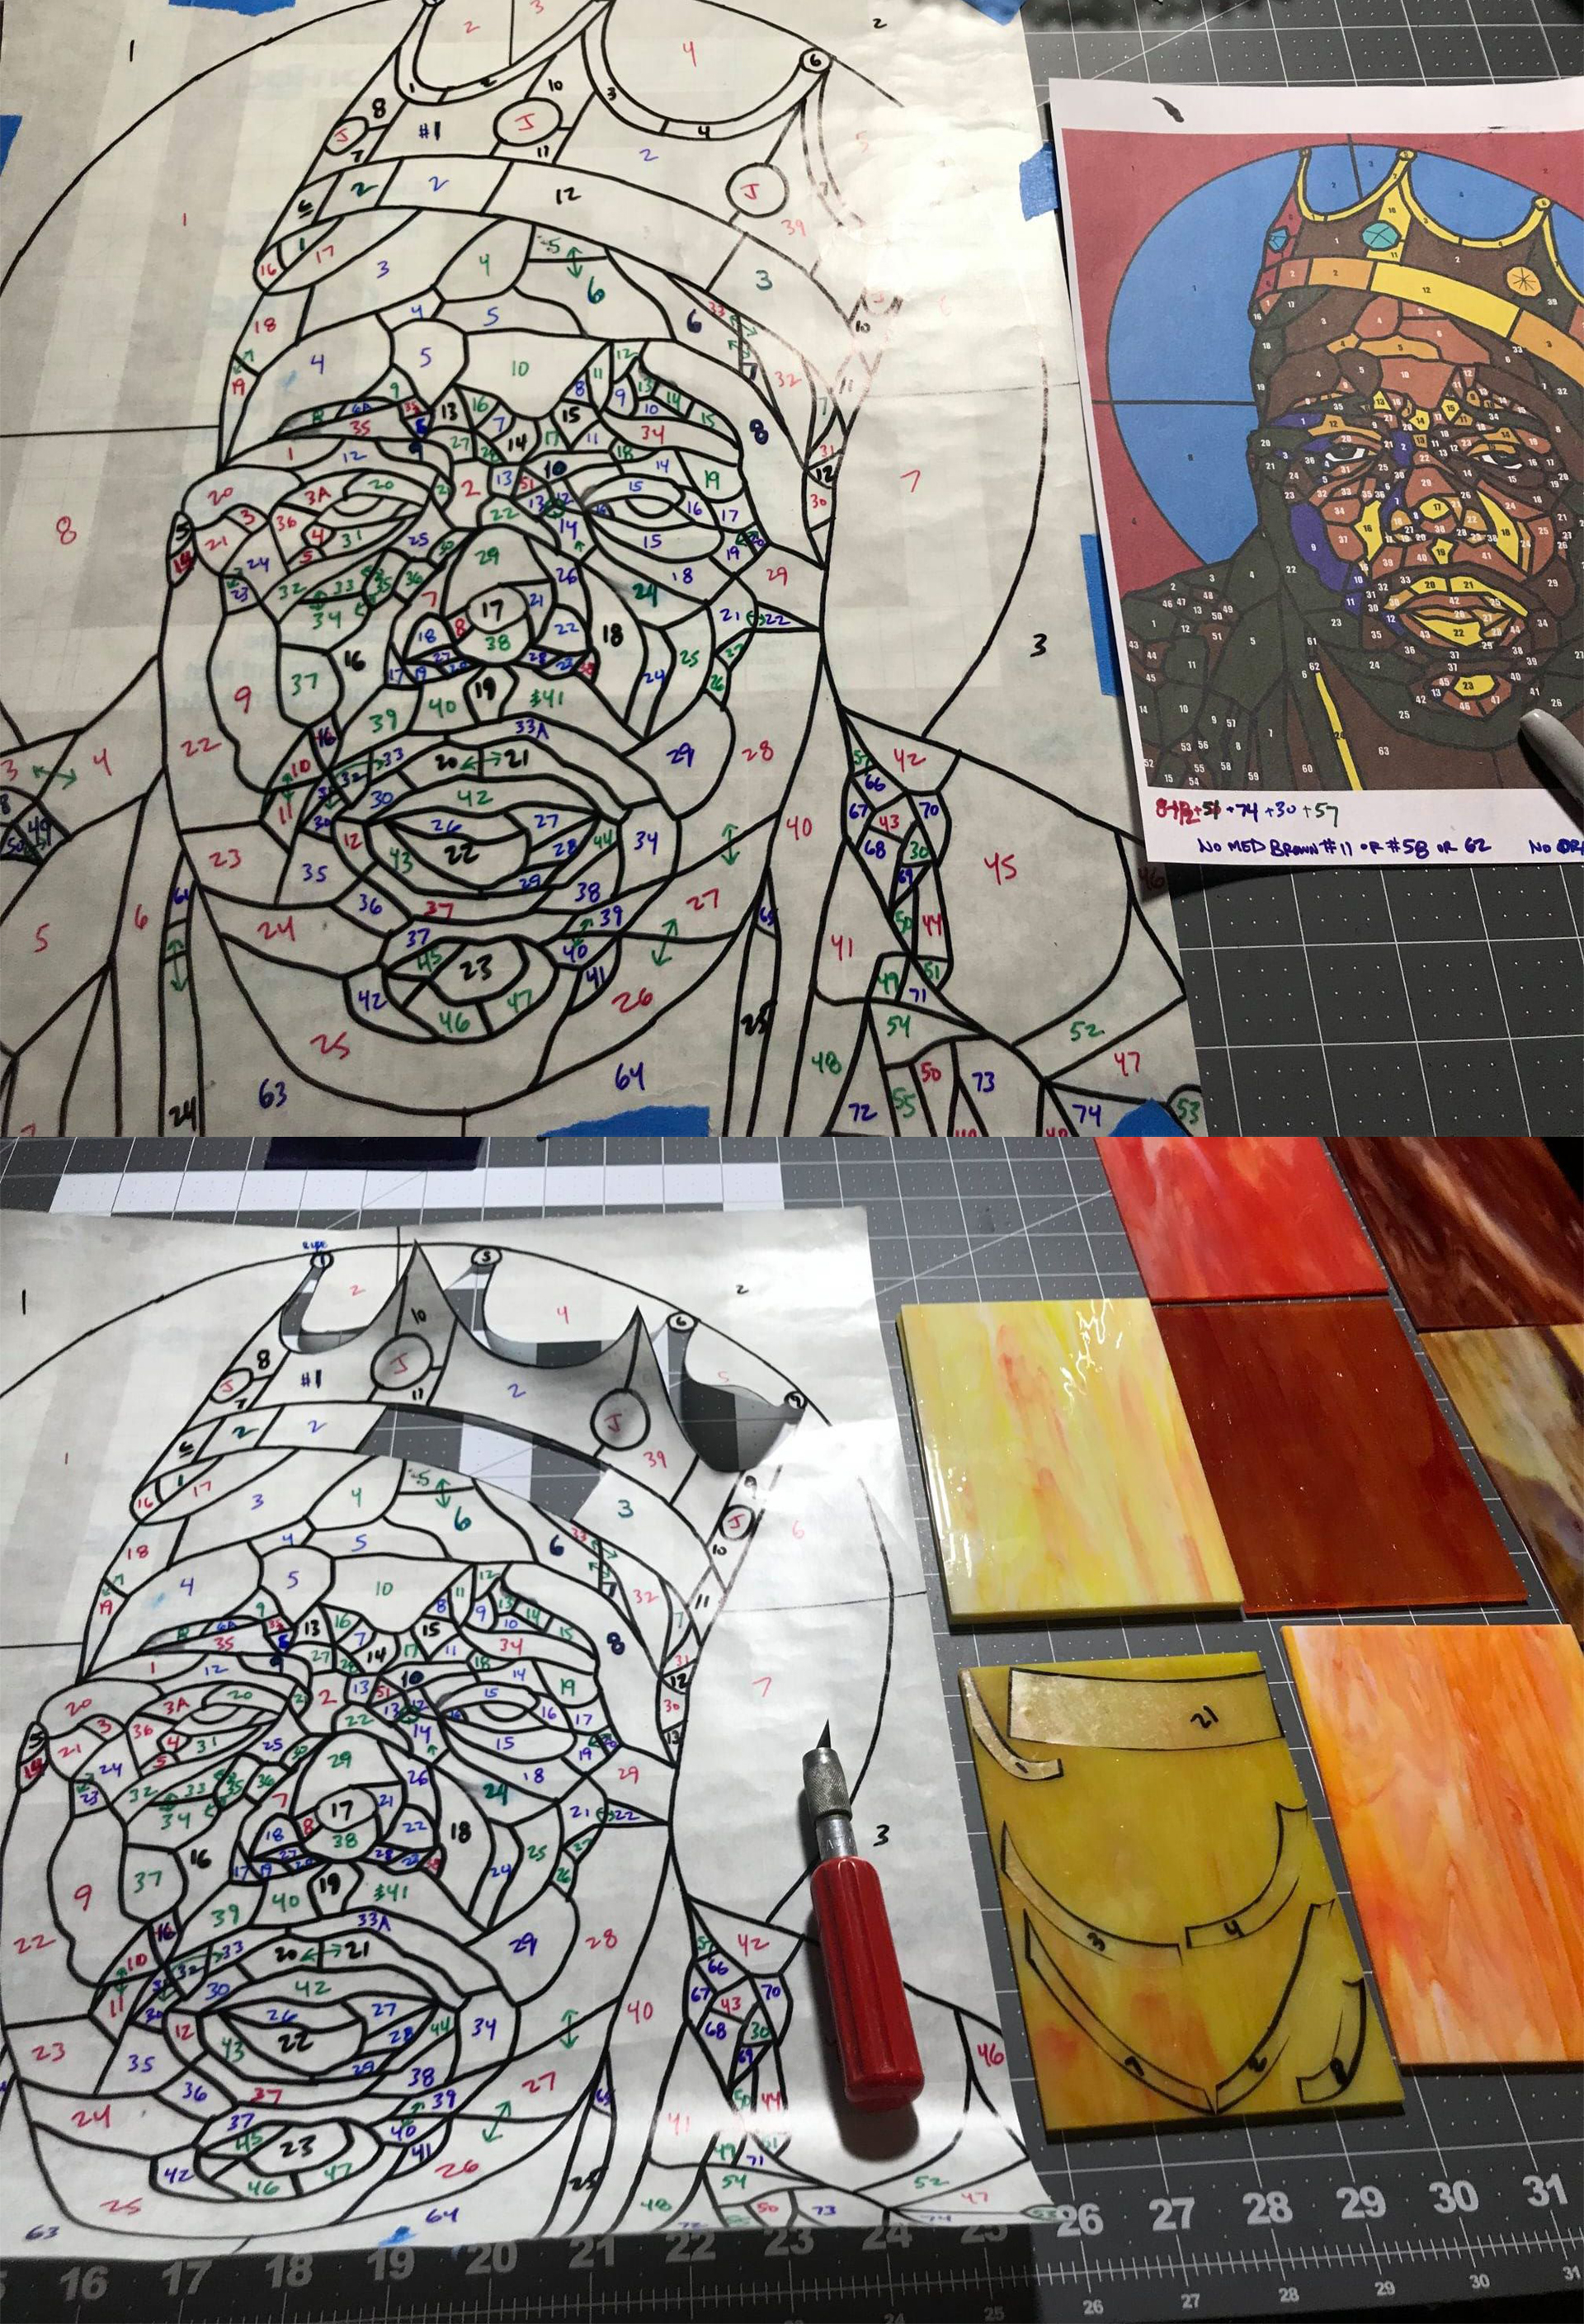
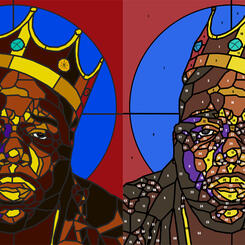
 Design Step 2The shapes are colored in to represent the colored glass, actual colors will vary greatly. The colored shapes are then numbered to create a color key, which is also printed out and used to keep track of all the pieces.
 -
 Making and cutting the templateThe full sized paper template is traced onto contact paper with marker and numbered to match the key, and then the shapes are cut out and affixed to the glass in the most appropriate spots, where patterns in the glass act as brushstrokes.
 -
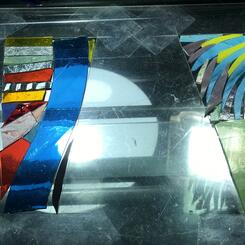
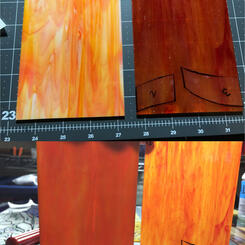
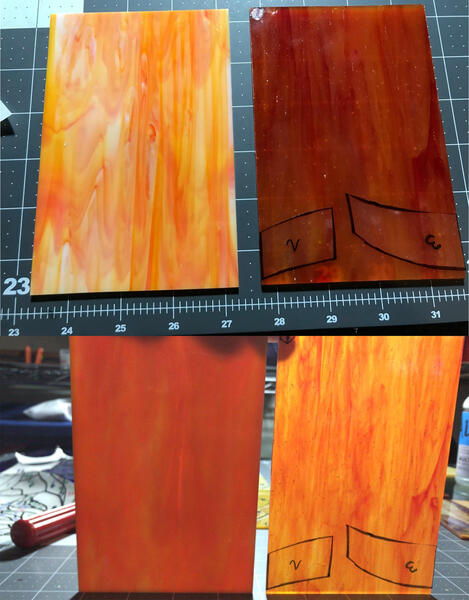 Glass OpacityWhen selecting the glass opacity is also a contributing factor, the piece on the left appears brighter than the piece on the right when the light is only reflecting on it, but is actually much darker in terms of opacity when light passes through it.
 -
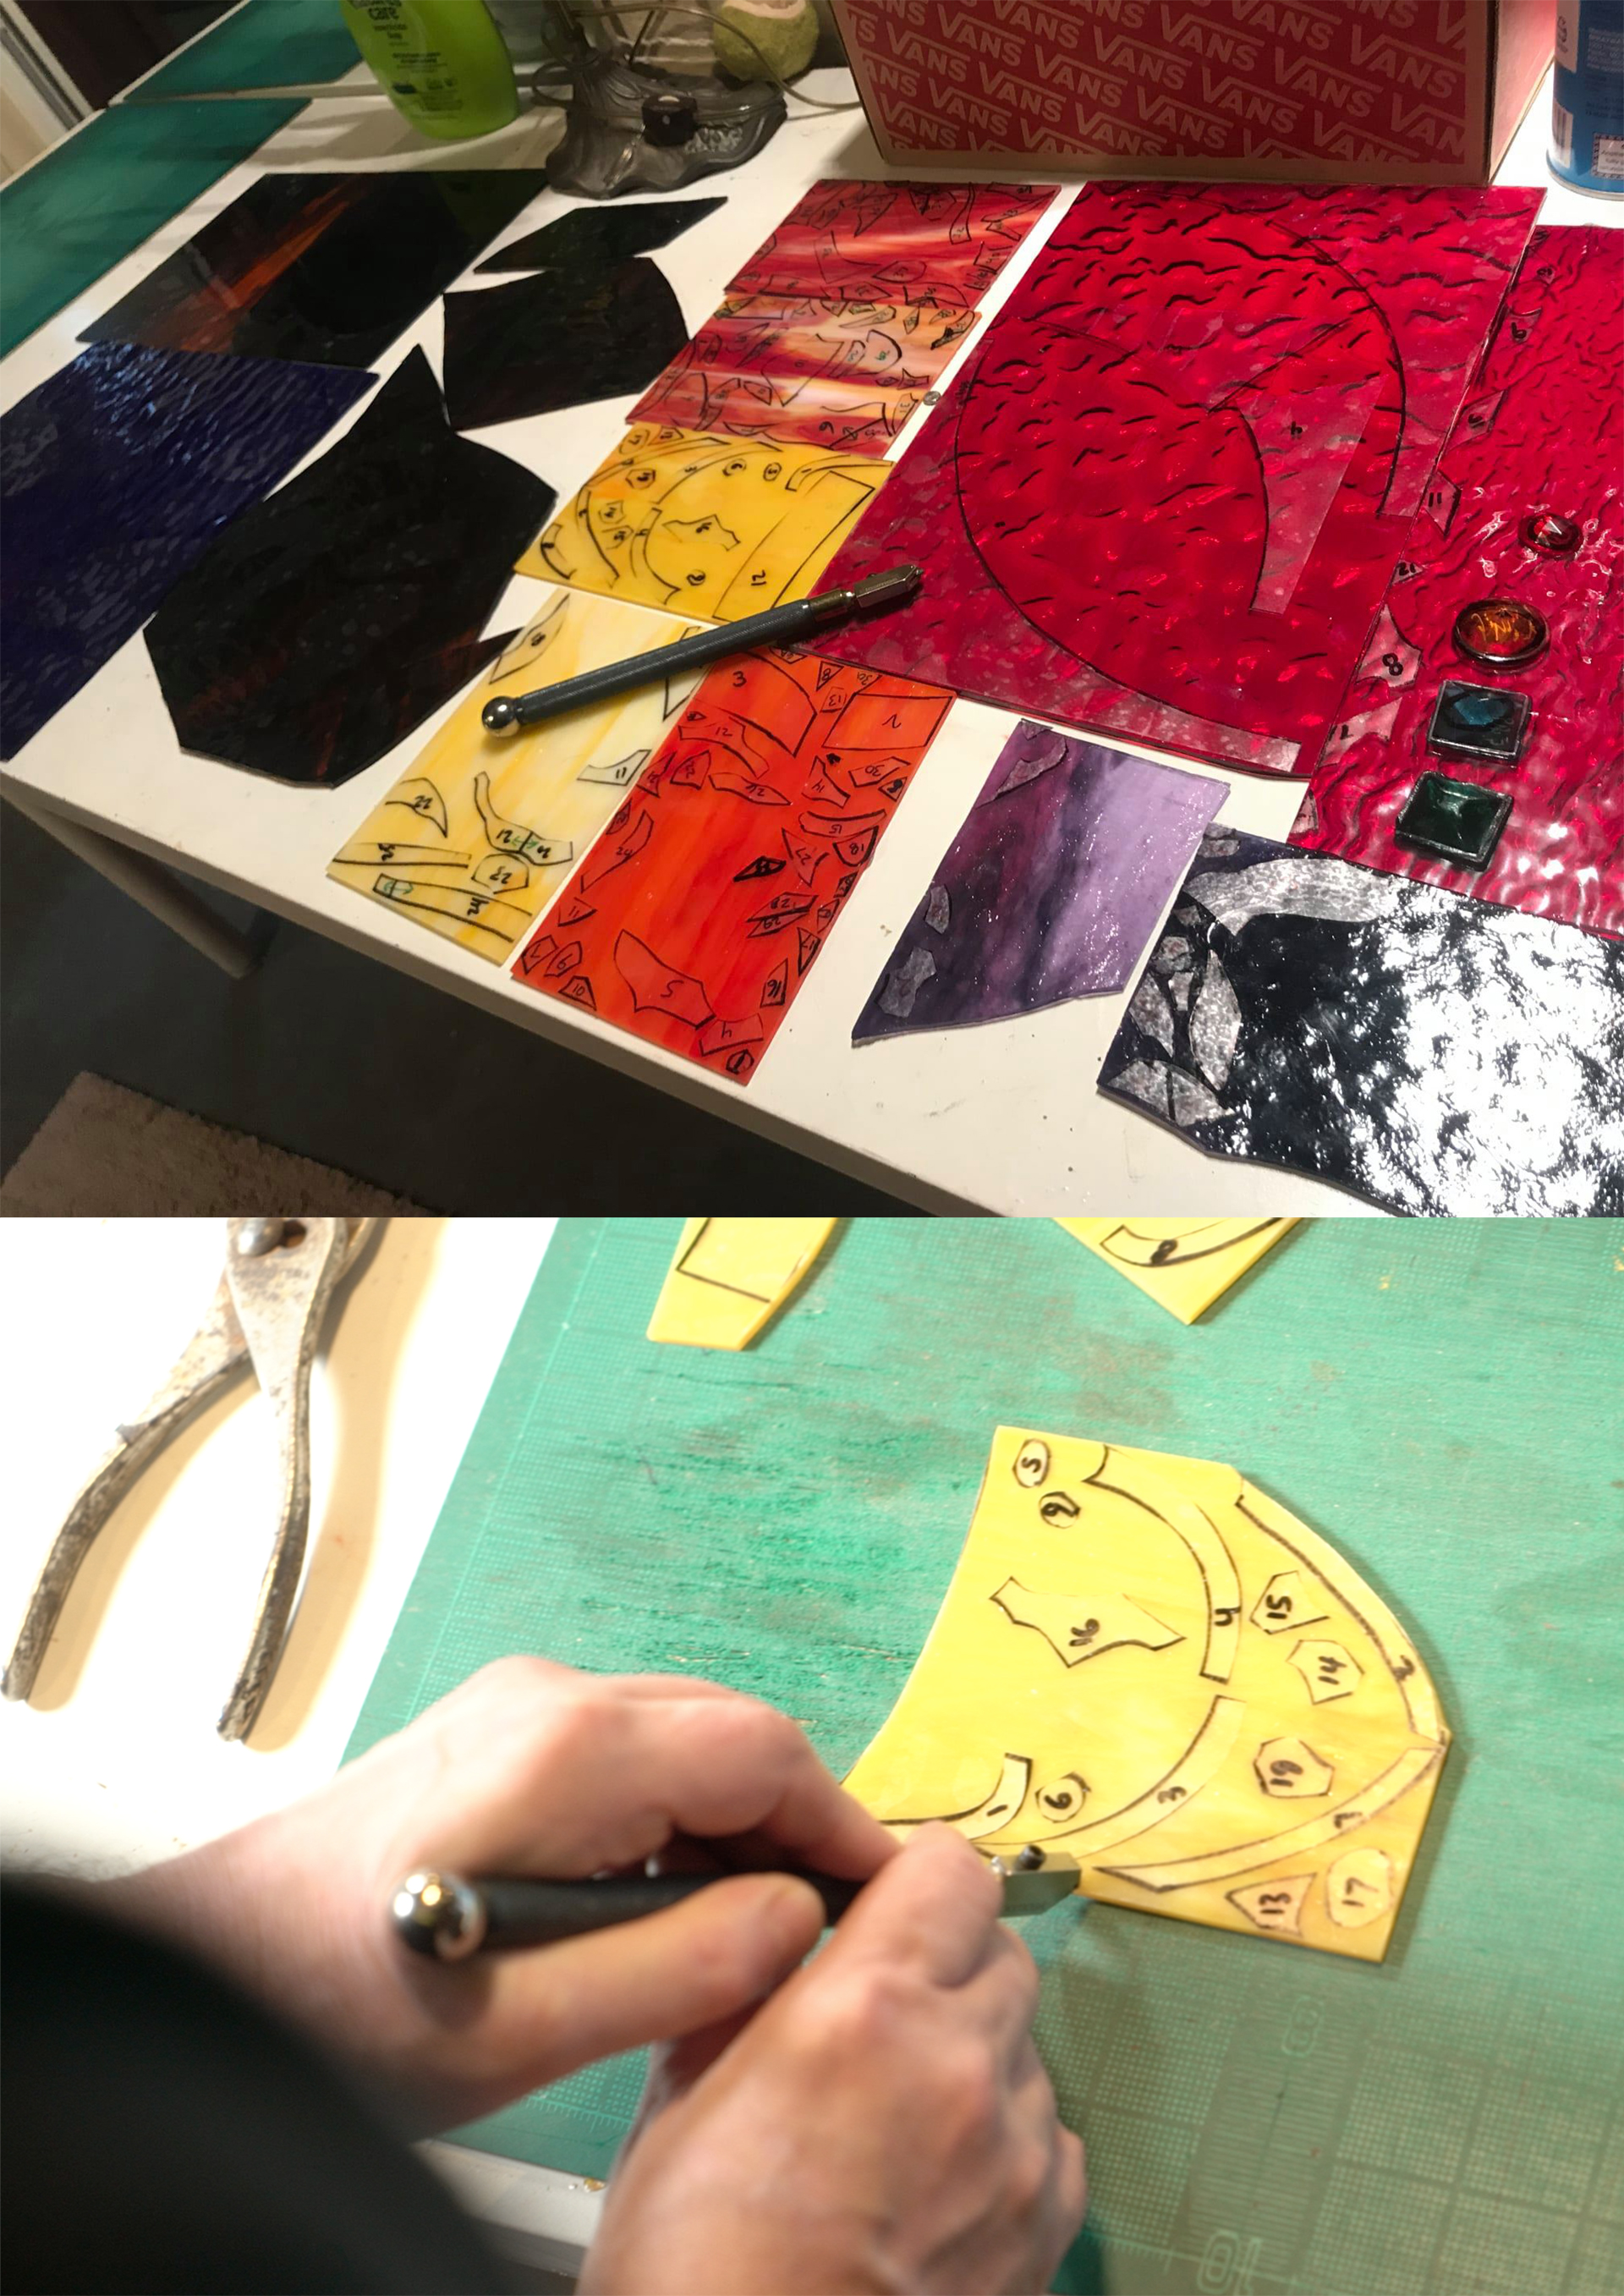
 Cutting the glassThe glass is not technically cut, but scored across the surface with firm even pressure and then broken along those score lines. Cuts must be from edge to edge, and curves cannot generally be tighter than 90°. Density and hardness greatly varies.
 -
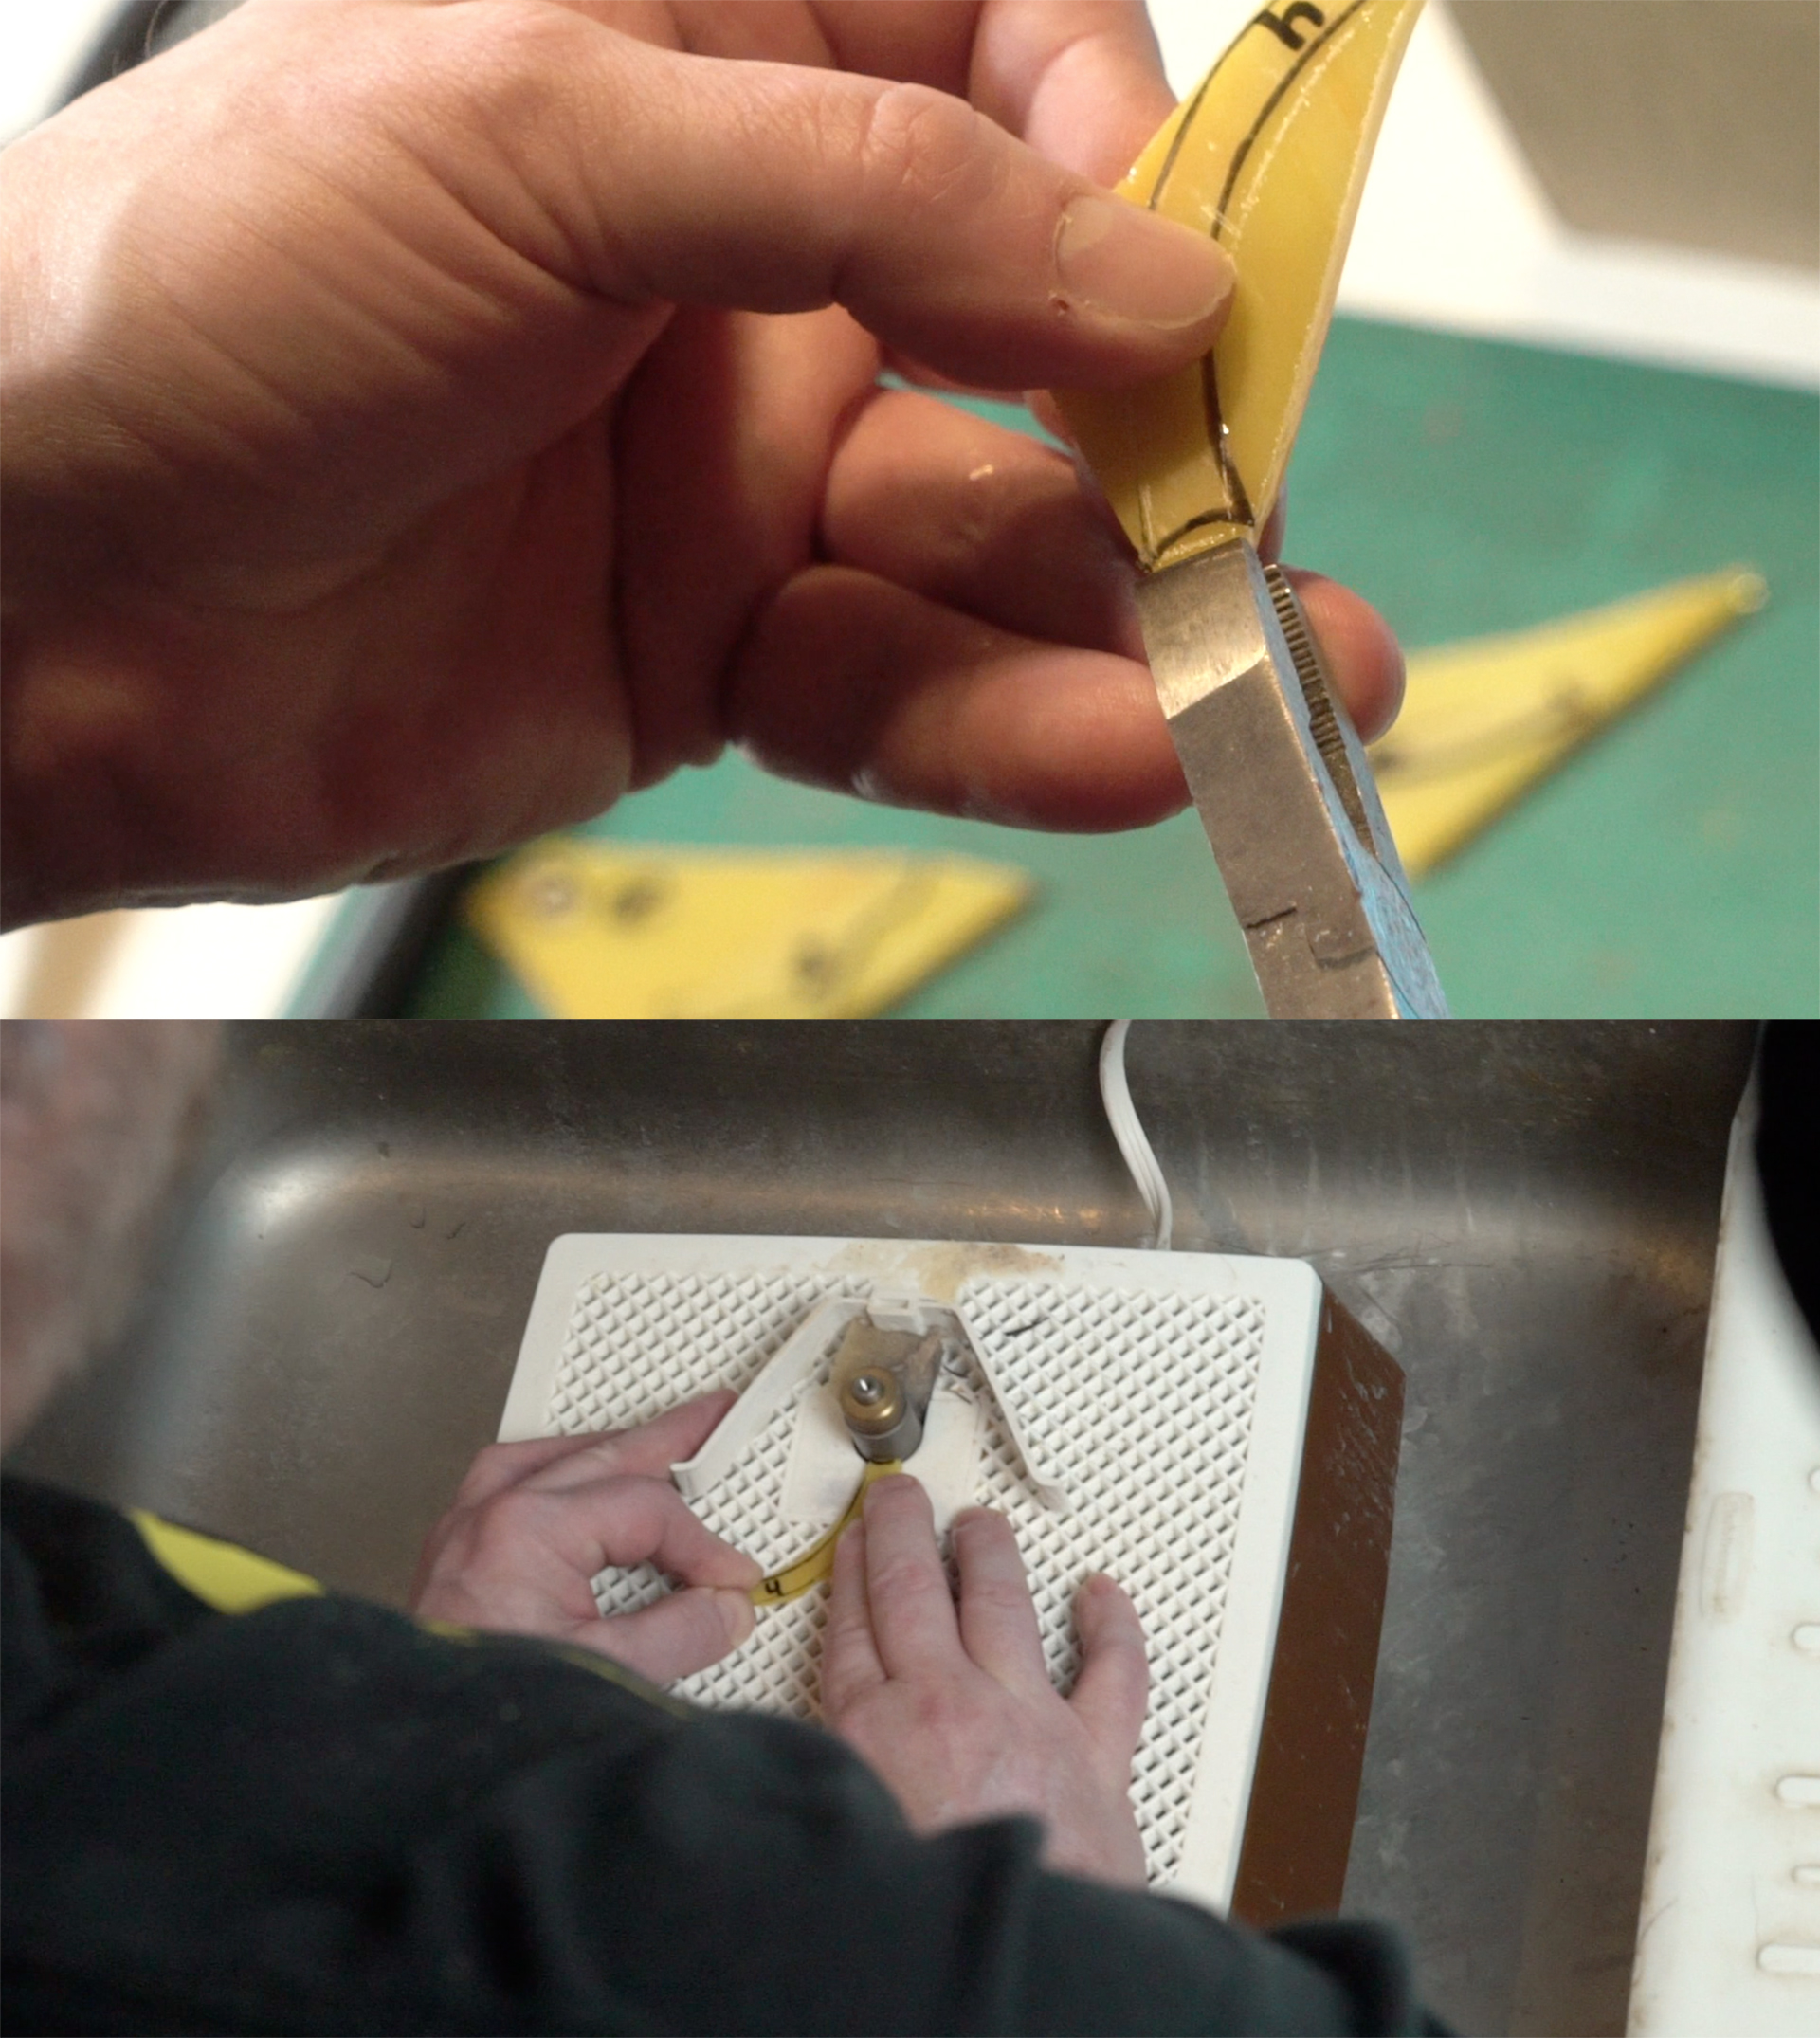
 Grozing and grindingUsing grozing pliers, after scoring along all of the edges of the contact paper, the excess glass is broken off of the pieces being used. Then the edges are further shaped and finally smoothed with a water-cooled rotating diamond coated vertical bit.
 -
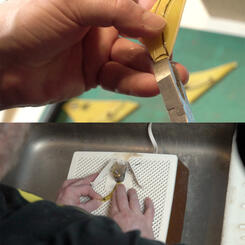
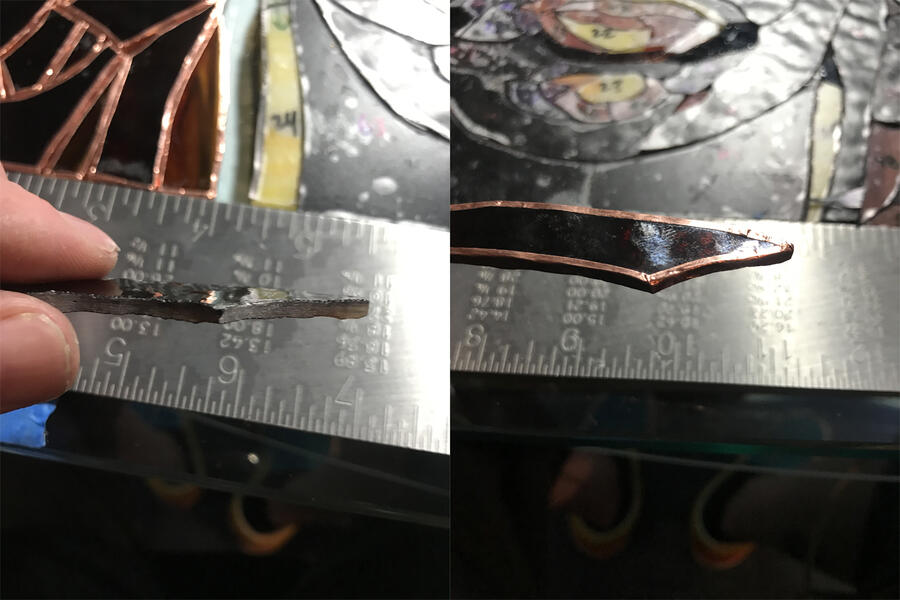 Copper foilingA thin strip of foil that comes in varying widths (to accommodate varying thicknesses) and colored backings is applied to the entire edge of the glass, evenly overlapping both sides of the glass. Silver backed foil is used on clear pieces to match the solder.
 -
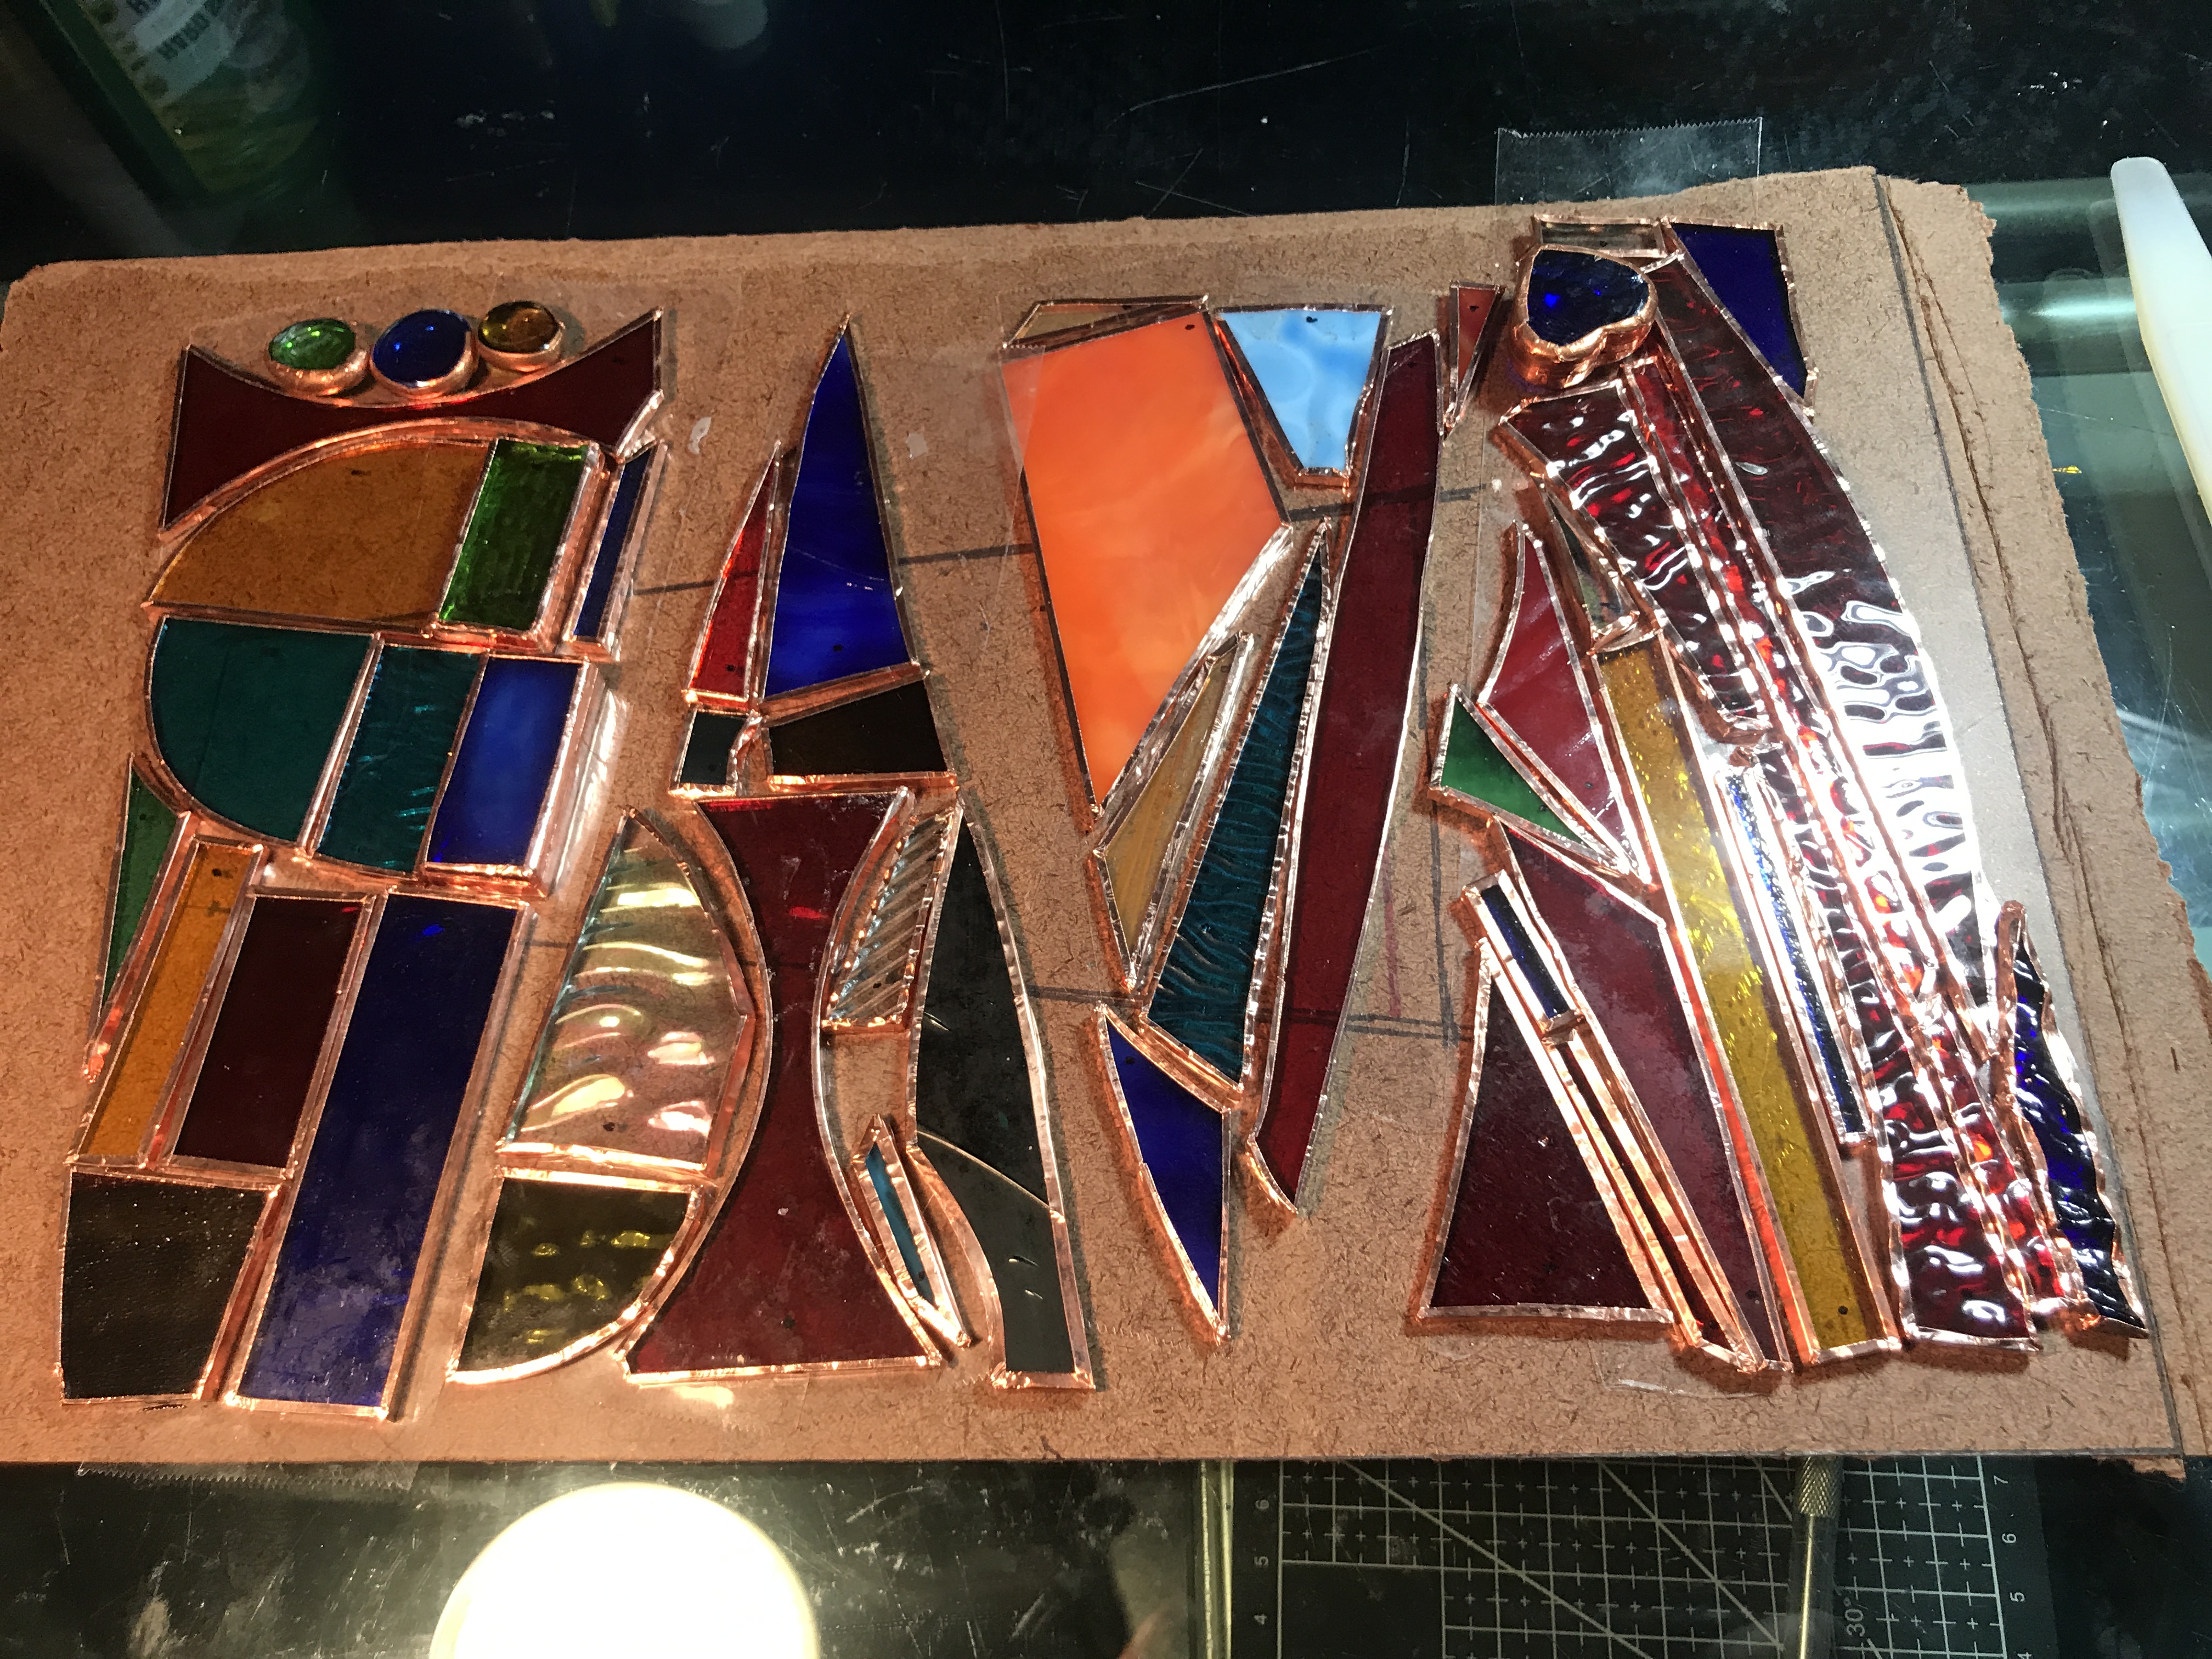
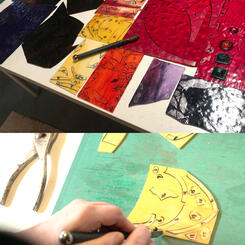
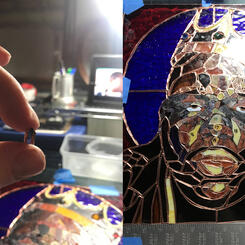
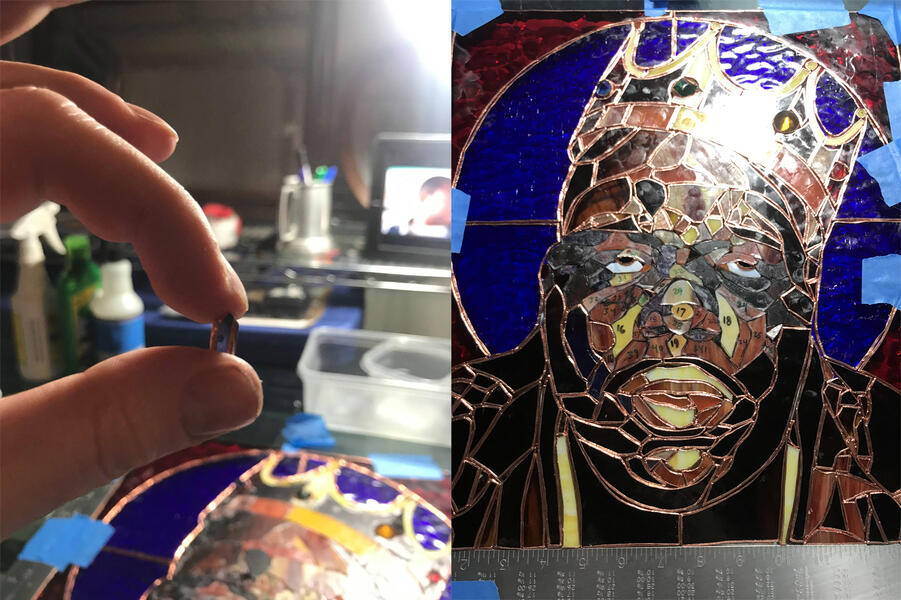 Assembly Pt. 1Some of the pieces are smaller than a pinky nail, or so small they are cubical, but they are all equally important pieces of the puzzle. Here you see how the pieces have been laid out before foiling so they don’t get lost or moved around as I work.
 -
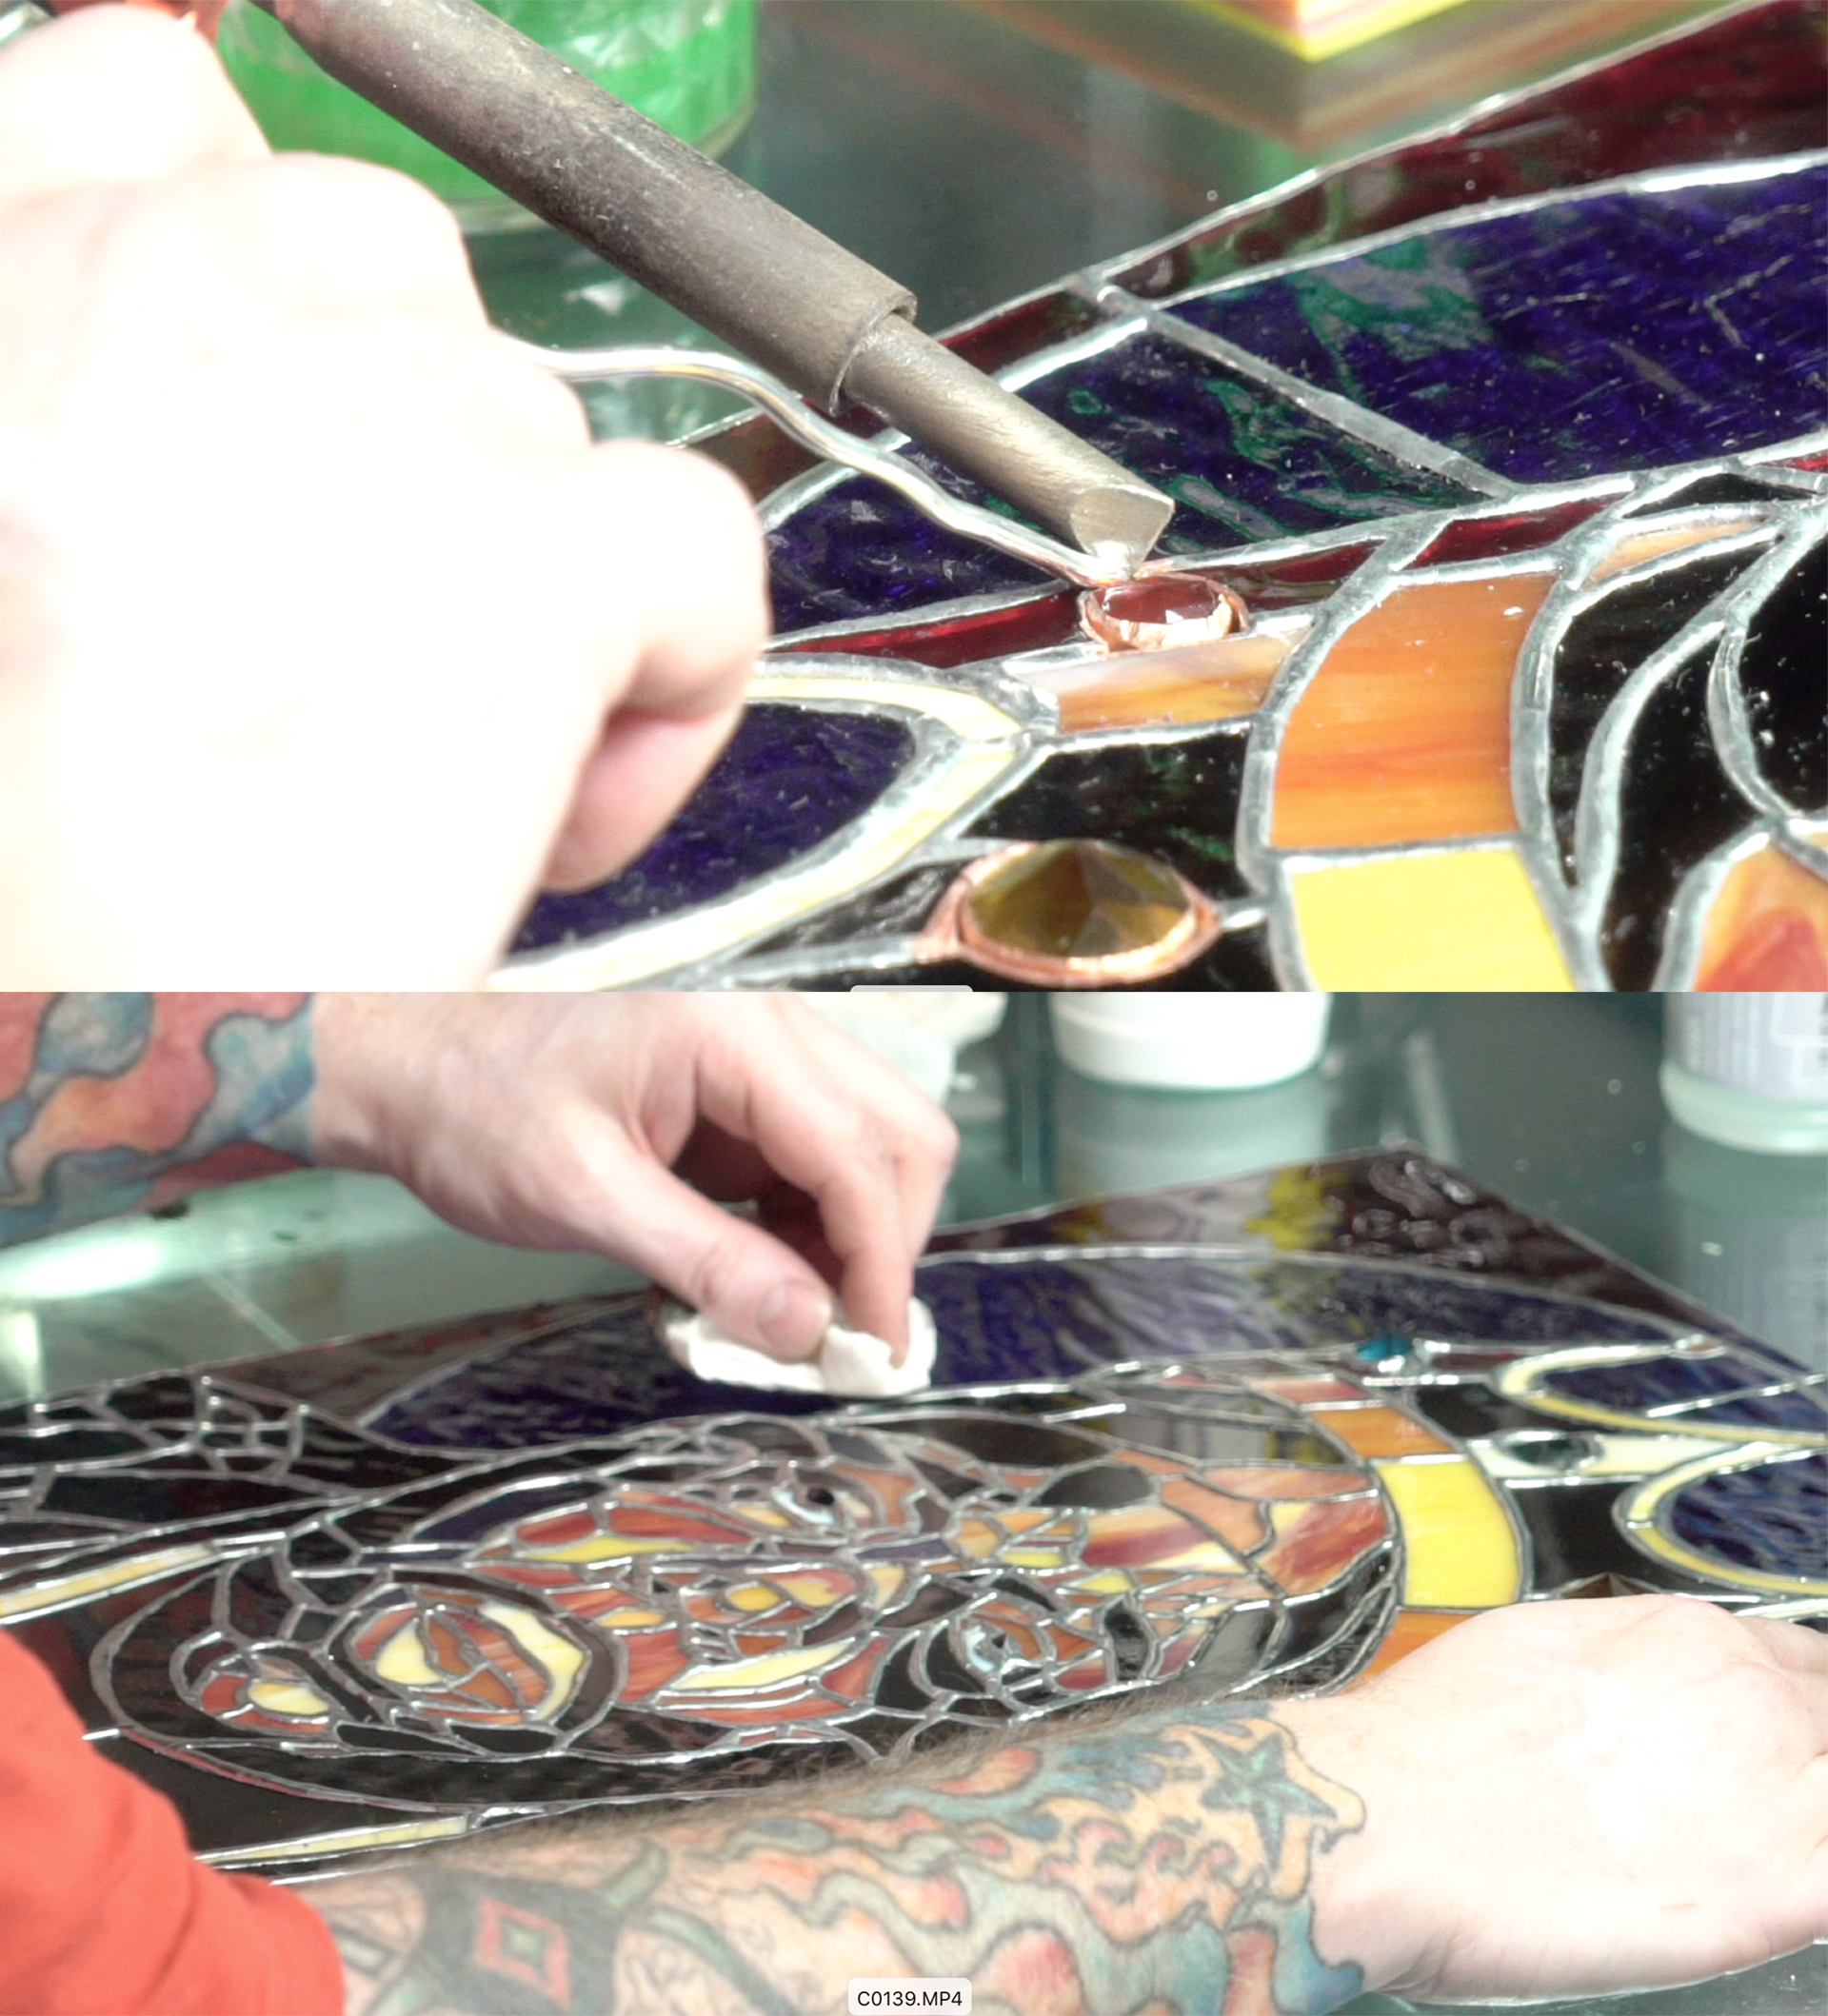
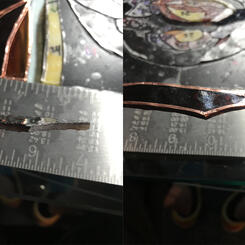
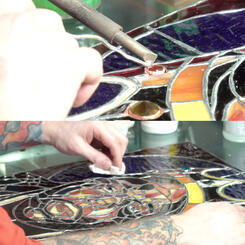
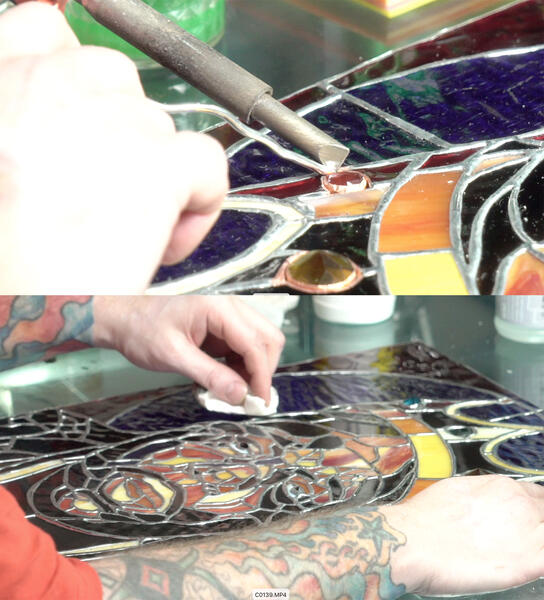 Assembly Pt. 2Flux (muriotic acid) is applied first to the copper where the glass edges meet, which then allows the solder to adhere to it when heated at high temperature and applied in a smooth even bead on both sides. I then polish the solder with wax to a high gloss.
 -
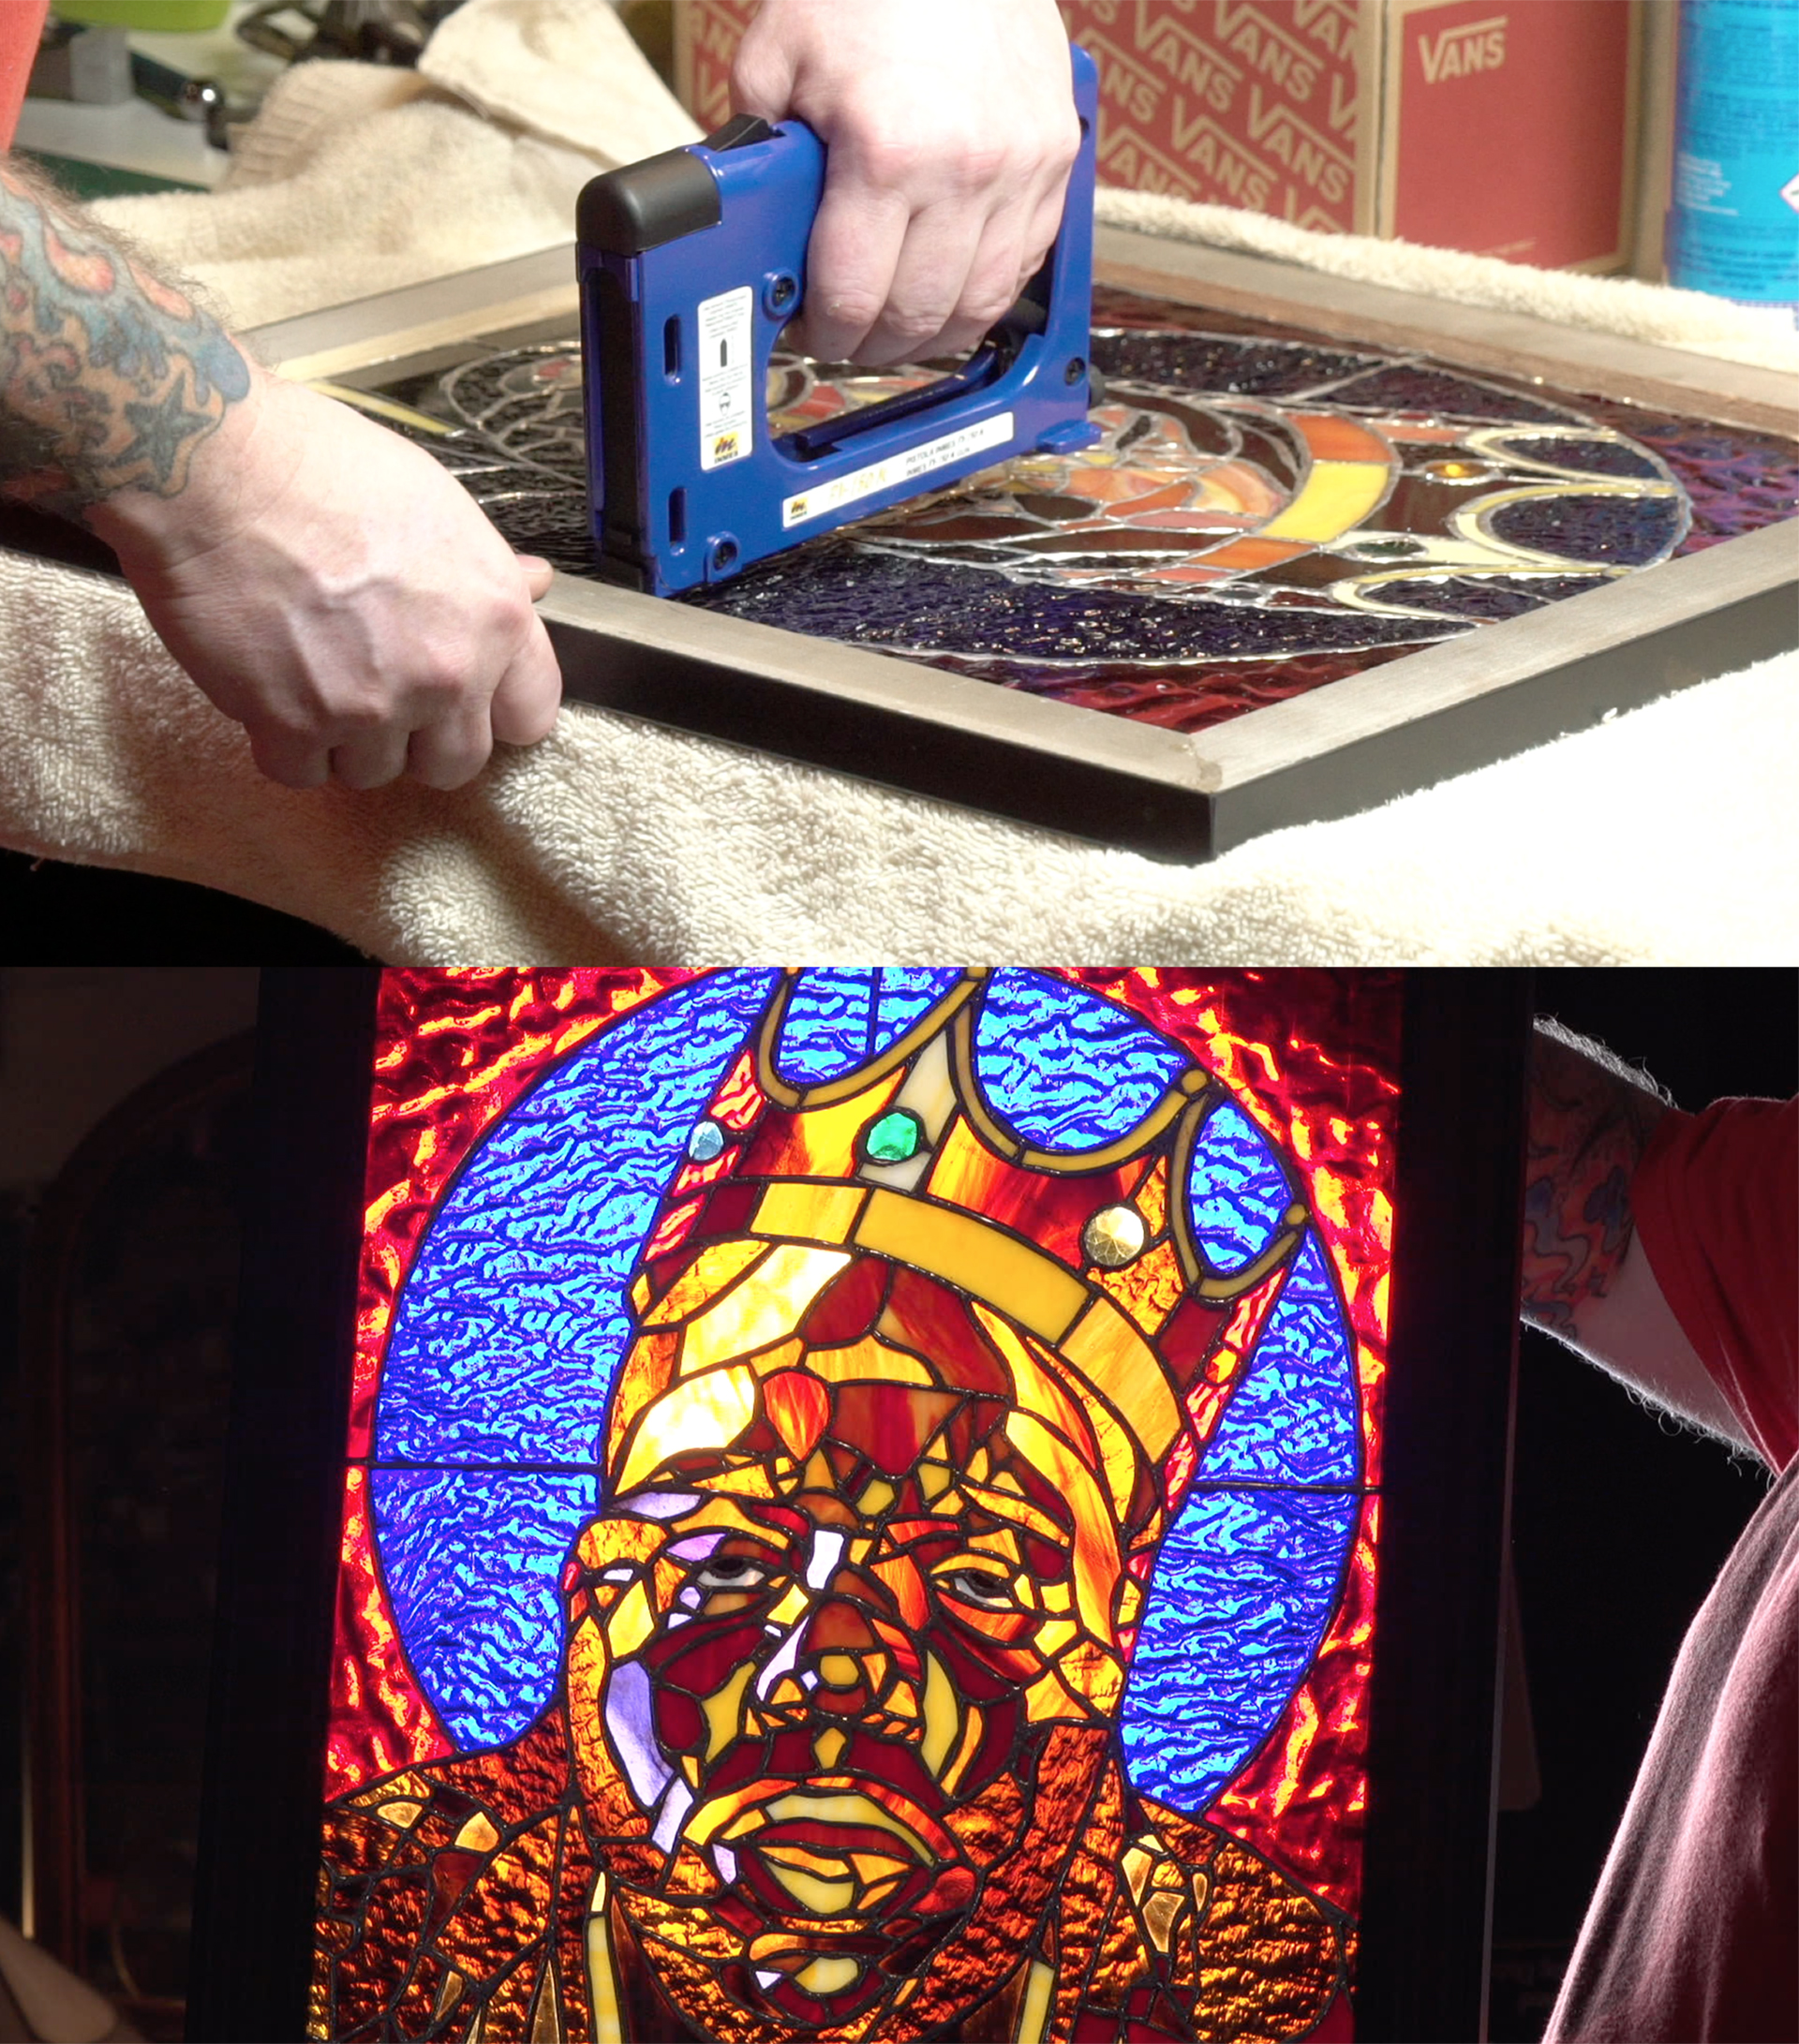
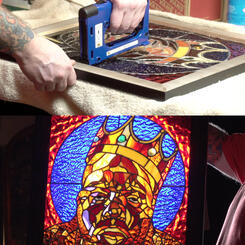
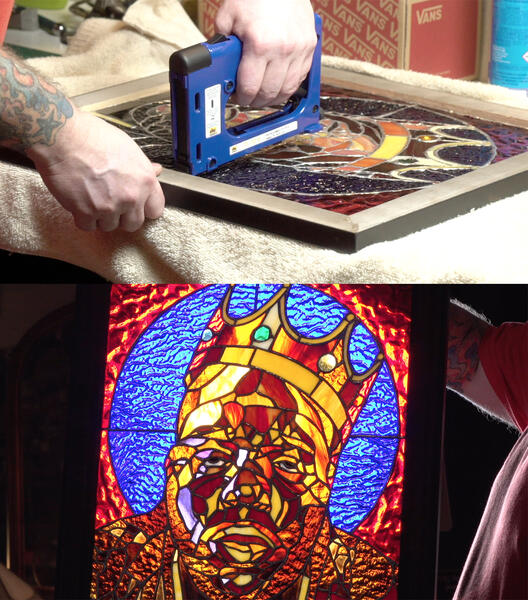 Framing and Finished!Then after polishing the panel is placed in the frame, I shoot in a few framer’s points to secure it and voila! Saint Christopher is complete, easy peasy lemon squeezy, and here I am proudly holding it in front of a very bright light.


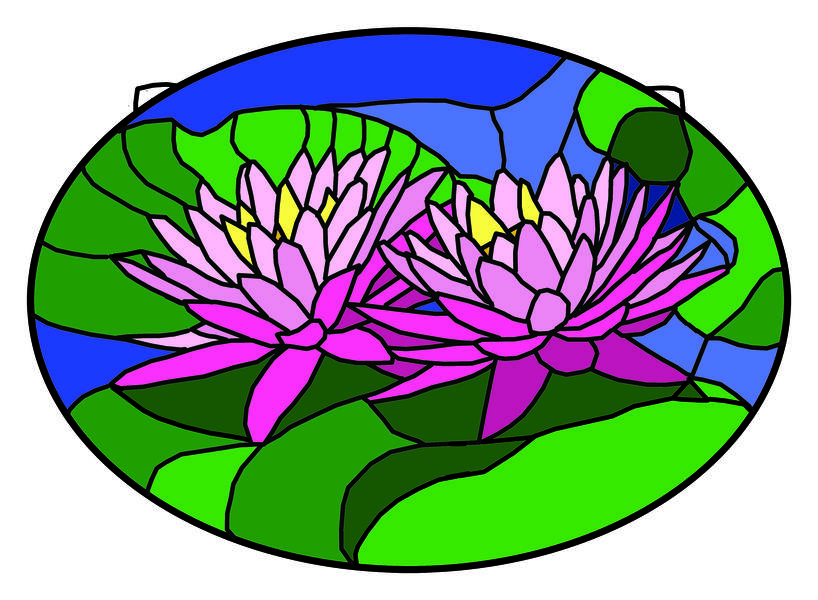
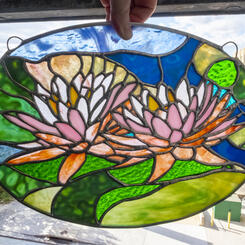
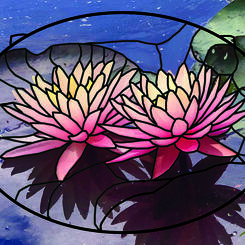
Water Lillies
-
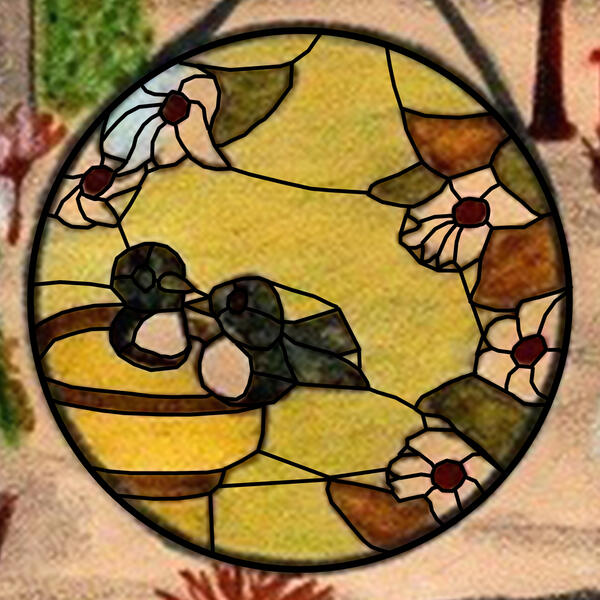
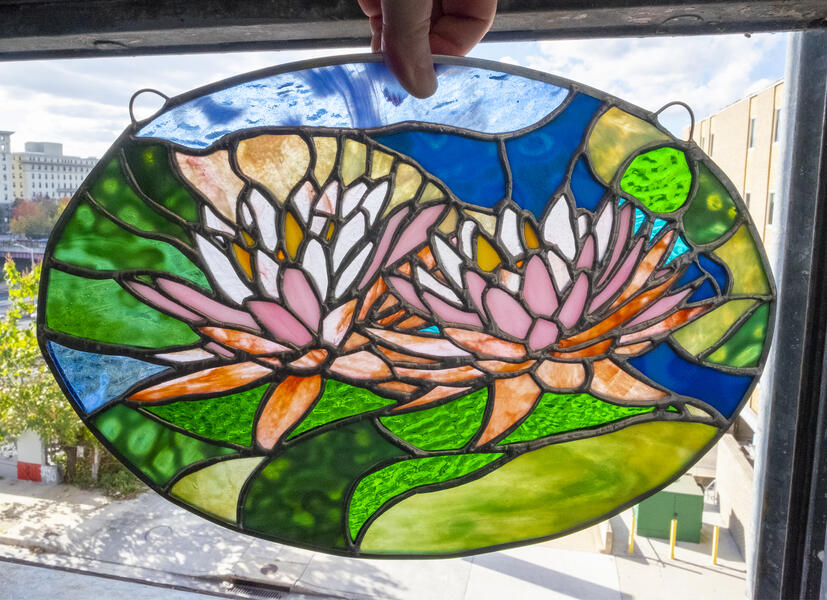 The finished pieceAfter the manual labor is all done (see above projects for more details on the assembly process), the piece is photographed and ready to wrap!
 -
 MastheadsThe original reference photo was too small (and slightly distorted by angle) to use, so a higher resolution copy of the original was requested…
 -
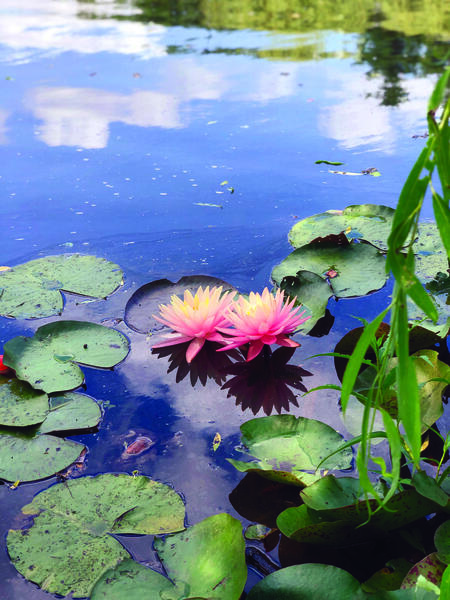 Original PhotoNow equipped with the highest possible quality reference image, I was ready to crop it to the proper dimensions.
 -
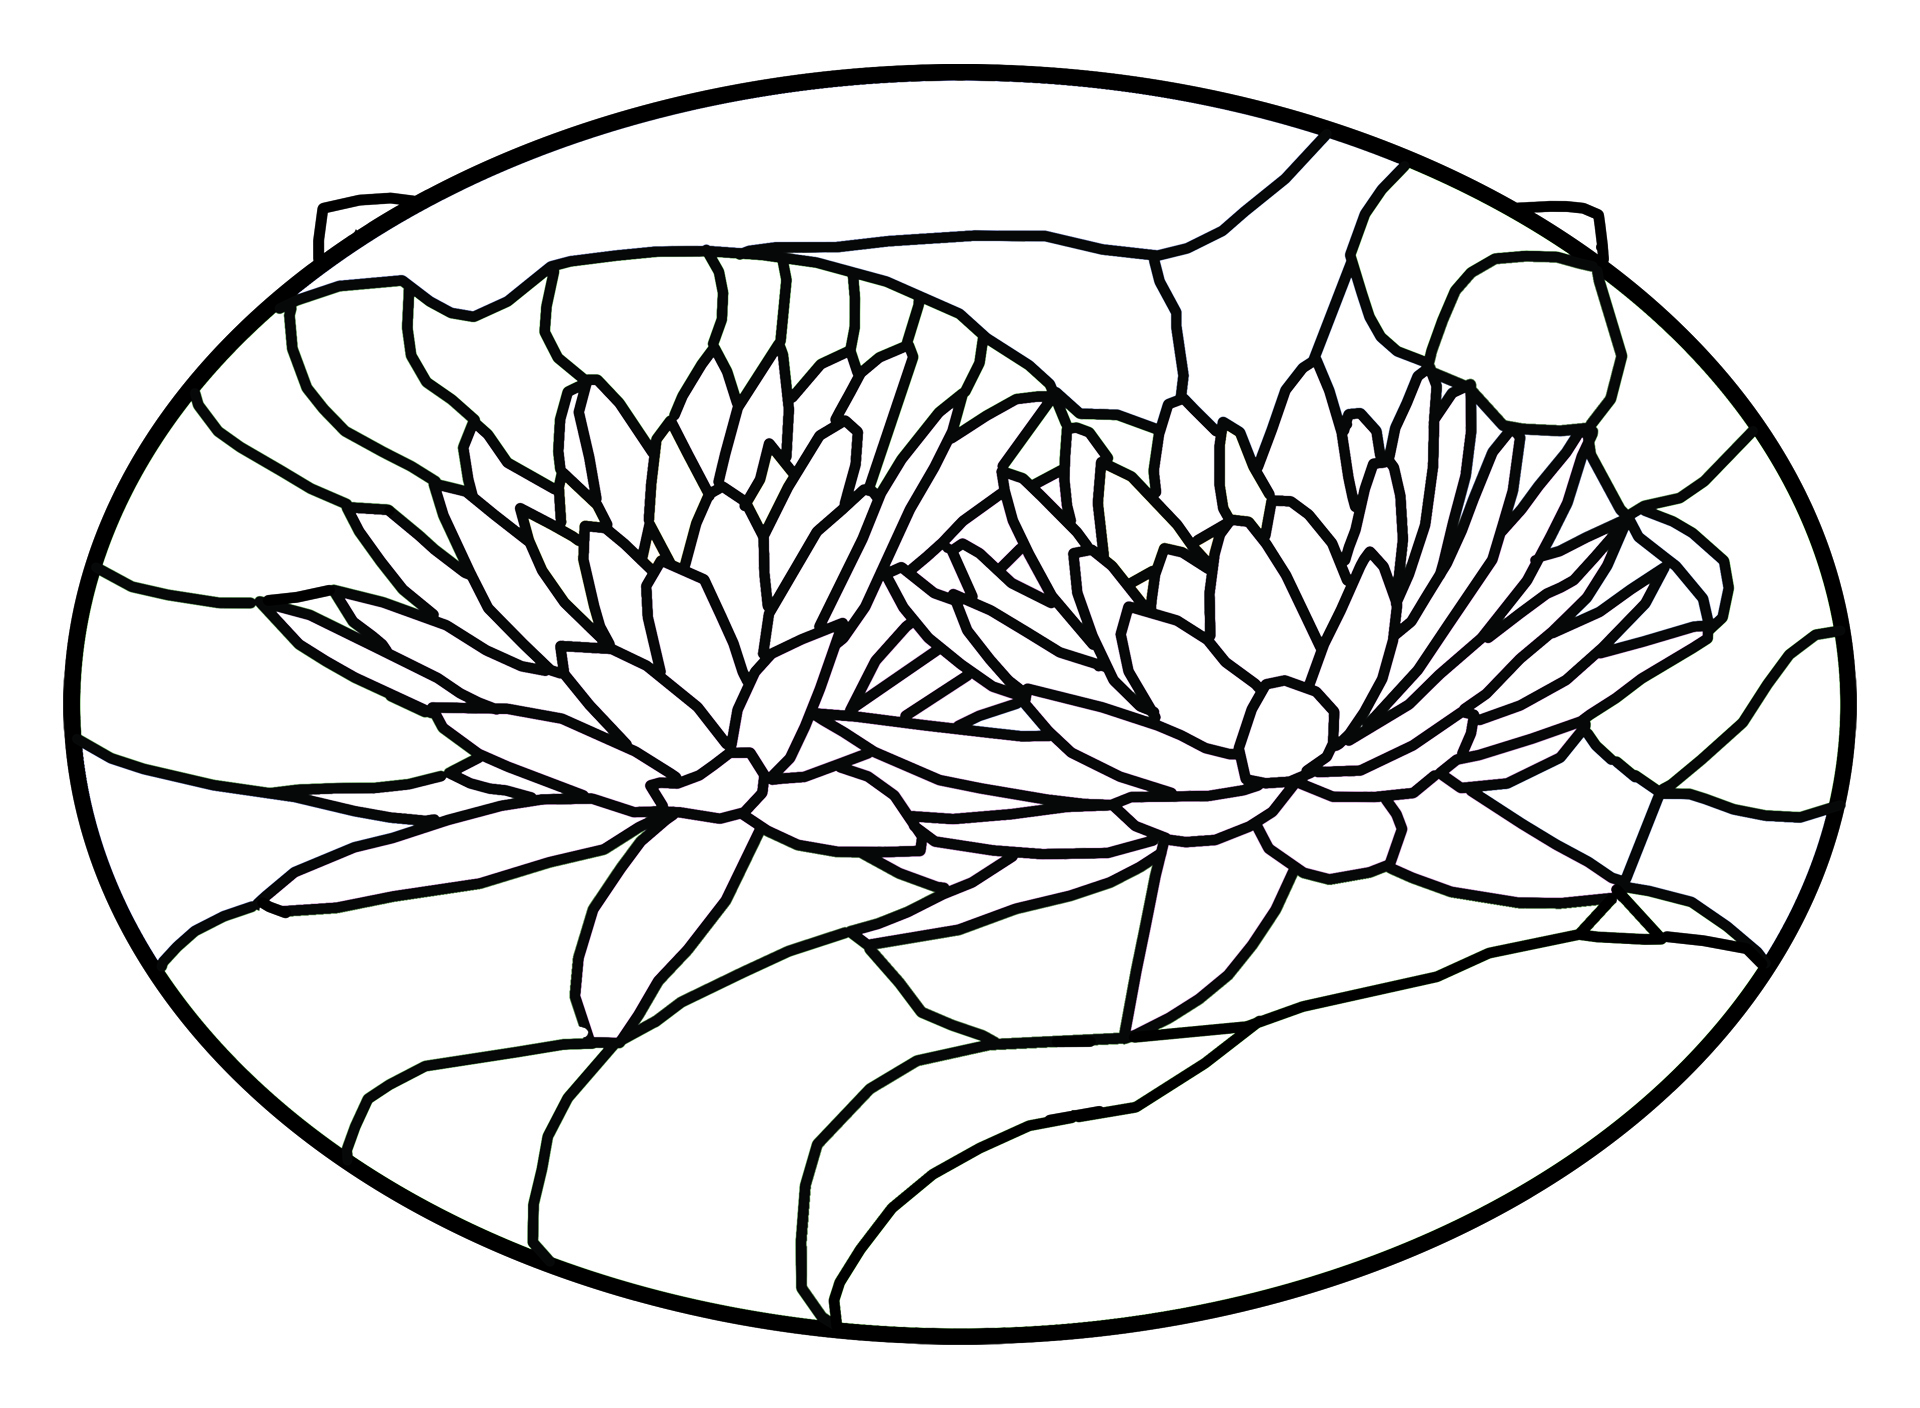
 Cropped PhotoAfter cropping, the image was sized to 11x15” at 300dpi, to accommodate the 10x14” oval I had based my quote on, which was drawn in the next step. I was also asked to replace the reflections of the flowers with more pads to balance the image.
 -
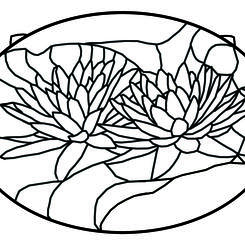
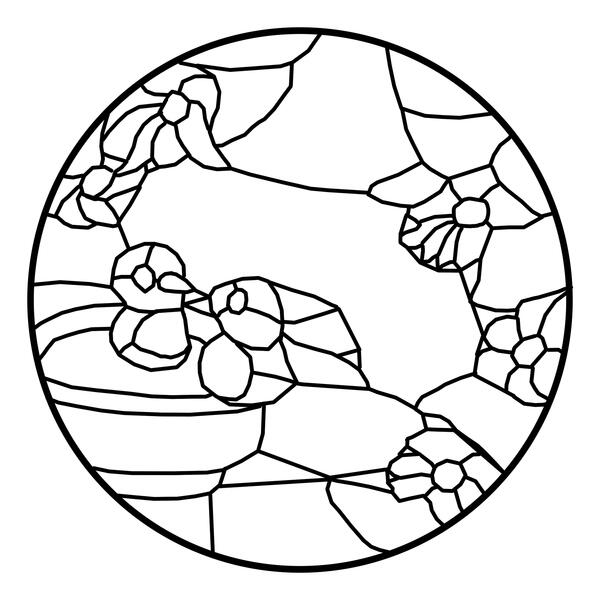
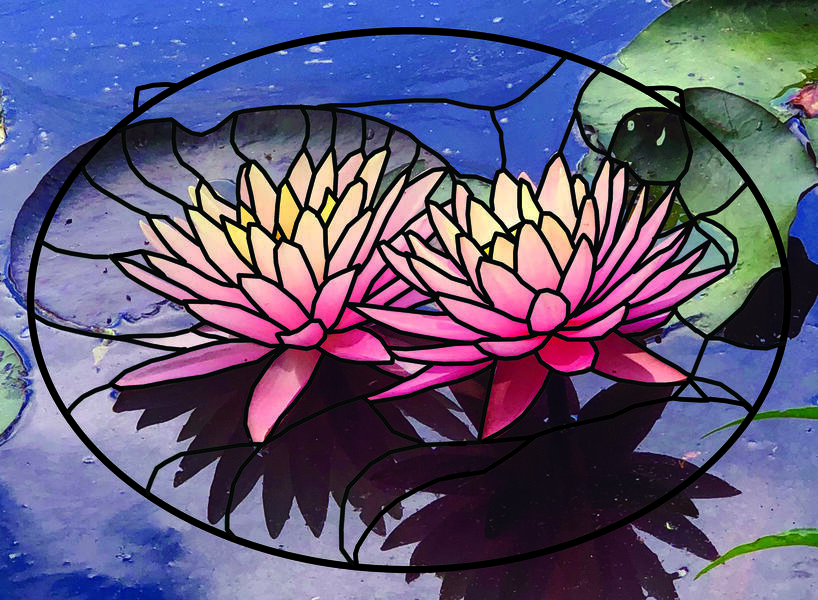 Cut line tracingAfter drawing the oval I traced all of the petal outlines, but then had to decide how to break up the shapes around them that bordered all of the petal's points. I solved this problem by making the cut lines on the lilies describe their contours and the water line.
 -
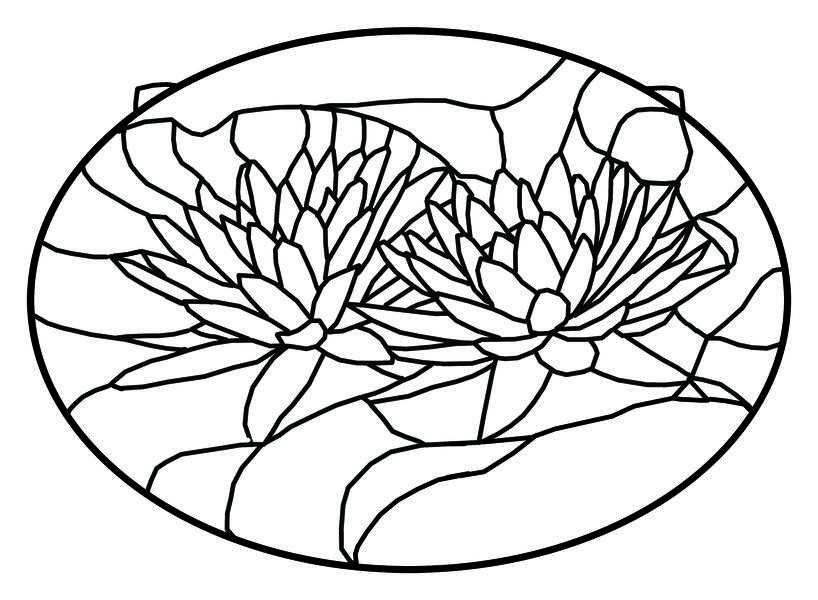 Digital templateAfter creating the template, I also noted where the hanging loops should be placed. This placement is crucial for hanging panels framed in zinc, they must be placed on or near solder joints, or otherwise reinforced to prevent possible damage from gravity over time.
 -
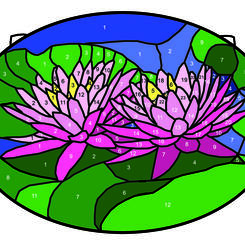
 Digital RenderingThe outline is then colored in for the rendering…
 -
 Color KeyAnd numbered to create the color key.


Indu Wellness
-
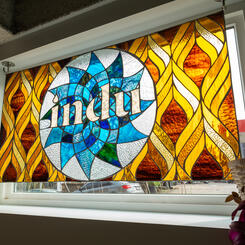
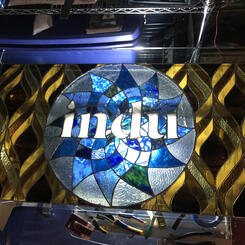
 InstallationAfter carefully measuring for and installing heavy duty tempered steel hooks in the window masonry, I carefully hung the panel and then photographed it, and after a brief period of rest began designing my next project.
 -
 Original LogoThis is the original logo and background design used as the reference for the window pattern. The word "wellness" was eliminated because of the complexity (and therefore cost) it would add to the design.
 -
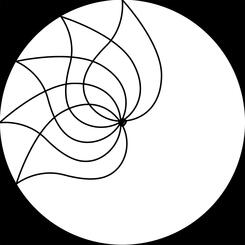
 Creating the mandalaTo create the mandala portion of the design, I first searched for a simple drop shape online. I selected one with a slightly greater curve to it than was used in the original logo, to give more of a sense of motion within the piece. I then duplicated the shape 11 times, while rotating it 30° each time and repositioning it to properly overlap and meet at the center.
 -
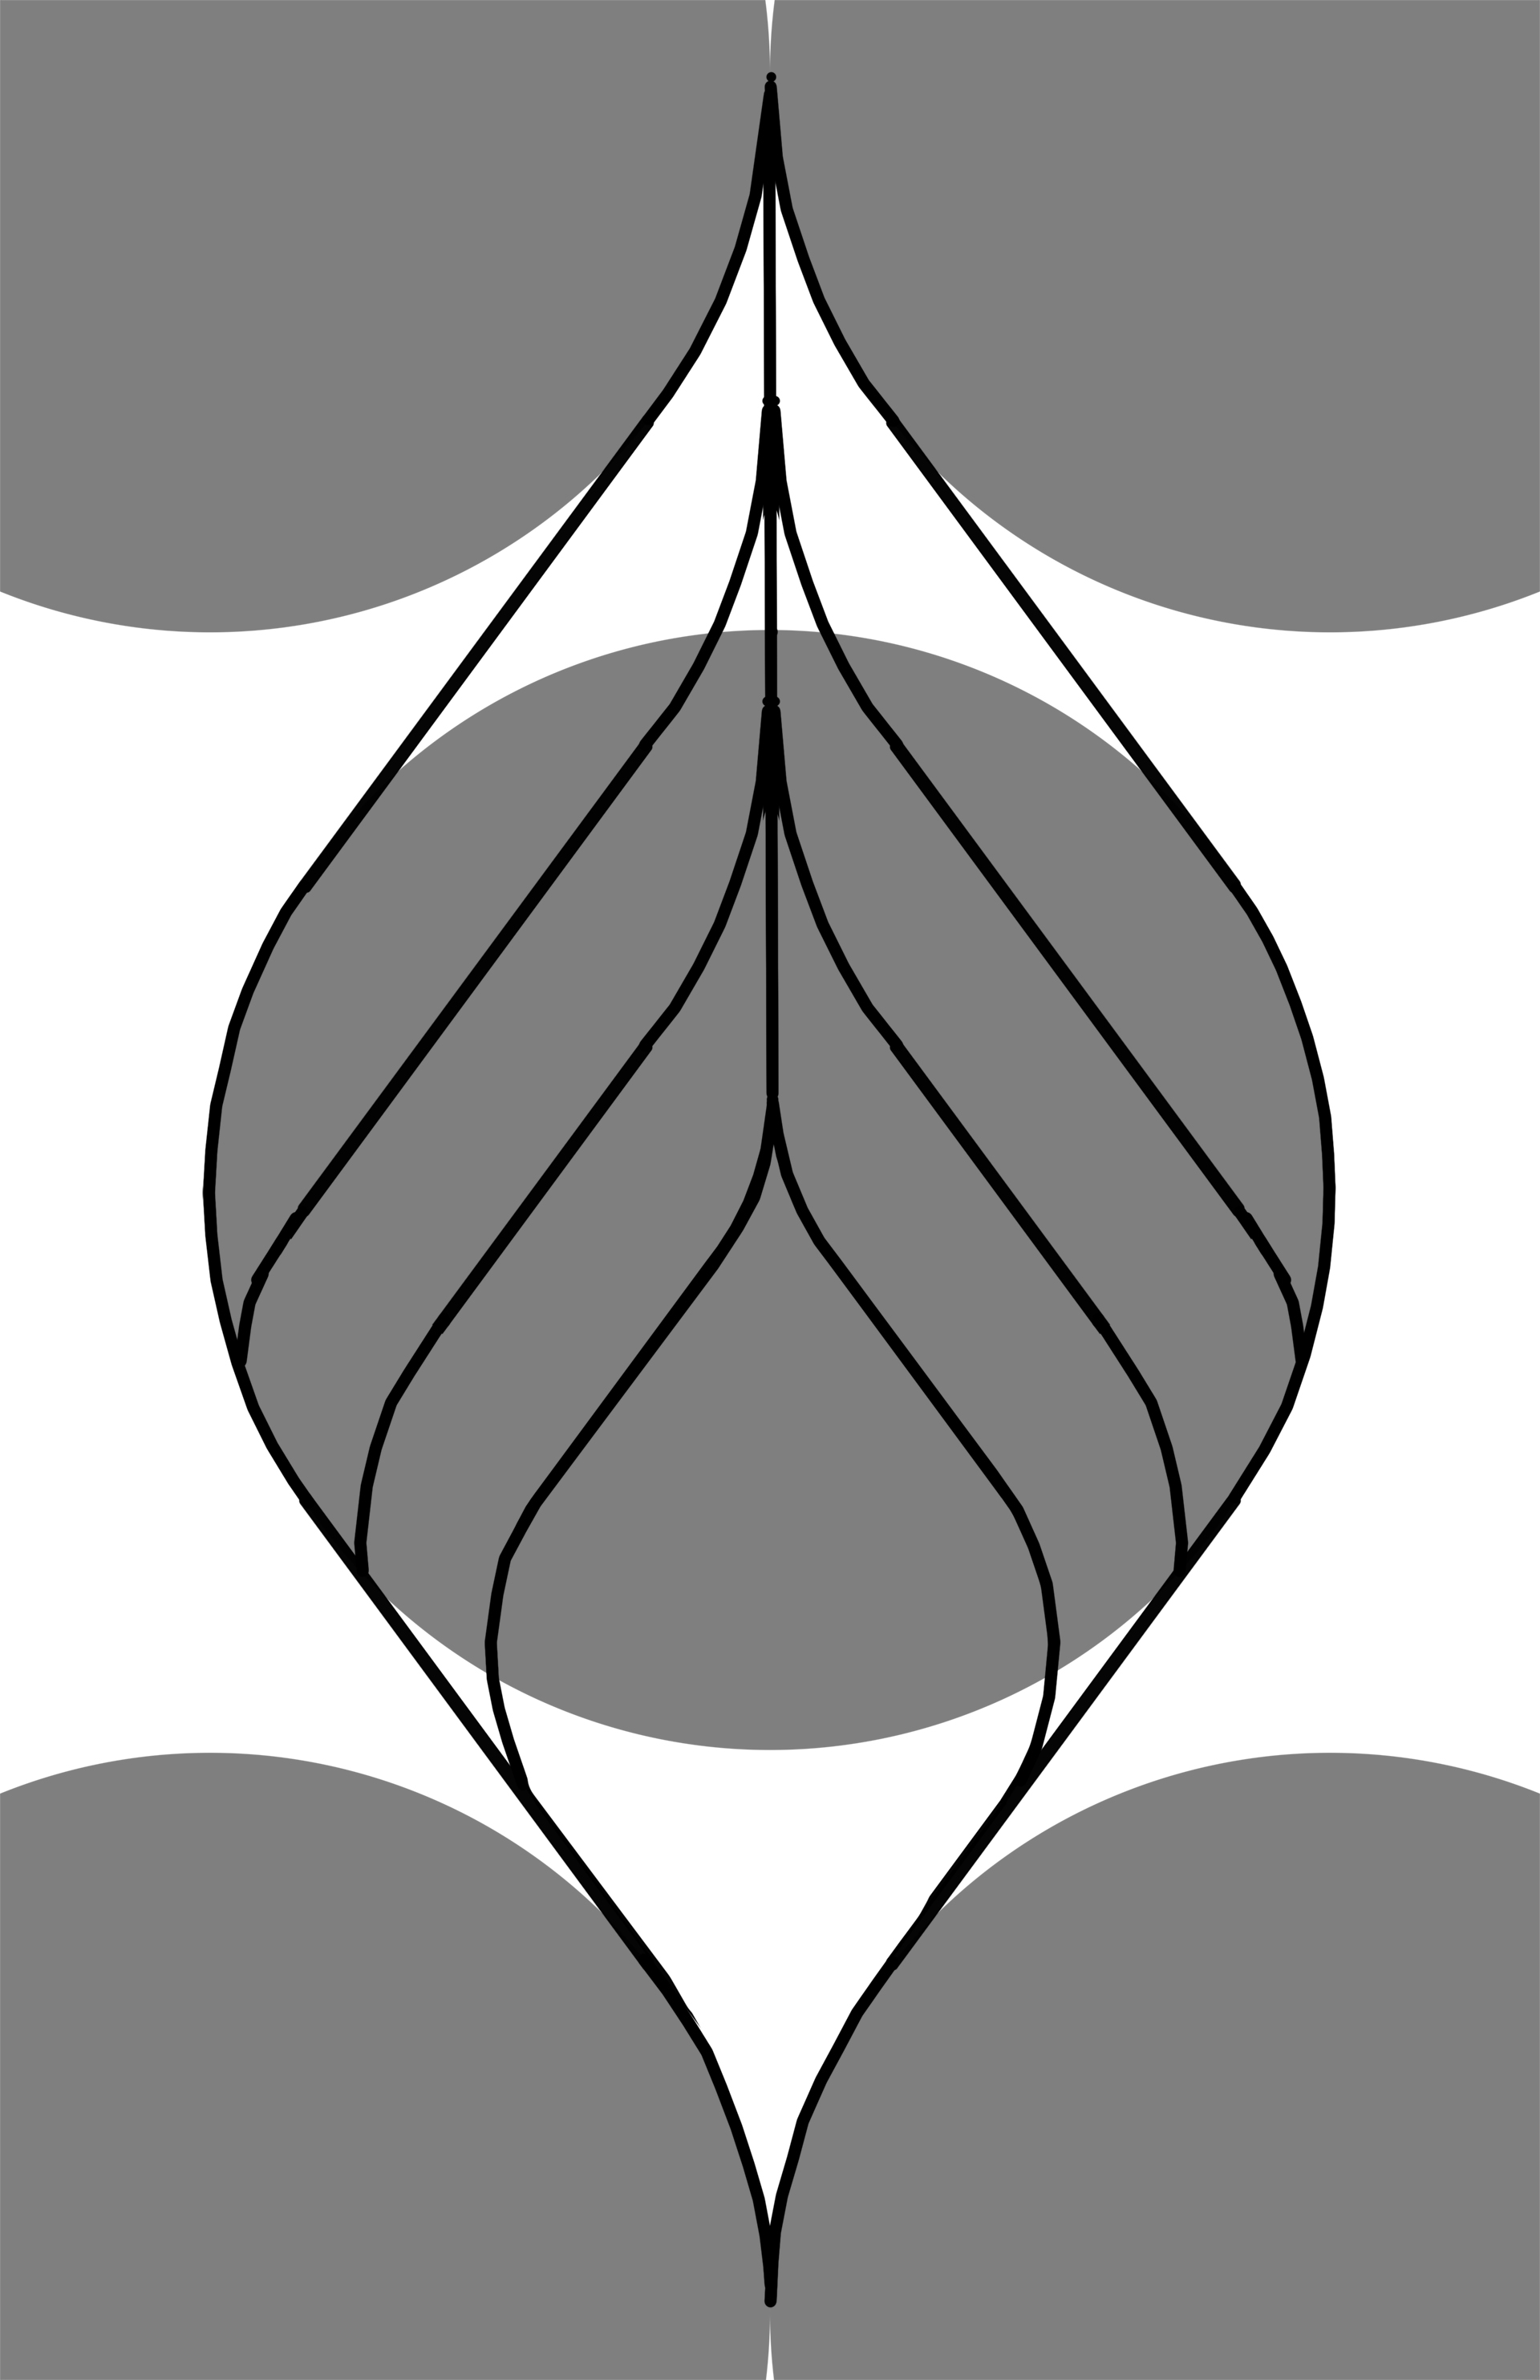
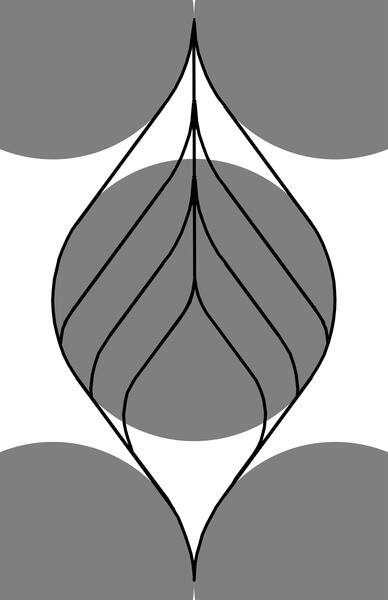 Repeating leaf patternTo re-design the repeating leaf pattern as one interlocking shape, I first made a perfect circle to trace the outward curves on. Then I repeated the circle 4 times to be equidistant from the central one, with their edges touching in alignment with the center of the middle circle to trace the inward curvatures and points on. After that, I drew the additional lines on the left side of the central circle, and then copied and reversed them to make the shape bilaterally uniform.
 -
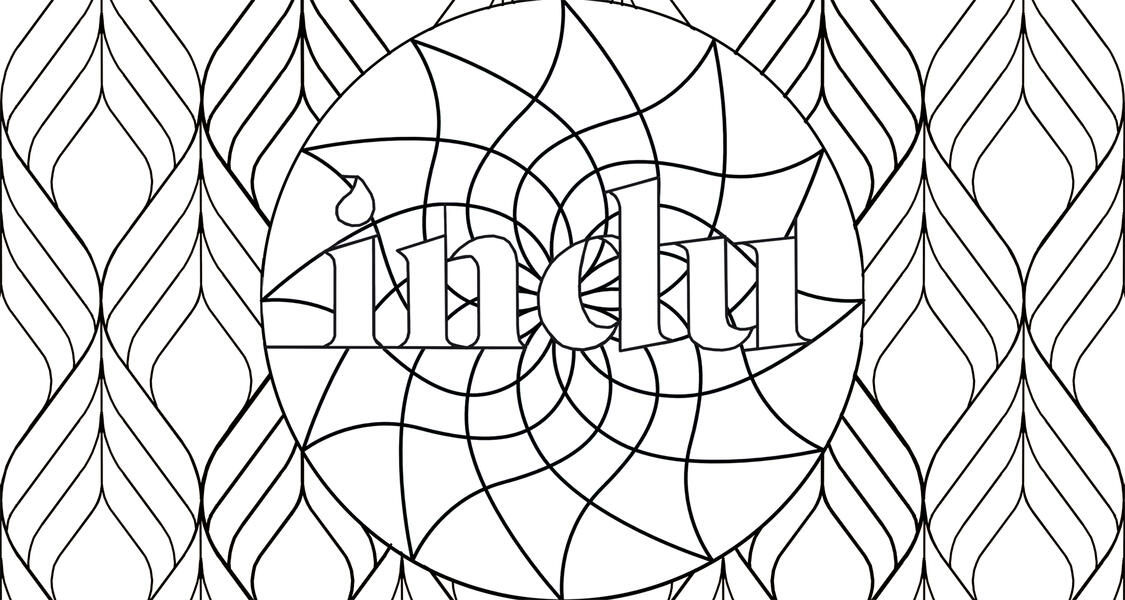 Digital templateI then copied the original text and slightly altered the dot of the "i" in indu to match the repeating droplet shape, centering it within the mandala and choosing all of the appropriate cut points. After repeating the leaf pattern on either side and creating the initial the template/rendering, I sent it to the client for approval of the basic design.
 -
 The glassI then selected a variety of glasses to represent the water element, a spotted white for the text to represent the moon’s surface, and a textured clear that would serve as both the background to the mandala and be able to be perceived as either water or the lunar surface depending on the viewer’s interpretation of the image.
 -
 Digital renderingWhen rendering the colors, I used photos of the glass in the text and outer circle to help visualize how they would work together. After approval of the background colors (which I chose to represent fall/decay in contrast to the central colors/theme of refreshment), I purchased the remaining earth-toned glasses and started the physical process.
 -
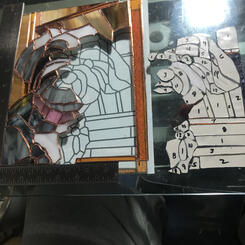
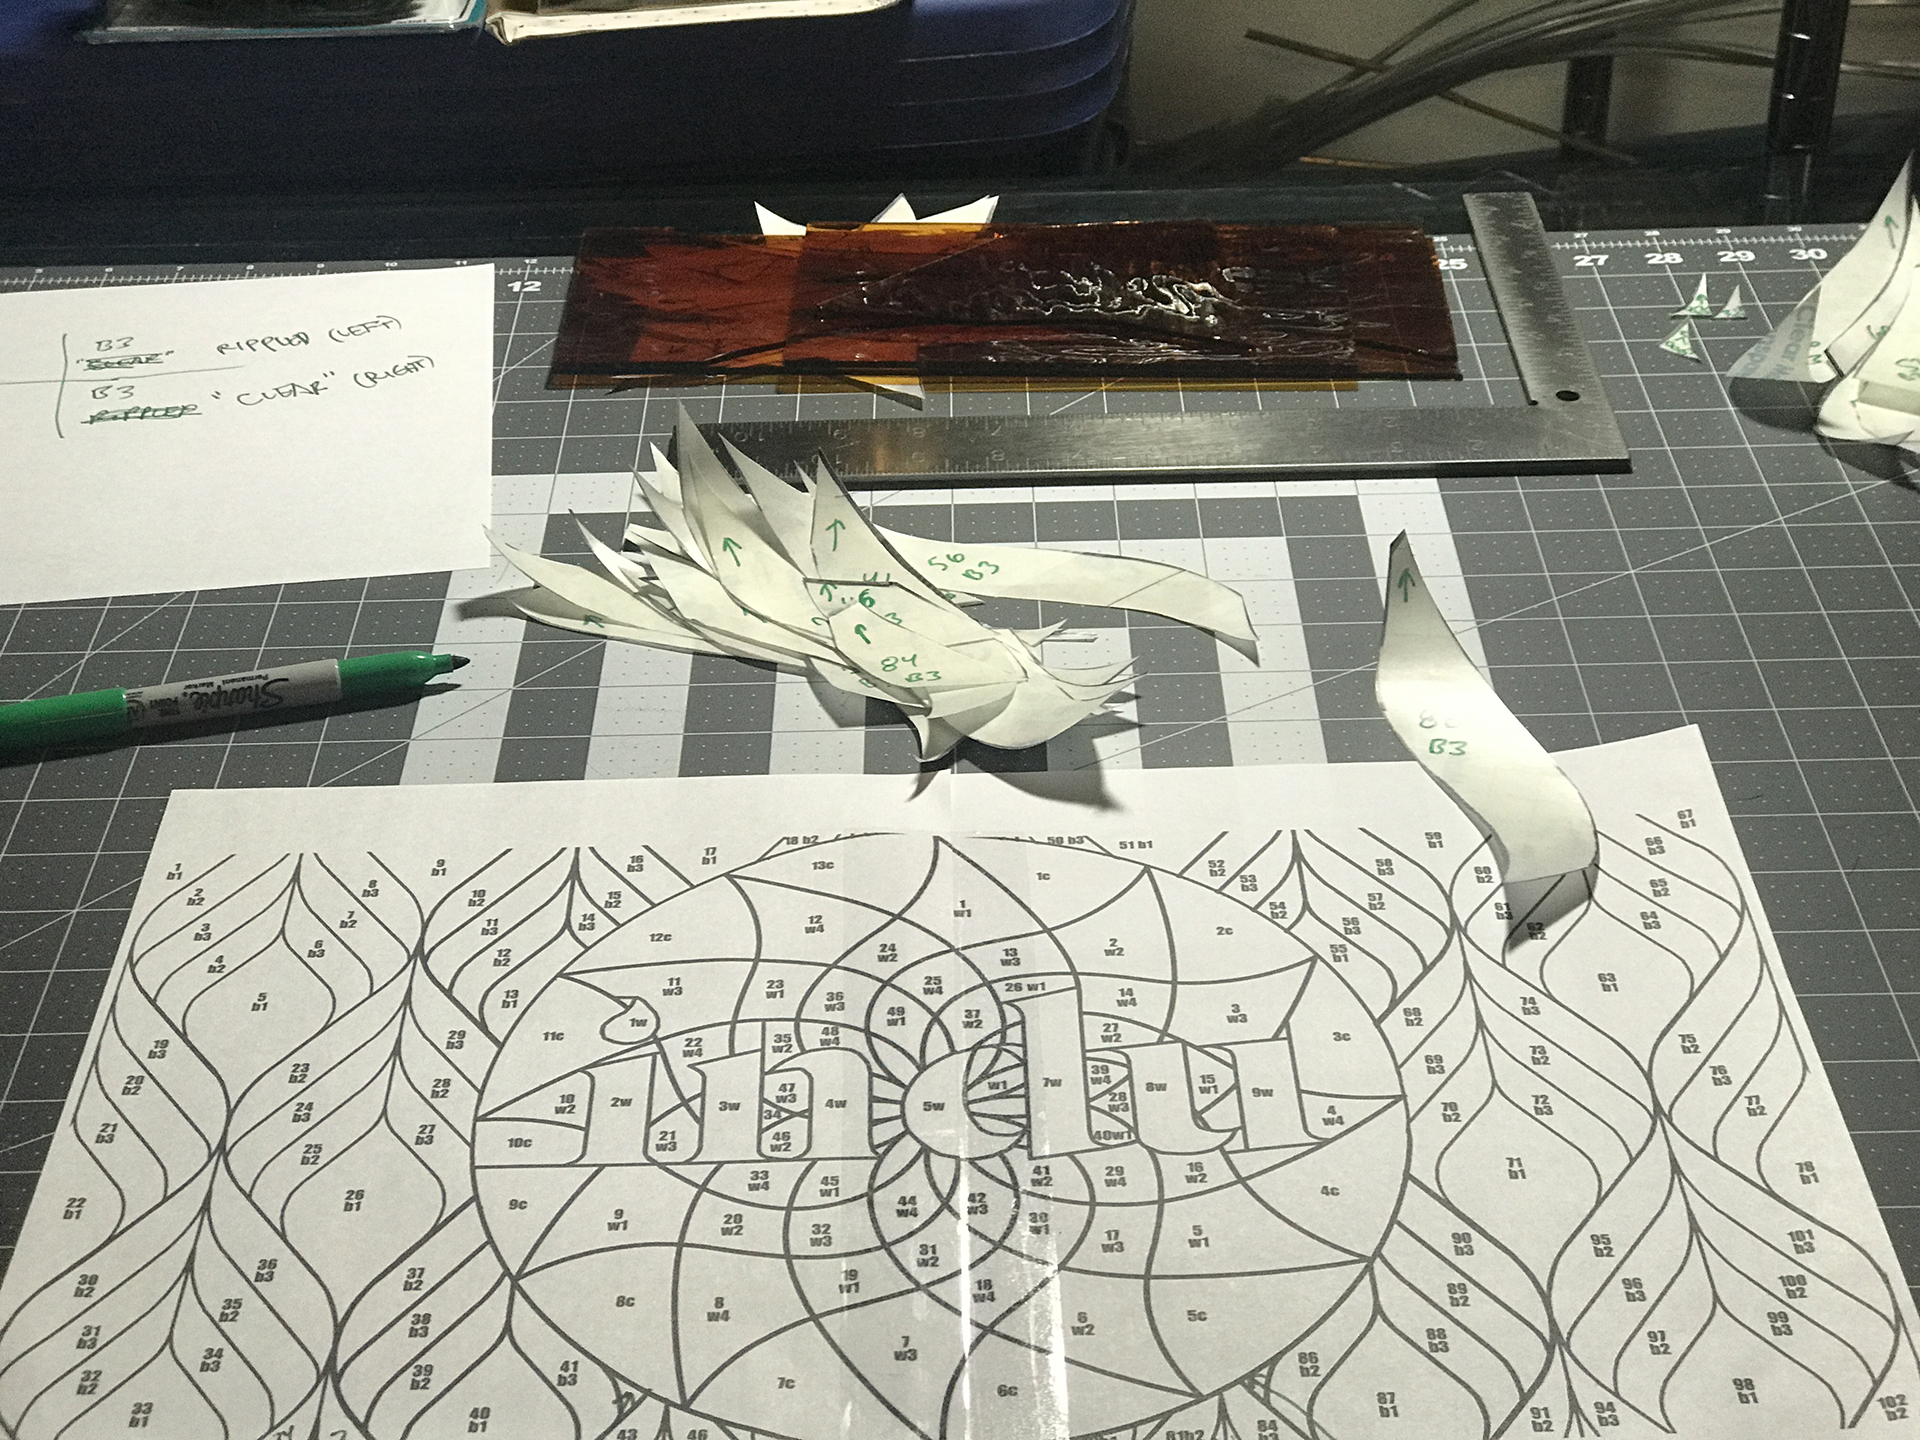
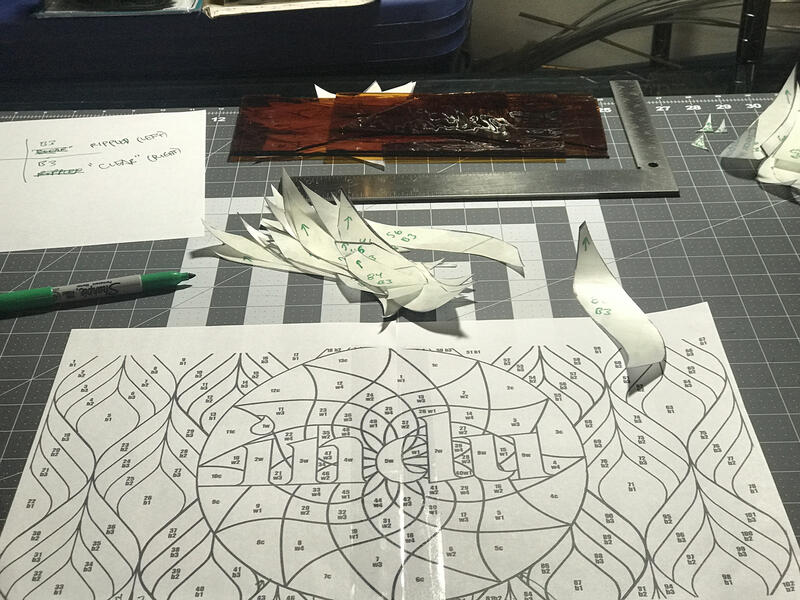 Template shapesHere we see the guide I printed to keep track of all the pieces, and some of the contact paper template shapes and the glass they will be adhered to throughout the cutting and grinding steps of the process.
 -
 Center circleI fabricated the central circle of the panel first, to allow for easier handling and rotation of the sections on my work surface before their final assembly. The outside edge of the circle has been reinforced with copper re-strip, which adds the stability and rigidity necessary for larger pieces assembled using the copper foil method (as opposed to lead came).
 -
 Final assemblyAfter assembling the 3 sections together, I used a heavy gauge nickel-plated copper wire to create double loops for hanging, which runs completely around the entire piece to help support its weight and increase overall stability. Then I framed the piece with 1/8” zinc channel, which I soldered to the front and back of the piece along all of the points where the shapes meet at the edge of the panel.


Birds of a Feather
-
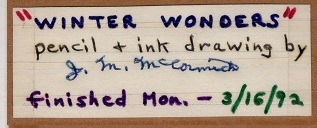
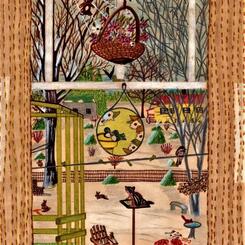
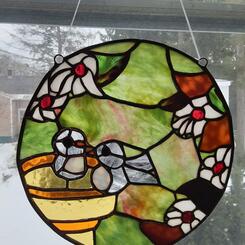
 Winter WondersJim’s original drawing on plain paper, loosely based on the view from my grandmother’s back window. Jim was unable to own any pets due to his severe asthma but he loved animals, especially the smaller creatures, and often included them in his work.
 -
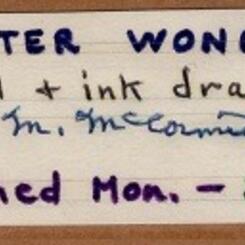
 SignatureTitle and signature from reverse side.
 -
 DetailClose up detail of glass panel illustration. As far as my father I know, this was drawn solely from Jim’s imagination and was not based on any existing work.
 -
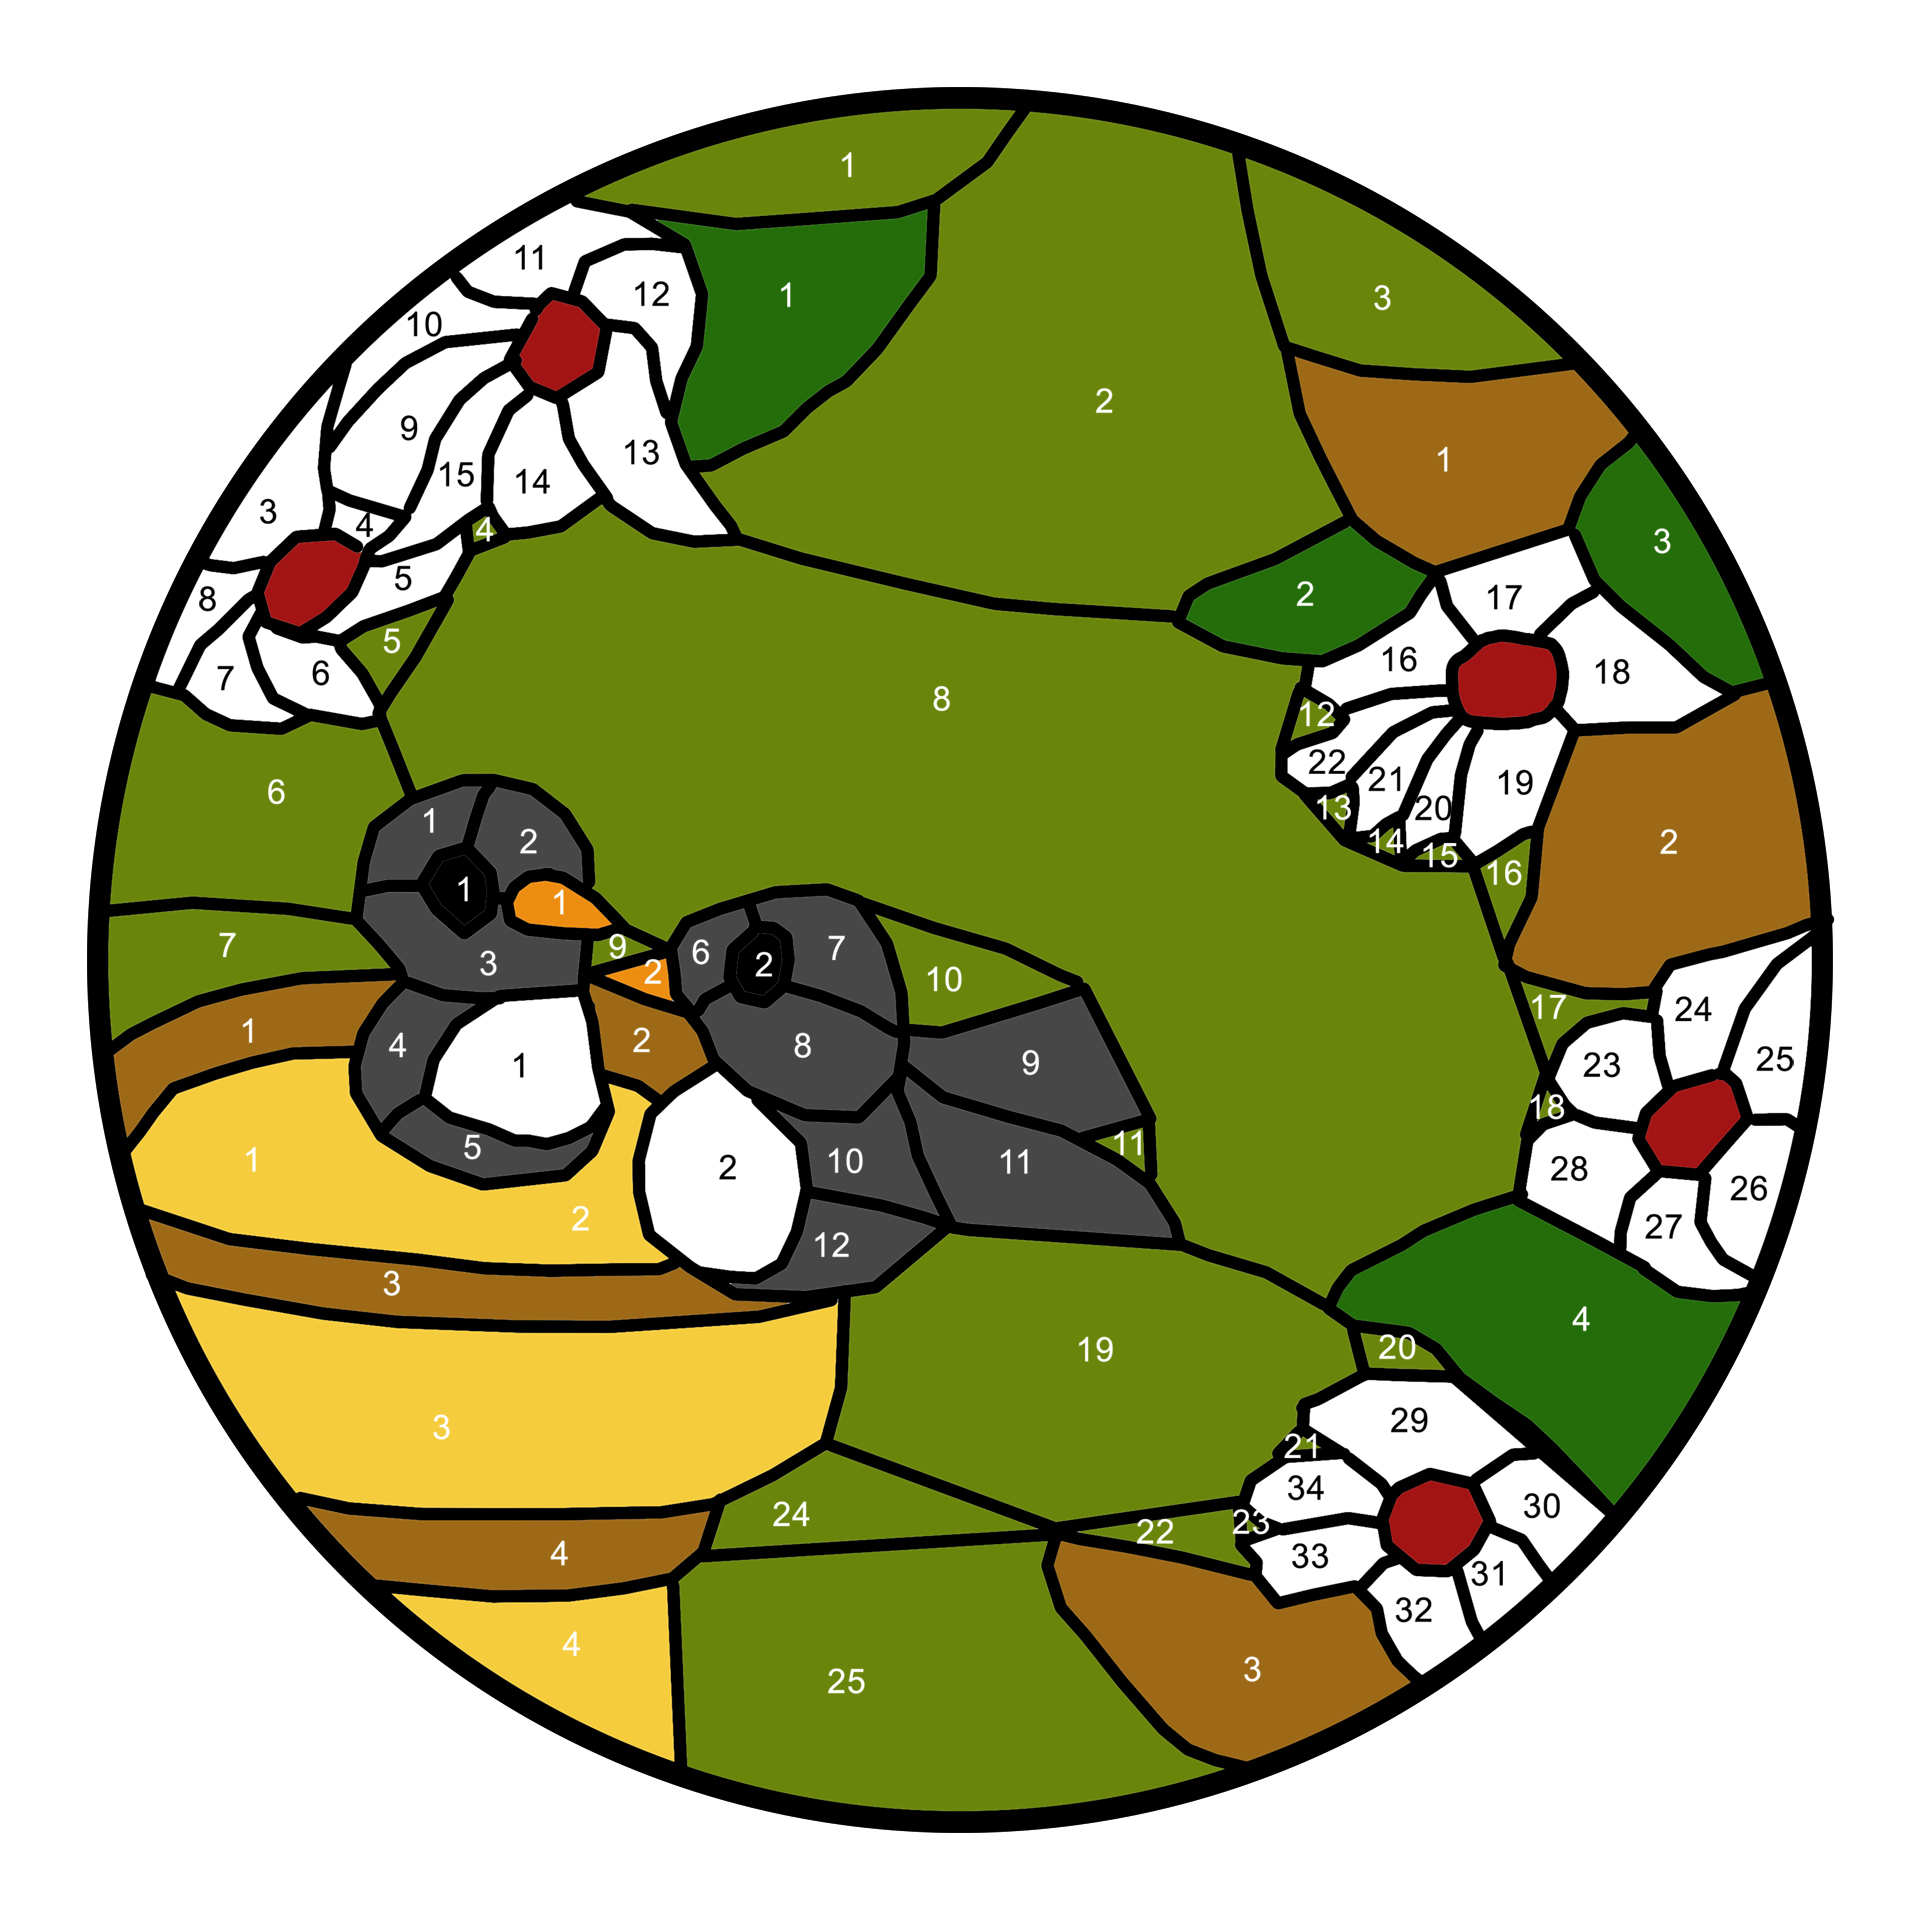
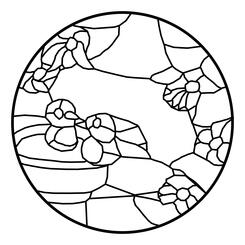
 Cut line tracingIt was a bit of a challenge to translate the image into an actual stained glass design not only due to the limitations of the medium, because faithfully reproducing it required a large number of smaller pieces to keep the flower outlines intact.
 -
 Digital templateThe armature is then separated from the image and then printed out at actual size (10” circle) to then be traced onto the contact paper template. It is also used when laying out the pieces to be foiled, after the cutting and grinding processes have taken place.
 -
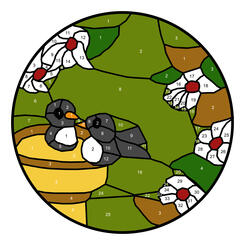
 Digital RenderingAfter deciding on the shapes, I fill them in with flat colors to help visualize the finished piece before selecting the glass I would use. Changes are also made along the way when making the physical template and cutting the glass to eliminate unnecessary cuts.
 -
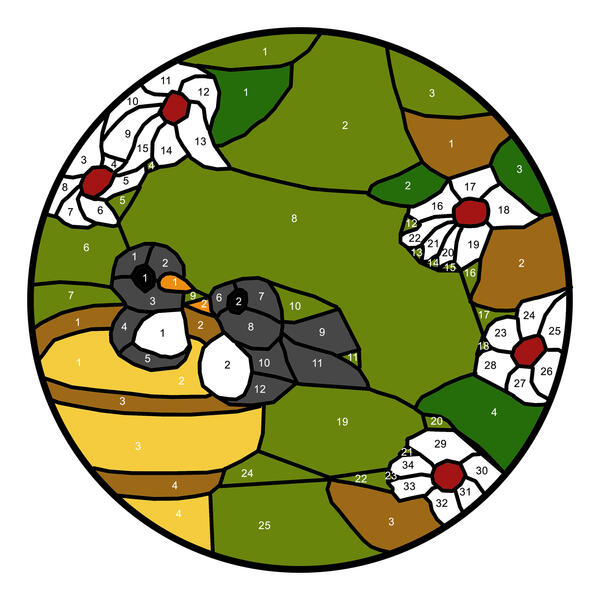 Color KeyThe rendering is then numbered within color groups, and the contact paper template is numbered to match it. I use both the key and the original image when selecting the glass to use, and happened to have saved some antique greens from over 20 years ago that would be perfect.
 -
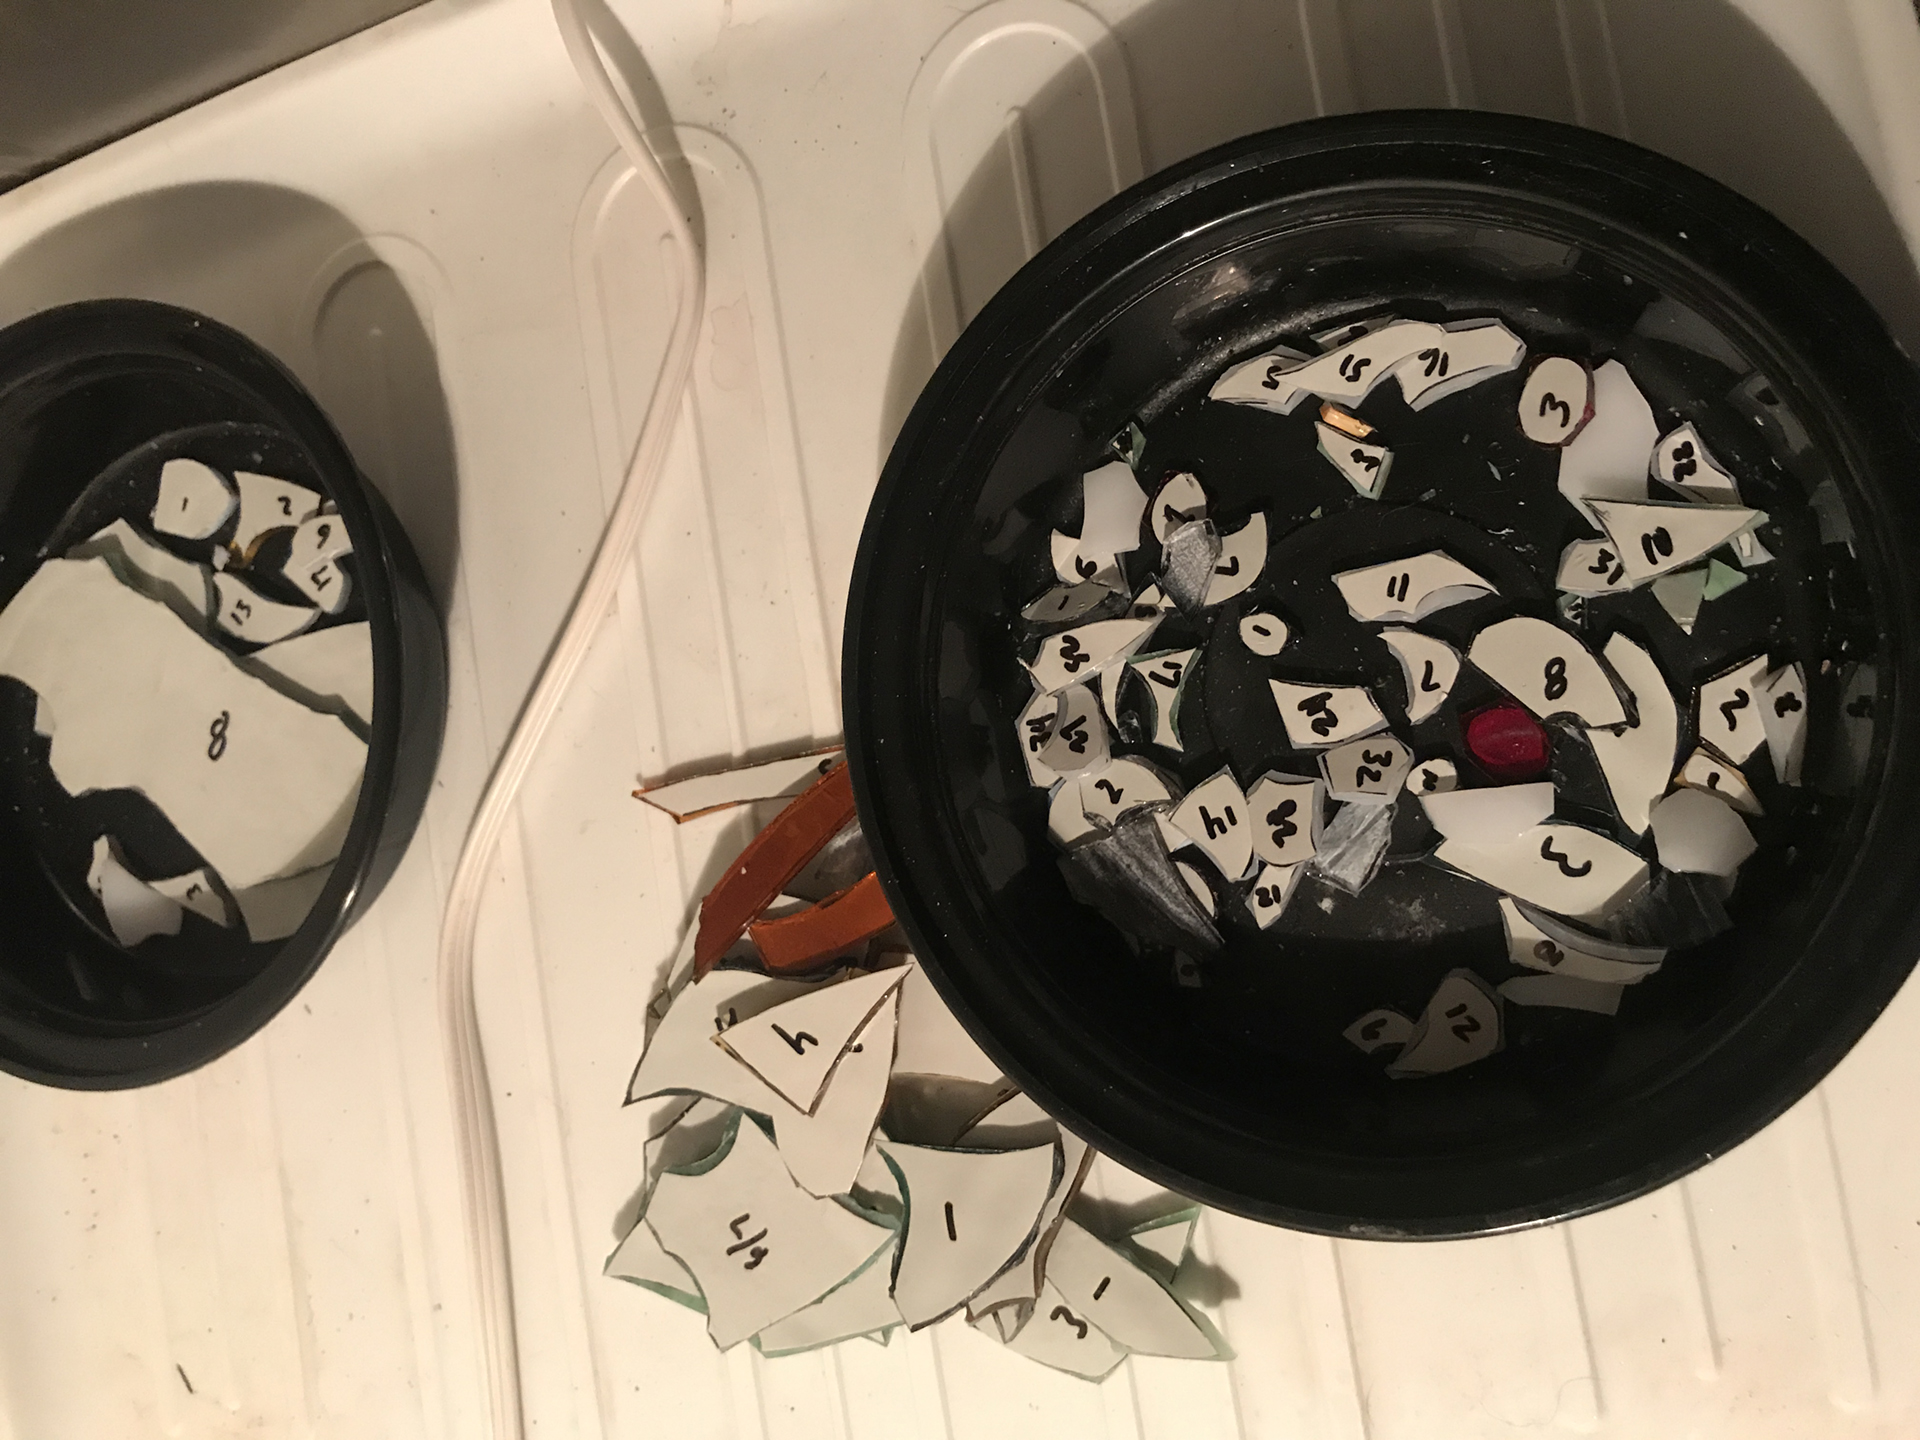
 Keeping TrackThese are the pieces of glass in between the cutting and grinding phases, the contact paper remains affixed until the pieces are cleaned and foil is applied to the edges. (See previous project for more details about copper foiling.)
 -
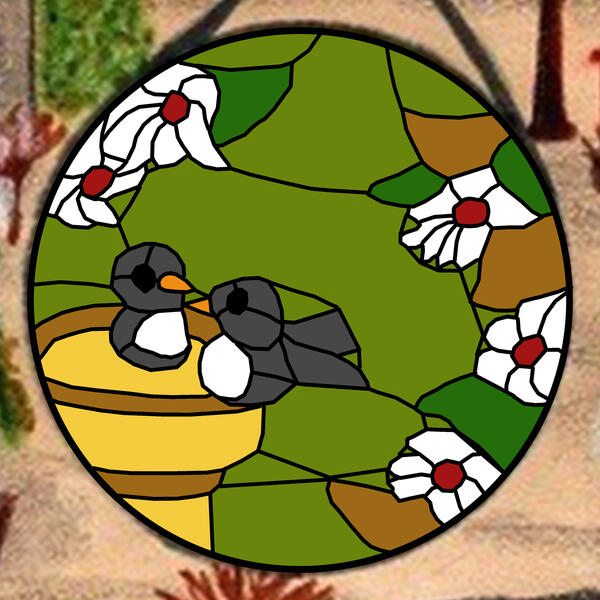
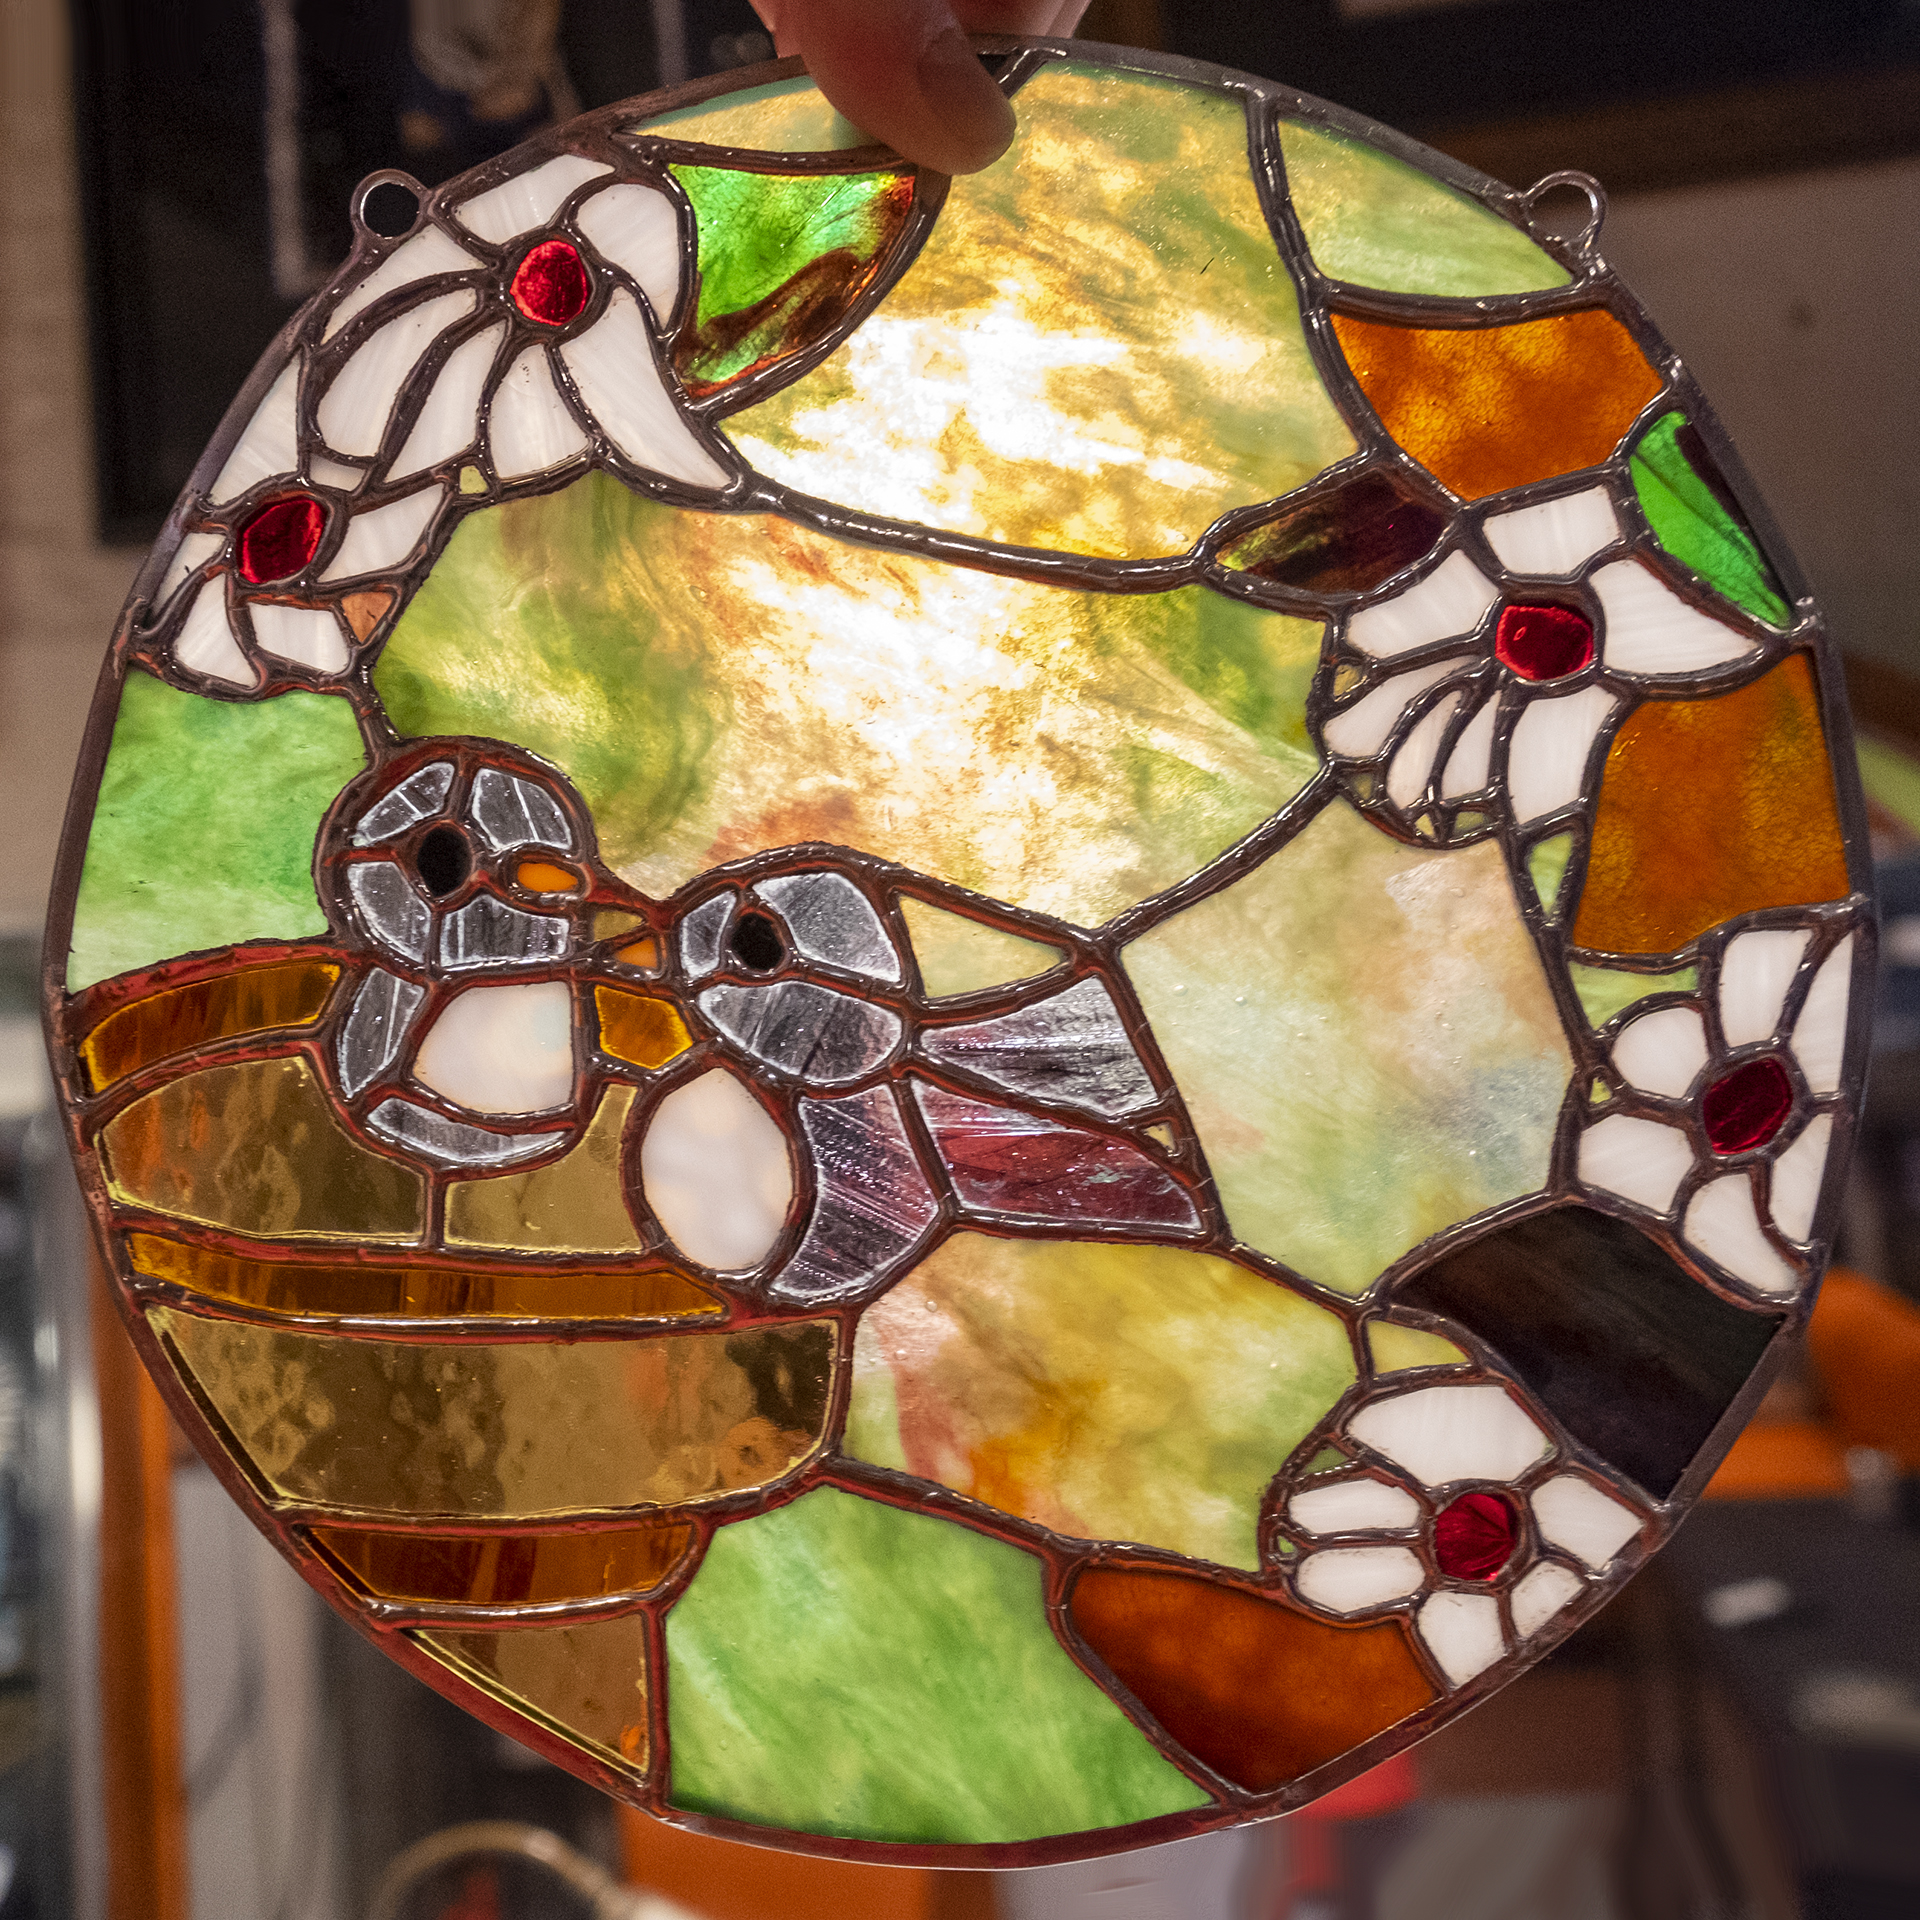
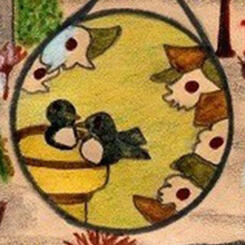
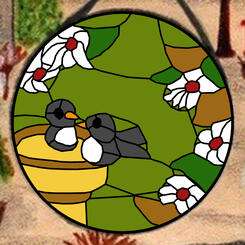
 Completed pieceThis is the finished piece, I selected a clear grey glass for the birds to allow more light through them, as I believed they represented Scot and Jim as a couple when he was creating the original illustration.
 -
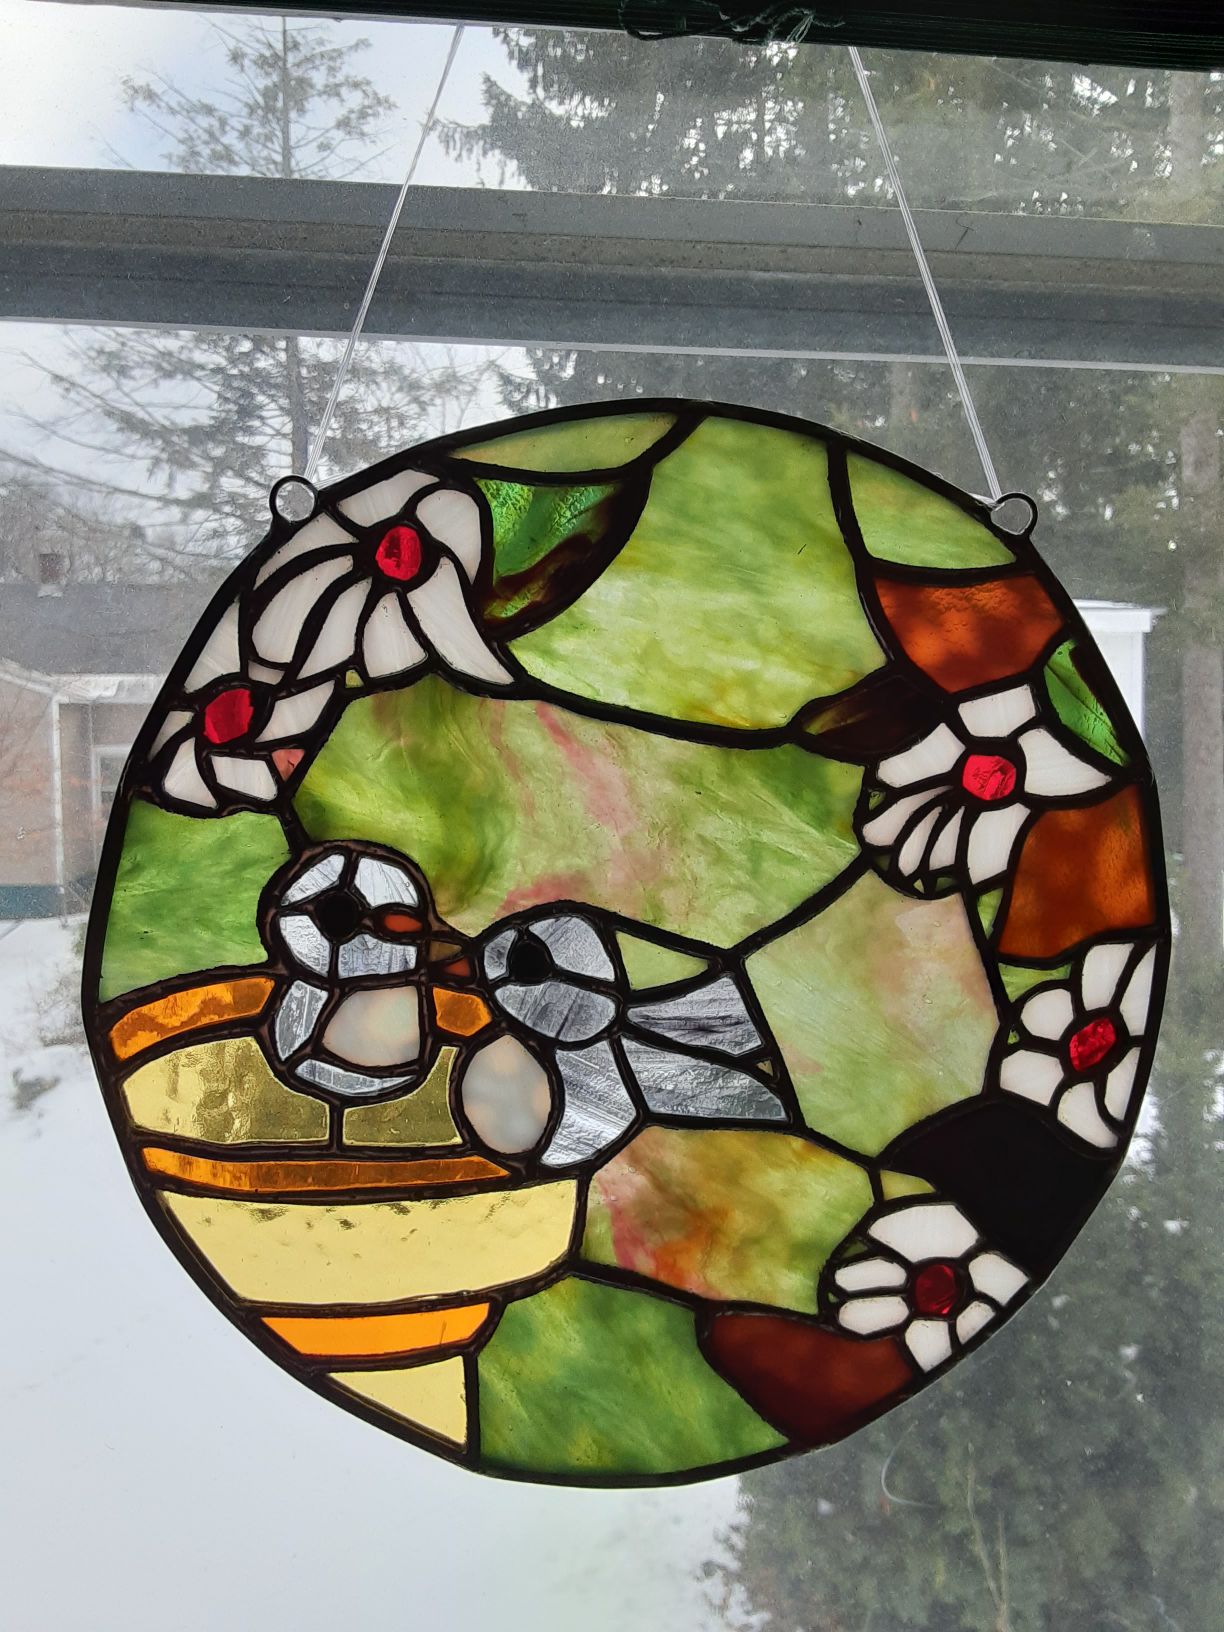
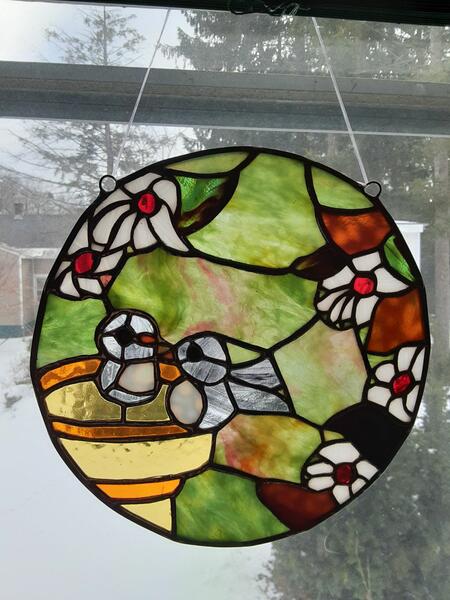 Finally HomeAfter being lost in the mail for almost a month, it arrived in Schenectady on January 8th and now overlooks the back yard of the house they shared for many years, where I hope it brings my father at least some small comfort after enduring so much recent loss.


Sheba
-
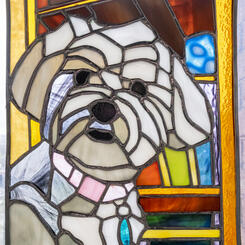
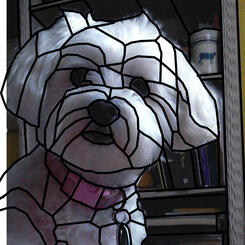
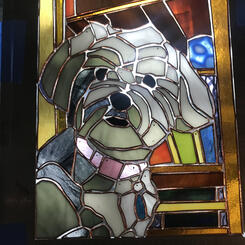
 Completed pieceHere we see the finished piece as it is meant to be displayed, with natural light coming through and bringing out all of the subtle variations and patterns in the glass, which is what makes the medium so magical to me in the first place!
 -
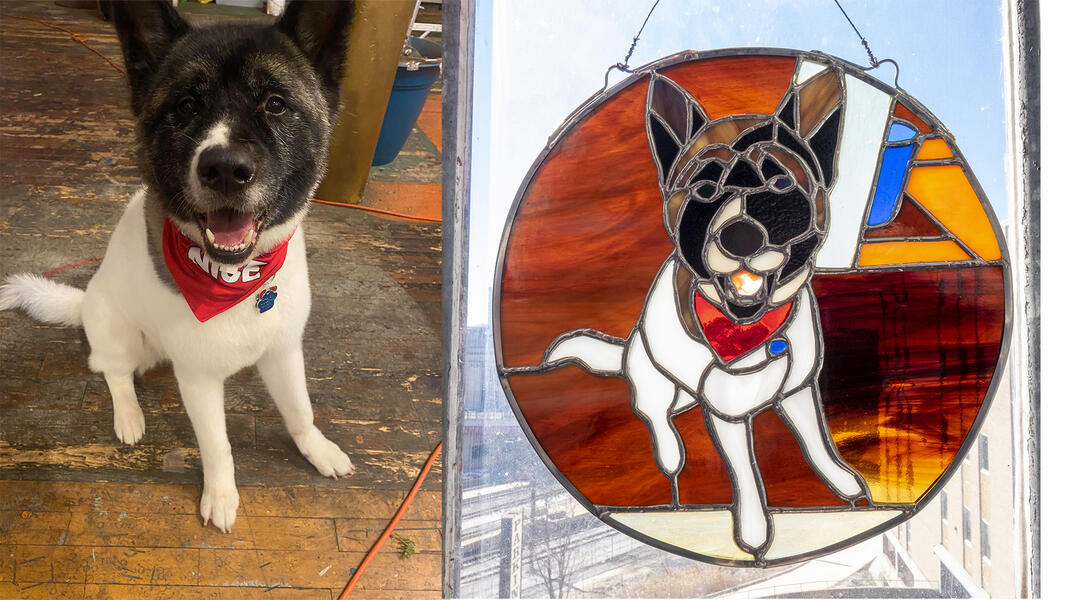
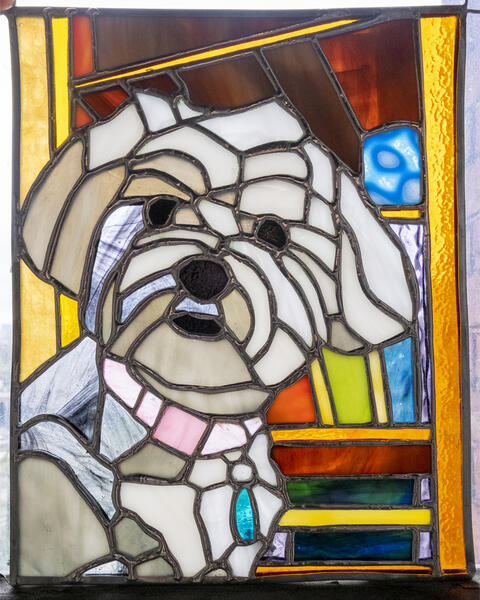
 Reference PhotoThe reference photo I was sent wasn’t the highest resolution to begin with, so first I had to make a few adjustments in Photoshop to upscale it and bring out some of the contrast.
 -
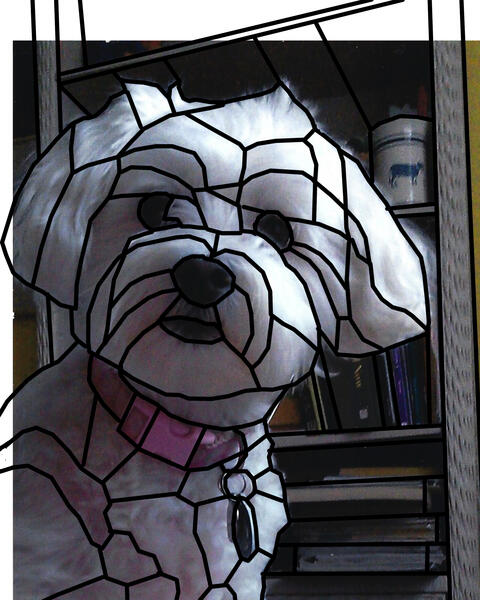 Cut LinesThe photo is then cropped using the Rule of Thirds so that the eyes fall roughly 1/3 from the top and outside edges of the frame. To do this within the proportions of 8x10”, I had to extrapolate some of the background image and a sliver of the dog’s right side while tracing the contrast points.
 -
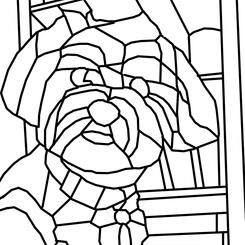
 TemplateThe line drawing template that I create is a little more jagged looking than the contact paper one I trace from it because of how I trace the image in Photoshop, but these lines are then smoothed out when tracing them in marker by hand onto the contact paper.
 -
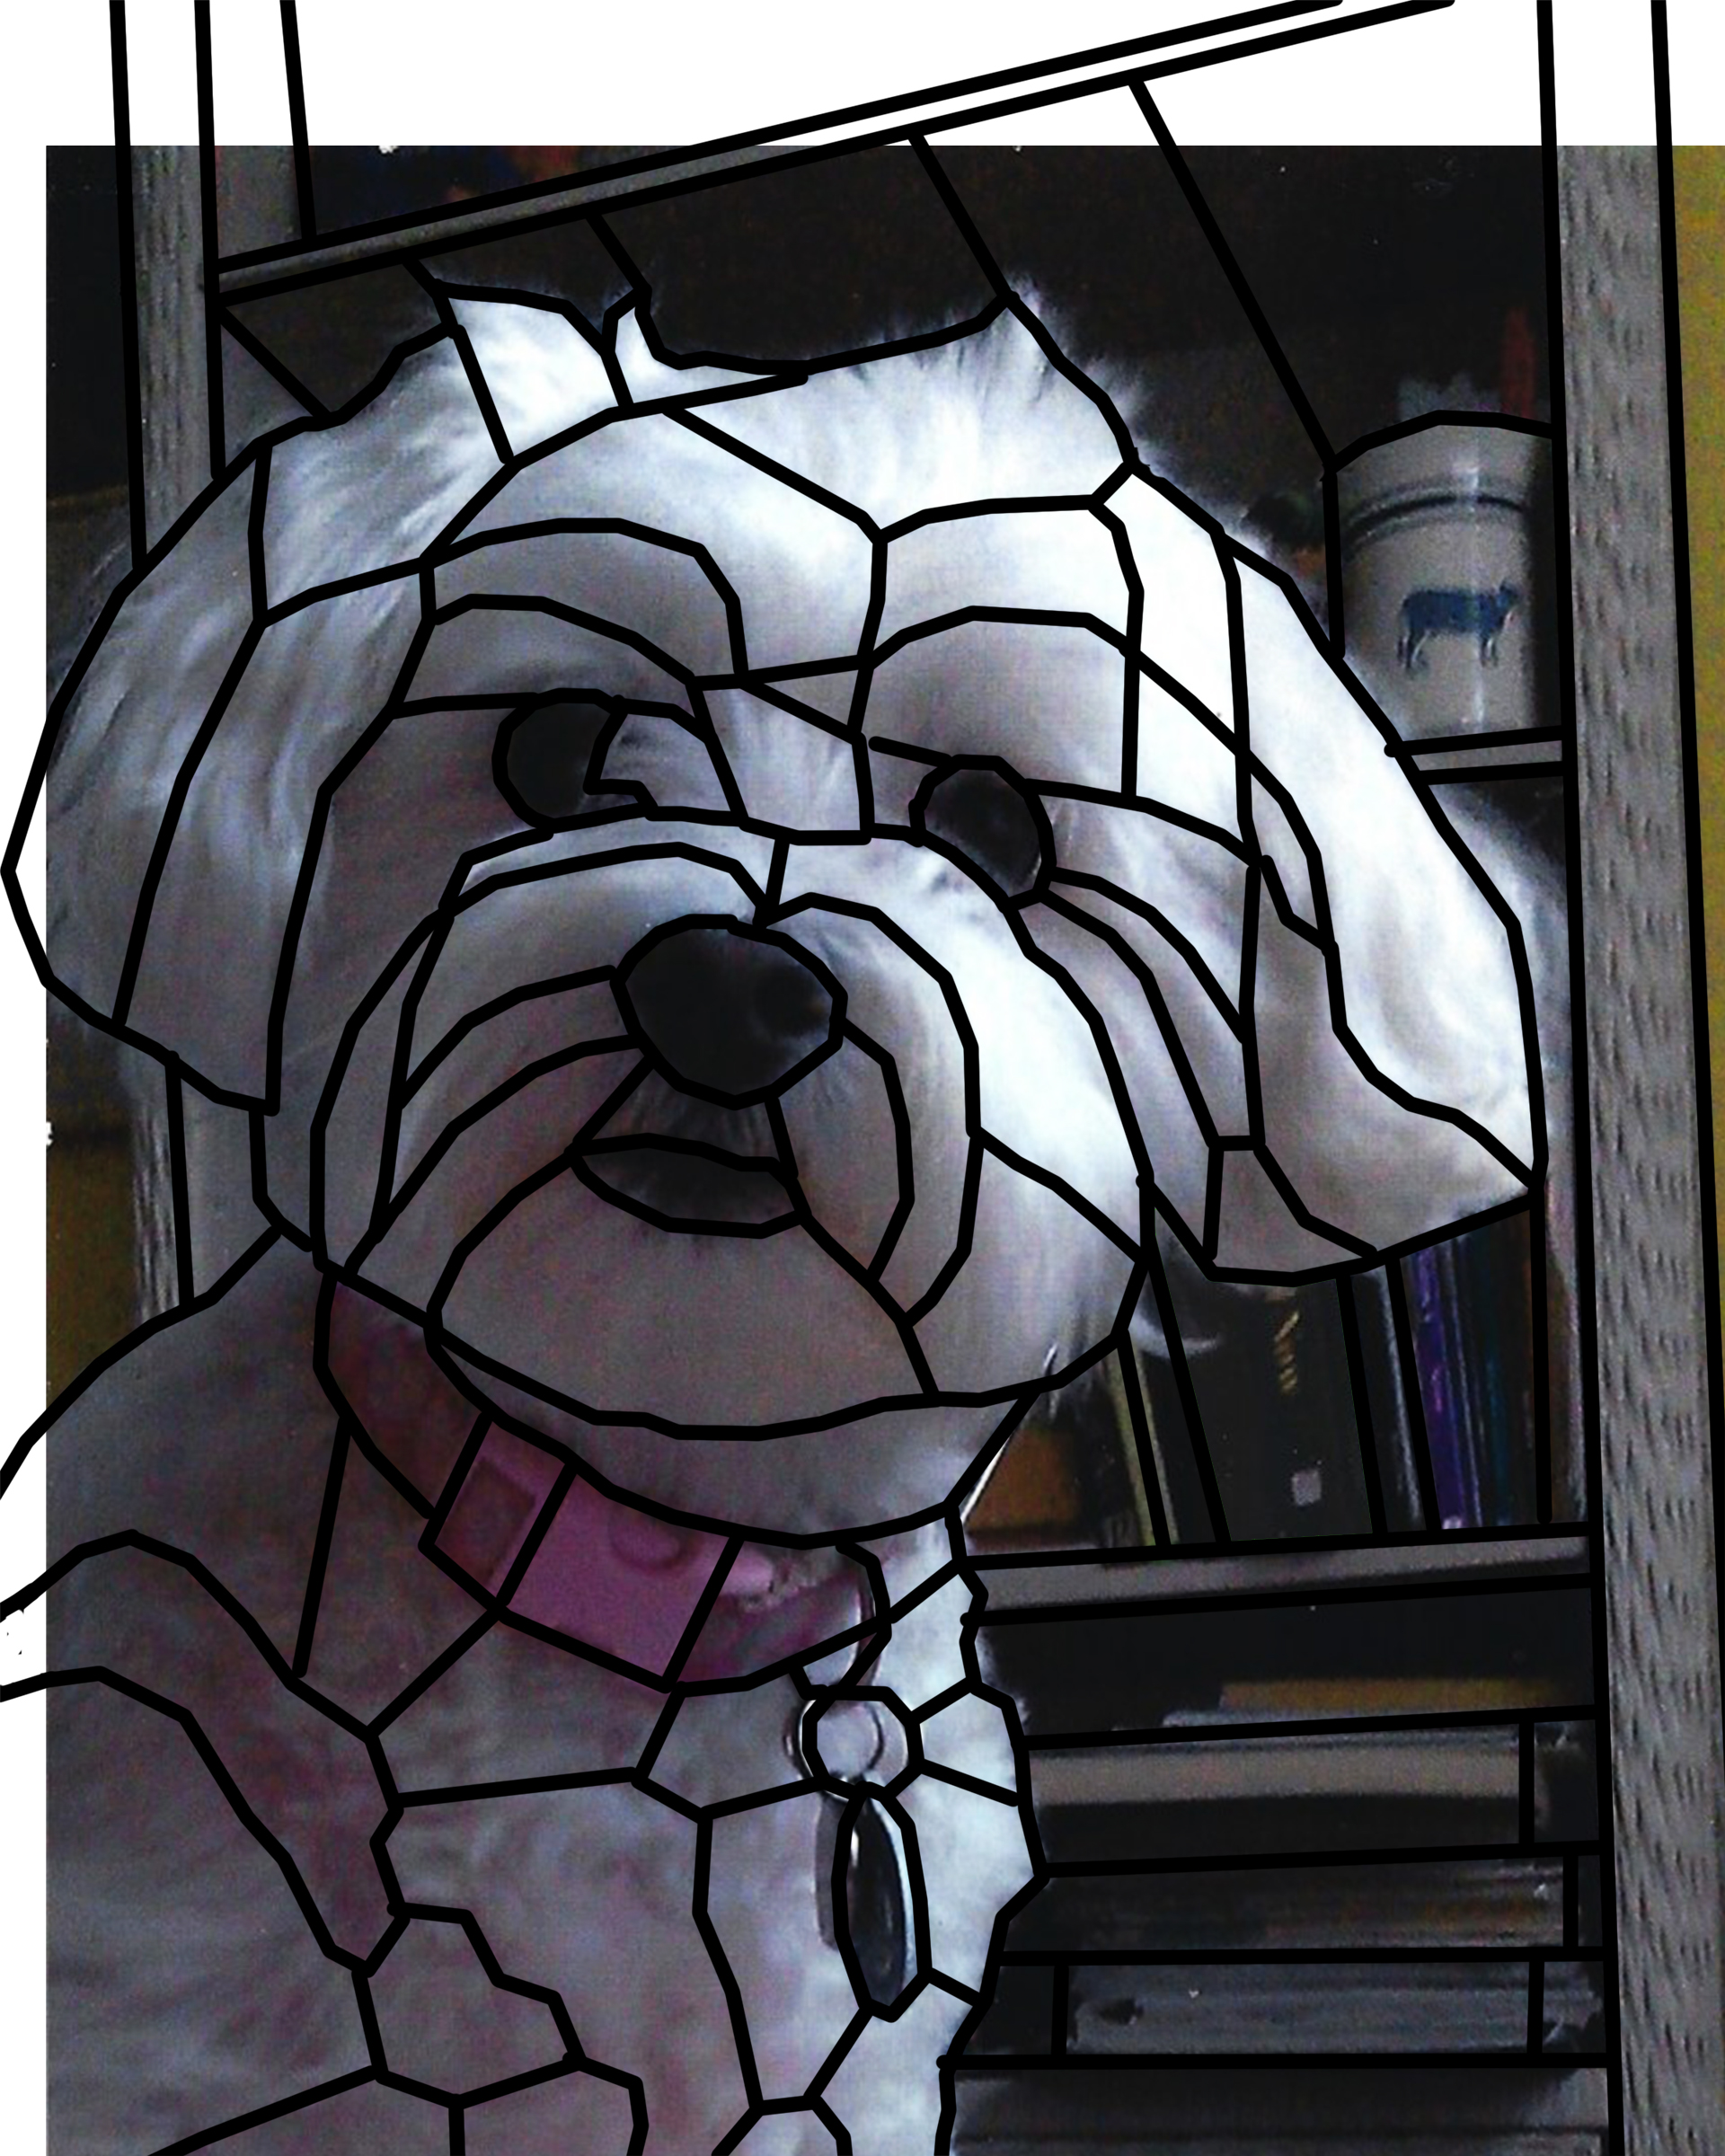
 RenderingSince the dog itself was monochrome and the only bright colors were going to be in the pink collar and blue tag, I decided to brighten some of the background elements to give the shapes a more abstract feel, and add more emotion to the image.
 -
 Color KeyThe colored shapes are then numbered to keep track of everything...
 -
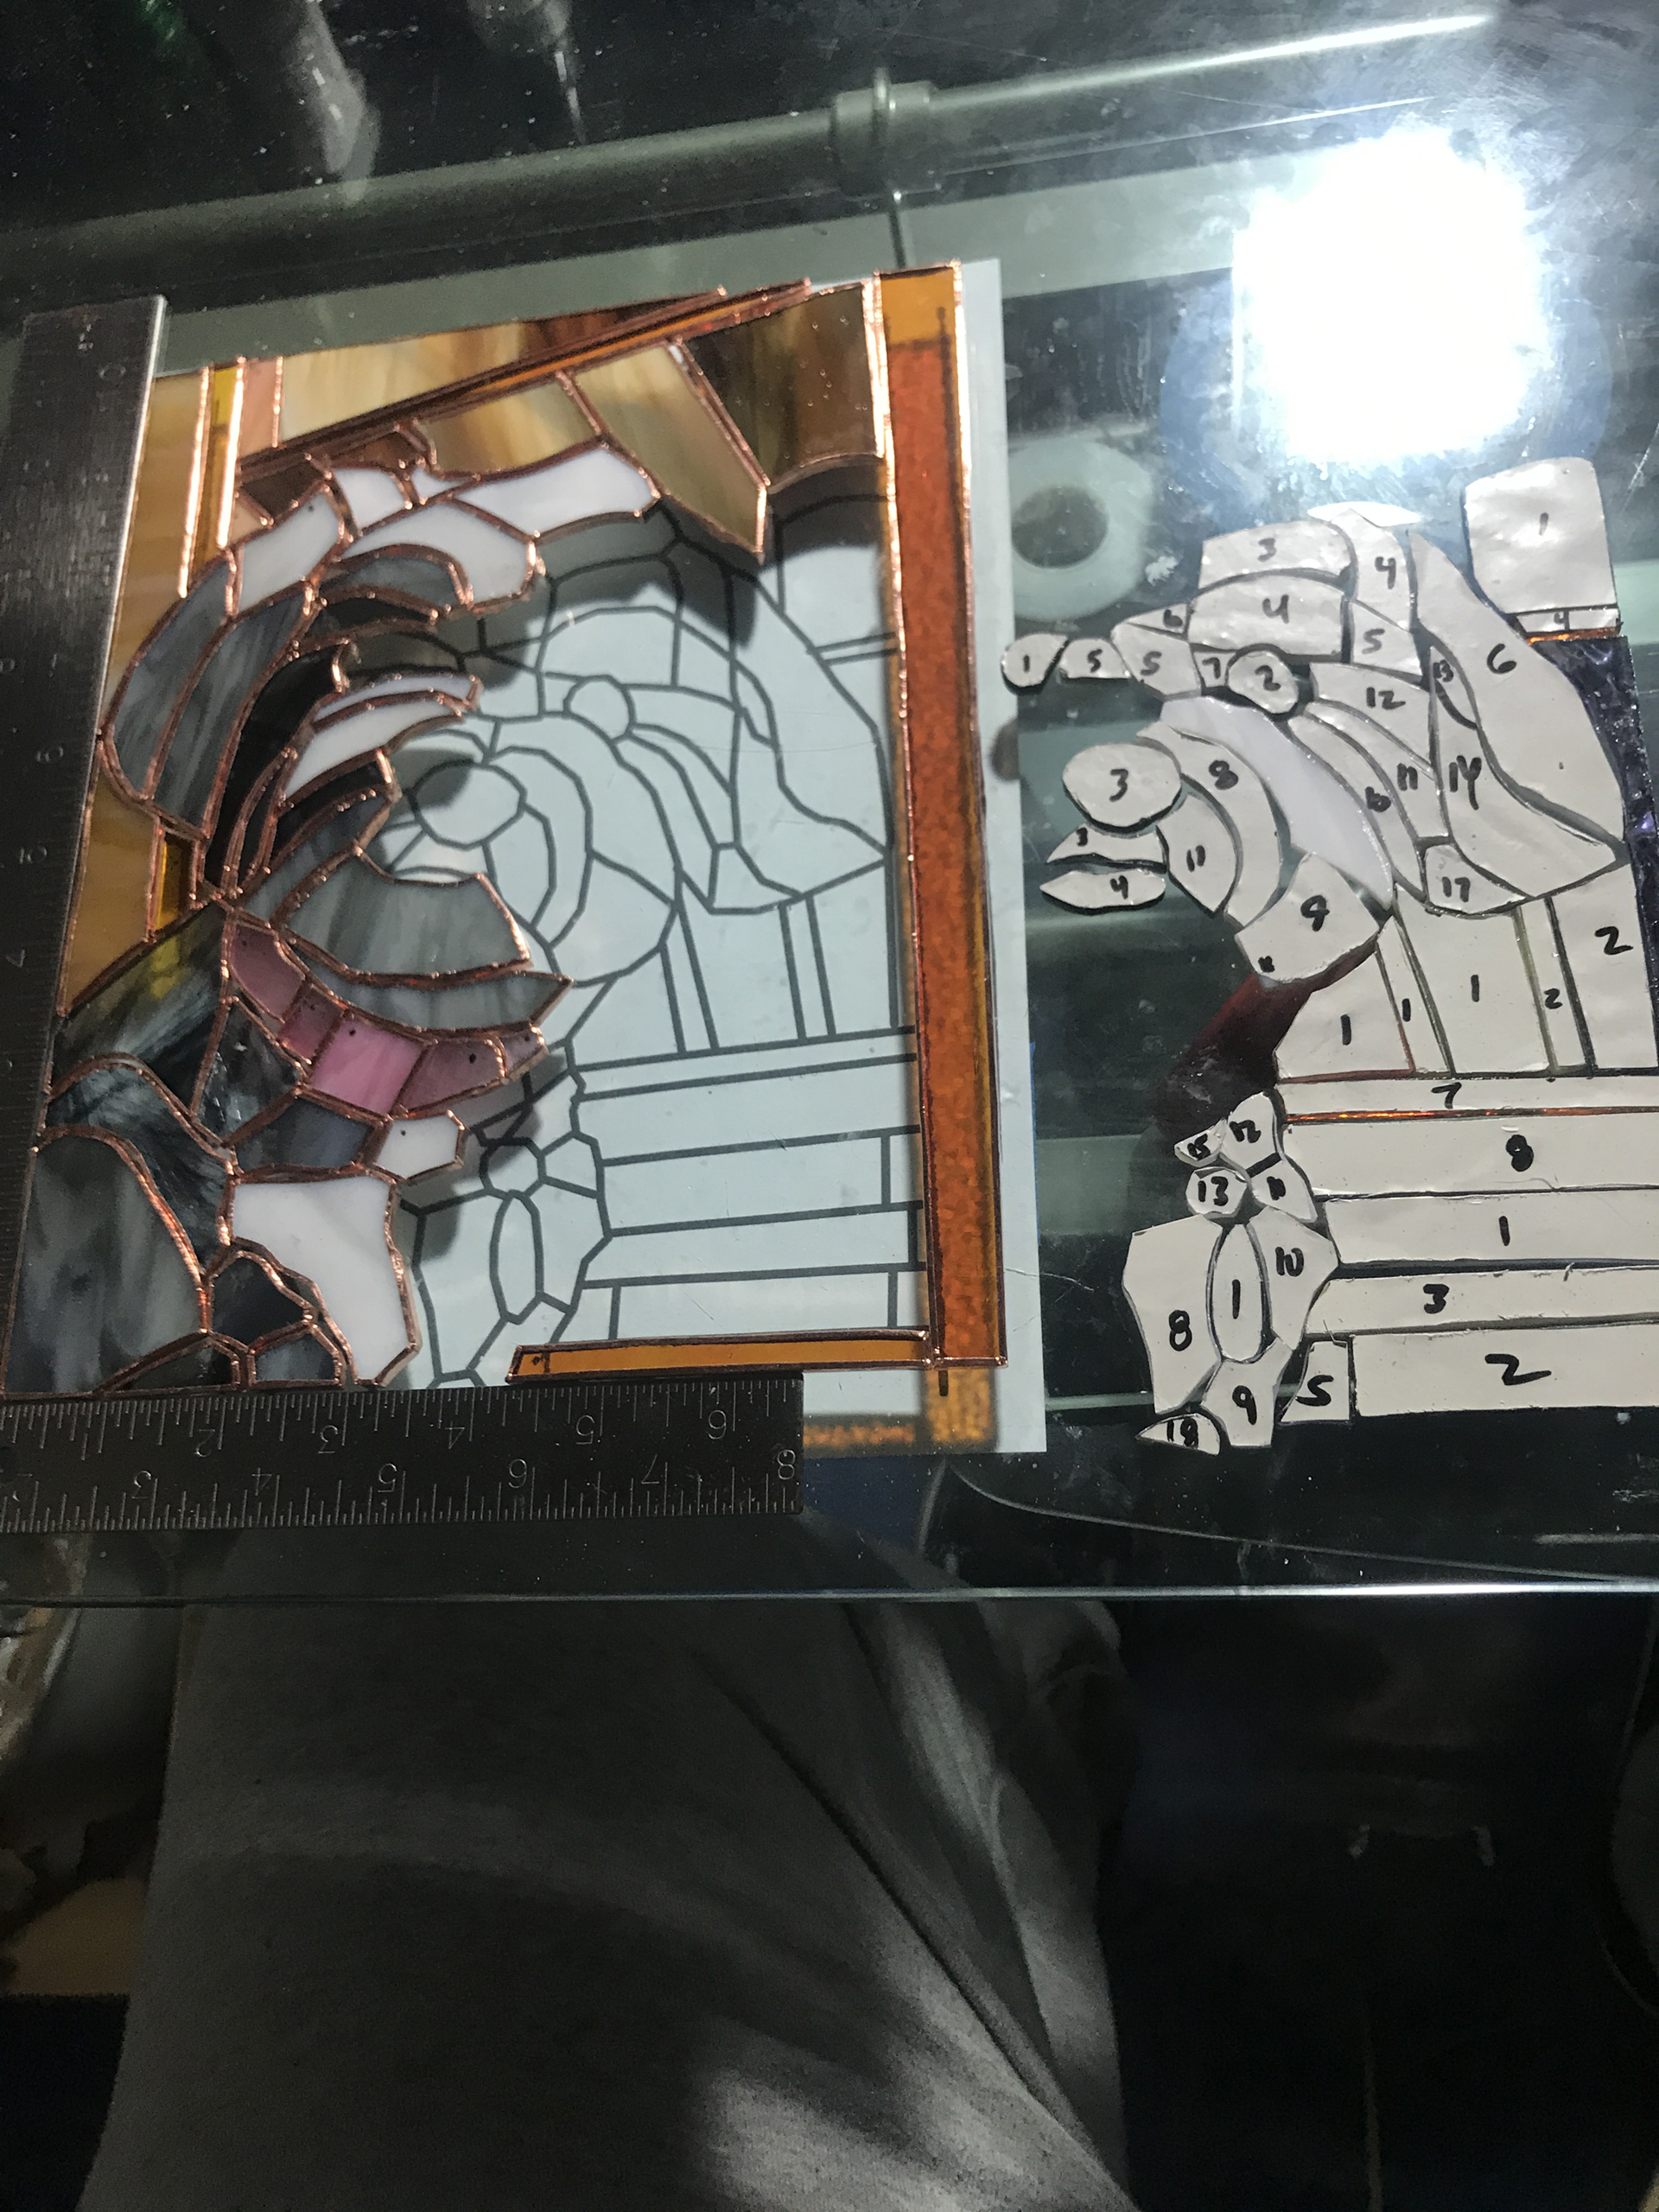
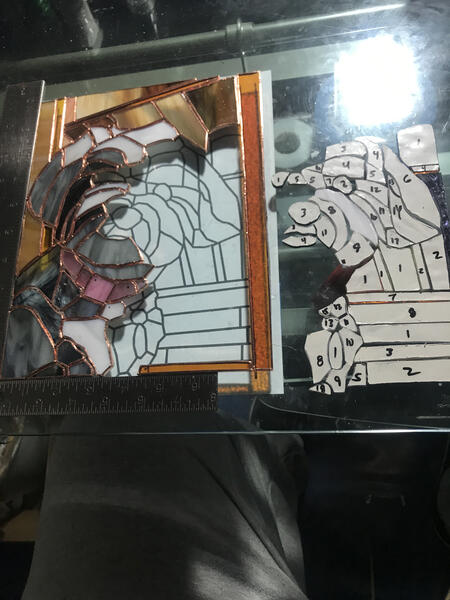 AssemblyHere you see how I use the first printed paper template as a guide to properly space all the pieces for assembly, after inserting it between the glass table top and the much thicker (1”) glass slab on top of it that I use as a work surface.
 -
 Light TableMost artists use a wooden table for using pins or nails to hold everything in place, but after having assembled various 3D pieces in previous years I prefer to know that my work surface is absolutely flat, as well as the added bonus of being able use it as a makeshift light table as I go along.